 I carried on today with the pedals. I shortened the master cylinder pushrods slightly, although I lengthed
the threaded portion of the pushrods so that there's, hopefully, the same amount of movement.
I carried on today with the pedals. I shortened the master cylinder pushrods slightly, although I lengthed
the threaded portion of the pushrods so that there's, hopefully, the same amount of movement.
Then I put the bias bar and everything back together. I'll probably need to take it apart again as I want to fit some sort of remote adjuster for the braking bias.
 I set about the steering column with an angle grinder so as to take off the
steering lock mechanism and ignition switch. It's just useless weight at the moment. After a lot of pushing and
shoving and covering the garage in dust the column outer looked like this, which was dramatically lighter than
it started off!
I set about the steering column with an angle grinder so as to take off the
steering lock mechanism and ignition switch. It's just useless weight at the moment. After a lot of pushing and
shoving and covering the garage in dust the column outer looked like this, which was dramatically lighter than
it started off!
 After trial fitting the steering column, although I've now realised that it
wasn't mounted correctly, the car looked like this.
After trial fitting the steering column, although I've now realised that it
wasn't mounted correctly, the car looked like this.
The steering wheel's gruesome but will help before I get the real one. Needless to say I clambered into the car and pressed the pedals and twiddled the wheel.
 After that I set about the rear suspension. It took quite a while to work out the right
order to get one of the corners together but I managed eventually (although I've got to re-route the handbrake
cable slightly). Doubtless it will be trivial to get the other rear corner together after working out what to do.
After that I set about the rear suspension. It took quite a while to work out the right
order to get one of the corners together but I managed eventually (although I've got to re-route the handbrake
cable slightly). Doubtless it will be trivial to get the other rear corner together after working out what to do.
 One issue what the spacing of the rear upright between the ends of the wishbone.
As standard there's about 25mm of spare space which confused me until I noticed a big pile of washers in one of
the bags of suspension bolts. After some experimentation I ended up with 7 washers on one side of the upright and
3, I think, on the other side. After chatting to one of the chaps at the Kit Car workshop it seems as though there
isn't a real guide, you just do what seems to fit best.
One issue what the spacing of the rear upright between the ends of the wishbone.
As standard there's about 25mm of spare space which confused me until I noticed a big pile of washers in one of
the bags of suspension bolts. After some experimentation I ended up with 7 washers on one side of the upright and
3, I think, on the other side. After chatting to one of the chaps at the Kit Car workshop it seems as though there
isn't a real guide, you just do what seems to fit best.
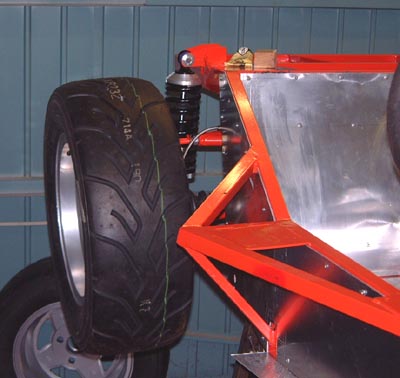 Finally, just for fun I put one of the wheels on. From the look of it, the camber is waaaay
out. :-)
Finally, just for fun I put one of the wheels on. From the look of it, the camber is waaaay
out. :-)
Not much time today, so I just started on putting the rear left suspension together. I've stalled at the moment as the drive shaft is refusing to go into the diff properly. It's going to give in tomorrow but it obviously doesn't know it yet. I've just been browsing the web and found someone who reckons that if the driveshaft is put into a Z shape then it goes in more easily as it stops the CV joints just plunging and absorbing the urge to push the shaft into the diff, I'll try again tomorrow.
 I also spoke to Martin Bell today and ordered the bodywork. For some time I've been wondering what
type of body I want. The main tub will be the Spyder style which essentially means no doors. However, there are
two sorts of bonnet, the standard one and the Le Mans one. They're the two in the these pictures, nicked from the
Fishers web site.
I also spoke to Martin Bell today and ordered the bodywork. For some time I've been wondering what
type of body I want. The main tub will be the Spyder style which essentially means no doors. However, there are
two sorts of bonnet, the standard one and the Le Mans one. They're the two in the these pictures, nicked from the
Fishers web site.
 I had convinced myself that I wanted the standard one. However, I think I've changed tack and decided
on the Le Mans bonnet, although I could easily change my mind in a day or so.
I had convinced myself that I wanted the standard one. However, I think I've changed tack and decided
on the Le Mans bonnet, although I could easily change my mind in a day or so.
Tom certainly thinks this is the right thing to do, but then he's only 18 so what does he know? Anyway, I've ordered the Le Mans for now.
I've arranged to go and visit Martin on Friday and collect the rest of the bits, which means the steering rack and the front uprights and brakes. With that, I should be able to get the car to rolling chassis form.
 With some assistance from a posse of cam7ers, I had another go at getting the recalcitrant driveshaft in. After a bit more resistance
it finally gave in and engaged in the diff. That meant I could finish getting the rear suspension all together.
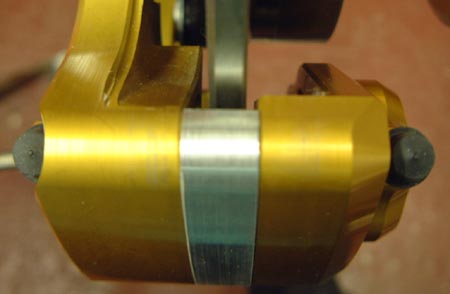
That went swimmingly until as I was tightened up the left hand hub nut it was getting very difficult and when I
looked at the nut it looked like this.
With some assistance from a posse of cam7ers, I had another go at getting the recalcitrant driveshaft in. After a bit more resistance
it finally gave in and engaged in the diff. That meant I could finish getting the rear suspension all together.
That went swimmingly until as I was tightened up the left hand hub nut it was getting very difficult and when I
looked at the nut it looked like this.
It looks as though the nyloc insert has come loose and pushed its way out through the cap at the end of the nut. I must admit that I was surprised when I got two previously used hub nuts with the driveshafts, as Ford recommend replacing them. I'll ask Martin Bell about it.
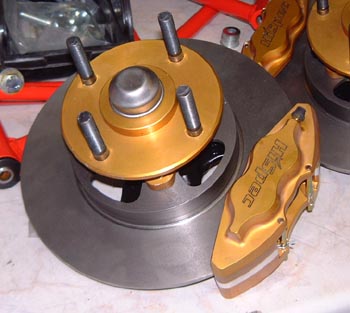 I went along to the Kit Car Workshop (again!) to pick up the last lot of bits
from the original order. These were essentially the roll cage, rack and front uprights/hubs/brakes. The latter
look very snazzy.
I went along to the Kit Car Workshop (again!) to pick up the last lot of bits
from the original order. These were essentially the roll cage, rack and front uprights/hubs/brakes. The latter
look very snazzy.
The calipers are HiSpec Ultralite-4 (4 pot) while the disc is a new one-piece HiSpec product with a rather spectacularly drilled out hub. Rather amazingly the disc is a mere 7mm thick.
While over with Martin I decided to change the bodywork order to the classic bonnet. In the flesh I thought it looked rather nicer.
Also, Martin confirmed that he'd get me a couple of new hub nuts.
 I've put the roll cage up on the chassis at the moment, mainly because it's difficult to
find anywhere else for it.
I've put the roll cage up on the chassis at the moment, mainly because it's difficult to
find anywhere else for it.
I'm hoping the rather imposing look of this is mainly due to the lack of bodywork at the moment.
 It's mounted at six points
to the chassis, with the side-arms extending to the points of the side-impact protection, where there are these
big plates for attaching the cage to the similar plates welded to the chassis.
It's mounted at six points
to the chassis, with the side-arms extending to the points of the side-impact protection, where there are these
big plates for attaching the cage to the similar plates welded to the chassis.
 Following that excitement I got on with putting the front suspension
on the car, fitting the brake fluid reservoir and the steering column.
Following that excitement I got on with putting the front suspension
on the car, fitting the brake fluid reservoir and the steering column.
Then I thought I'd put the pads in the front brakes. I ran into a problem in that the calipers are not, quite, centred on the disc and only one pad would fit. I could change the mounting shim (or washer to you and me) so that the other pad would fit but I hadn't got the necessary thickness of shim to get it exactly in the middle. Again, I'll ask Martin about this.
 After fitting the rack and the track rod ends another problem became obvious.
One TRE is fine but the rubber boot on the other one rubs one the disc. It probably just needs a different boot
to fix it. Again, I'll ask Martin.
After fitting the rack and the track rod ends another problem became obvious.
One TRE is fine but the rubber boot on the other one rubs one the disc. It probably just needs a different boot
to fix it. Again, I'll ask Martin.
One easily resolved problem was with the front wheels which I just couldn't get on at first. After looking around this seemed to be due to the powder coating on the inside of the wheel hub not allowing the wheel to go over the centre of the hub. That was easily fixed by Dremeling off the powder coating with a small abrasive wheel. Problem is, it might all fall off now.
There's another problem with the wheels. Martin had ask me what size studs I wanted pressed into the hubs as I might have wanted to use a spacer on the wheels. WE agreed that he'd put some long ones in so that I could at least cut them down. However, It now seems as though this is causing a small problem. The wheel nuts that I've got are fairly small and seen to go a long way "through" the wheel and the nut ends up pressing into the shank of the stud before the wheel is held firmly. Obviously, I could easily fix this with a spacer but what I'd prefer is a "fatter" wheel nut. I really can't be bothered taking out the studs as it's a pain to get at and I never like the amount of hammering that you have to do in the absence of a big press,