 I’ve managed to spend a bit of time on the car this weekend. First of all, I wanted to be really sure that the diff was going to fit properly. So, I cut out some supports for it, following the CAD model that I showed you a short while ago. However, in an advance on the normal materials technology I used hardboard rather than aluminium for the diff support plates. It’s much easier to cut out, so it’s bound to be a better choice.
As you can see, it fits in pretty well. In fact, the CAD model seems to have predicted how it will fit exactly which is nice to know. Also, with the diff at this position, and with the largest sprockets that I’ve got fitted, the chain seems to be clear of the diff mountings and the chain guard around the drive sprocket. Admittedly, it’s not far from the latter, but hopefully OK.
The main issue now is how to retain the bottom of the frame around the diff. There seem to be two ways of doing this. The first is shown in the CAD model and uses a couple of plates with slots cut into them into which the bottom bolts on the triangular support plates fit. That will require two more laser/water cut plates though, and positioning the plates might be a bit tricky. Mind you, from what I can see of the current position of everything, a little bit of inaccuracy on this is probably no great problem.
The alternative is just to use a couple of turnbuckle like things, perhaps just lengths of studding really, to restrain the bottom corners of the triangles to the engine frame. In fact, I could even use turnbuckles that were arranged in a slight (plan form) triangle so as to locate the bottom of the diff laterally. That’s essentially what’s done on the Radical that I showed you the photograph of in the same post. It has the advantage of ease of manufacture and, perhaps, slightly easier adjustability.
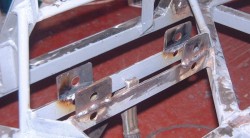
 While musing about this, I’ve pressed on with a few other things. You may remember that in an earlier post, I mentioned that the front lower damper mounts were really too low and wouldn’t allow enough droop in the front suspension. I did spend a while talking to Jeremy about this and he suggested that he could make some different front rockers. However, I thought I’d just do what I said and space the damper mounts up slightly which, as you can see from the photo, I’ve now done. This second set of holes is 30mm above the normal ones, which are themselves raised 25mm above the “standard” ones because of the lowered chassis on this car.
I’m now just about at the point where I’ve finished all the various bits of welding to be done to the chassis. The main thing left is the roll cage. The parts for this are currently languishing in Fedex’s depot up the road in Huntingdon and I’m going to go and pick them up tomorrow. Or, perhaps I’ll just get them to deliver them while I’m actually in.
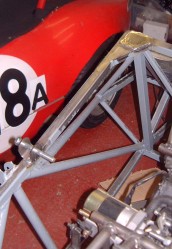
 I’m planning on just welding the roll cage to the car directly, not bothing with making it removeable as I’ve done before. In order to do so it seems sensible to beef up the mounting points with some chunkier lumps of steel. So, I’ve started this off by welding some 3mm thick plates where the main roll hoop will mount. Also, you may remember that I’m planning on making the rear diagonal stays removeable so as to ease fitting of the bodywork. So, I’ve welded some attachments for the lower end of these stays to the rear of the chassis. The intension is to use a ½” rod end at each of the removeable stay so as to make fitting the stay straightforward. This at least means that the positioning of this attachment isn’t fantastically critical. This is something else, though, that will need a bit more welding when I can turn the chassis upside-down, hopefully in a week or so.
You can see these two hard-points, the ones on the left of the chassis, in this photo.

Tim – I’d love to see a pic of your roll cage sitting on the frame.
Thanks
Chet
It’s coming! 🙂 I’m having trouble finding the right position for the rear hoop; I think I might have to move it back a bit and make some new hard points; the thing is I need enough room for a helmet and a crash pad behind my head.
Tim