 I have been wondering about what to do about mounting the alternator. As mentioned
before the SD1 brackets won't do. However, I was
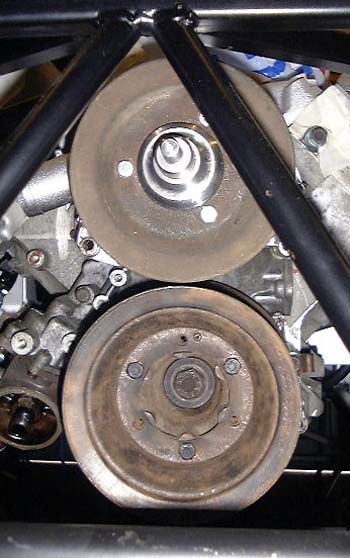
wondering if it was possible to cut and shut the SD1 mounting. So, I mounted the water pump pulley (so that I could
check if the pulleys all lined up properly. I was amazed at how close the water pump pulley and the crank pulley
are to each other. I don't remember the engine being like this originally, but I suppose it must have been.
I have been wondering about what to do about mounting the alternator. As mentioned
before the SD1 brackets won't do. However, I was
wondering if it was possible to cut and shut the SD1 mounting. So, I mounted the water pump pulley (so that I could
check if the pulleys all lined up properly. I was amazed at how close the water pump pulley and the crank pulley
are to each other. I don't remember the engine being like this originally, but I suppose it must have been.
I chopped a lump off the old alternator mounting, just to allow it to be bolted to the engine, after which it looked...
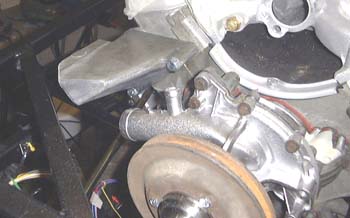 ... like this. However, I found it very difficult working out where I could
mount the alternator, and a bit dubious about welding some aluminium to make it work.
... like this. However, I found it very difficult working out where I could
mount the alternator, and a bit dubious about welding some aluminium to make it work.
Hence, I need to either make up a steel bracket, or try to get hold of a P6 mounting bracket. I'll have a couple of phone calls this week about that to see what I can find.
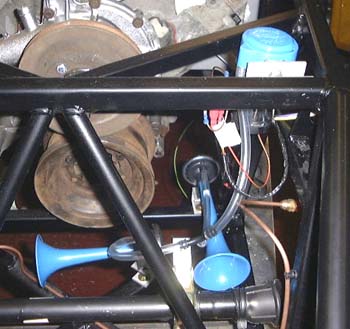 After that I thought I'd do something simple. So I spent a surprisingly long time mounting
the compressor, relay and horns for the air horns that I bought a while ago. Things are already
a bit cramped down in the nose of the car, so they've ended up non-parallel, but that shouldn't affect the noise...
After that I thought I'd do something simple. So I spent a surprisingly long time mounting
the compressor, relay and horns for the air horns that I bought a while ago. Things are already
a bit cramped down in the nose of the car, so they've ended up non-parallel, but that shouldn't affect the noise...
Following on the mystery of the alternator mounting I borrowed the mounting that William has got for his engine. This came out of a TVR and certainly looks like it has different gadgets on the front of it from mine. However, although his alternator mounting is different, it still appears to conflict with the chassis, so I can't use that one as a pattern either.
During the week I phoned up Rimmer Bros to see if they had anything, which they didn't. I also tried tracking some parts down at 1st choice spares, which was also a failure. It's looking more and more as if I'll have to make something, which other people have said is the thing to do anyway.
During the week I phoned up Greengauges to tell them about the munged reed switch. Rather impressively they reckoned that there must have been something wrong with it, so they sent me another one free of charge!
 The only actual work at the weekend concerned side panels. For a while I've been thinking that I would
prefer to panel in the side of the car. Without that there seems to be precious little that would stop grot building
up inside the bodywork. So, I bought some aluminium at MacKays and set to with the drill and rivetter, again. I
measured the bodywork and there should be space to fit this in, if not I'll end up having to take it off again!
The only actual work at the weekend concerned side panels. For a while I've been thinking that I would
prefer to panel in the side of the car. Without that there seems to be precious little that would stop grot building
up inside the bodywork. So, I bought some aluminium at MacKays and set to with the drill and rivetter, again. I
measured the bodywork and there should be space to fit this in, if not I'll end up having to take it off again!
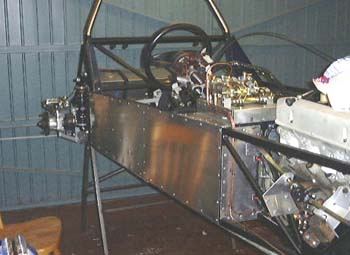
 Richard came round first thing with my engine hoist. We used this to lift up the front
of the chassis so that the stand could be rotated by 90°. This means that it'll be possible to fit the GRP
side panels at some point. I was thinking I would do this very soon but I think I've realised that there's lots
of things that need to be done fist. Such as sorting out the alternator mounting and the oil filter.
Richard came round first thing with my engine hoist. We used this to lift up the front
of the chassis so that the stand could be rotated by 90°. This means that it'll be possible to fit the GRP
side panels at some point. I was thinking I would do this very soon but I think I've realised that there's lots
of things that need to be done fist. Such as sorting out the alternator mounting and the oil filter.
 Having got the new speedo sensor, I had another go at mounting
it. The problem is, when it was there it seemed very insensitive. After some investigation it became clear that
that reed switch was not happy, not surprisingly, being mounted in a ferro-magnetic bracket, namely a big
chunk of steel. So, I took that off and made something chunky out of 5mm aluminium. (Which was salvaged from
the offcuts bin at MacKays a while ago.) This involved some more aluminium welding which I'm getting better at,
although I keep having to stop to take the welder to bits and fix the knot of aluminium wire that's appeared inside
it.
Having got the new speedo sensor, I had another go at mounting
it. The problem is, when it was there it seemed very insensitive. After some investigation it became clear that
that reed switch was not happy, not surprisingly, being mounted in a ferro-magnetic bracket, namely a big
chunk of steel. So, I took that off and made something chunky out of 5mm aluminium. (Which was salvaged from
the offcuts bin at MacKays a while ago.) This involved some more aluminium welding which I'm getting better at,
although I keep having to stop to take the welder to bits and fix the knot of aluminium wire that's appeared inside
it.
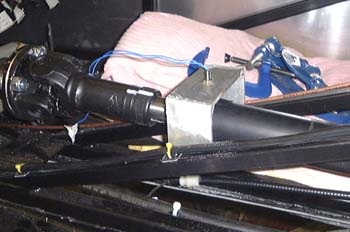
Anyway, it ended up looking like this, and the sensor appears to be much happier here.
 Today I carried on in the same sort of area. I sorted out the wiring for the speedo sensor, which also
involved routing the reverse switch wiring to the same sort of place. The reverse switch on the LT77 gearbox is
mounted in the remote itself and I needed to sort out the wiring for that too.
Today I carried on in the same sort of area. I sorted out the wiring for the speedo sensor, which also
involved routing the reverse switch wiring to the same sort of place. The reverse switch on the LT77 gearbox is
mounted in the remote itself and I needed to sort out the wiring for that too.
It was clearly time to fit the gearlever. If you remember, I had two different remotes. Although I thought it would probably be too short I tried the shorter one first, and after clambering into the car pronounced it indeed shorter. What's more, this one does not have either the reverse switch mounting or the mechanism to make it more difficult to get it into reverse gear. As reverse is next to first on this gearbox you really need this.
So, I fitted the gearlever from the new (shorter) remote to the older one. Unfortunately, when I took the lever out the nylon slipper pad inside the base shot out across the garage which necessitated a two hour hunt to find it. This was pretty silly as Trevor had already warned me about things like this....
Anyway, once I had it together it looked like this. I guess I'll have to shorten the gearlever at some point, but for now it can stay like this.
I ordered a bunch of stuff today. From Think Automotive I got a couple of little things, such as the vent valve for the fuel tank inlet. Most importantly, from Rimmer Bros I ordered a load of stuff such as a pipe for the clutch hydraulics and a V8 badge for the back!
 All the stuff arrived from Rimmers and I installed a couple of things. As it
was going to cost a fair bit to get my rocker covers powder coated, and the Rimmers ones are quite reasonably priced,
then I bought some excellently coloured ones from them. William
should buy some of these, they'd go with his bodywork!
All the stuff arrived from Rimmers and I installed a couple of things. As it
was going to cost a fair bit to get my rocker covers powder coated, and the Rimmers ones are quite reasonably priced,
then I bought some excellently coloured ones from them. William
should buy some of these, they'd go with his bodywork!
 I also bought the required reversing light switch from Rimmers which was easily connected
in to the wiring that I already had in situ.
I also bought the required reversing light switch from Rimmers which was easily connected
in to the wiring that I already had in situ.
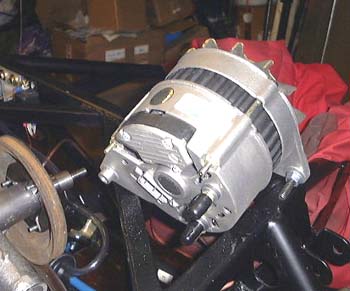
I paid a visit to the Lucas place in Cambridge to see if I could get a smaller alternator than the one I have, as it seems as though the problems with fitting the thing will be rather easier with a smaller one. After much perusing of catalogues I purchased this one, in exchange for the SD1 device. It's also a lot lighter than the old one. I now just have to figure out how to mount it...
The people at Lucas gave me some advice on wiring in the new one, and confirmed that they will test the starter motor for me, as I can't detect any resistance across the windings...
 I finally got around to having a go at a mounting bracket for the alternator.
Hence I spent an inordinately long time cutting and weldig together a rather ridiculous looking bracket. I don't
know yet whether it's going to do the job as I decided to spray it with Hammerite before trying it.
I finally got around to having a go at a mounting bracket for the alternator.
Hence I spent an inordinately long time cutting and weldig together a rather ridiculous looking bracket. I don't
know yet whether it's going to do the job as I decided to spray it with Hammerite before trying it.
After I'd sprayed it I realised that I'd forgotten to sort out some way of mounting an adjustable stay for the fan belt adjustment. Hence, there'll have to be more of the same when I get to the car next.
in case you've got to this frame directly and can't get out, go here.