 Having done the side panels, I could at last start looking at other things a bit. I decided
the first thing to do was to make some progress on the interior of the car. In order to get into this the first
thing is to get the scuttle fitted.
Having done the side panels, I could at last start looking at other things a bit. I decided
the first thing to do was to make some progress on the interior of the car. In order to get into this the first
thing is to get the scuttle fitted.
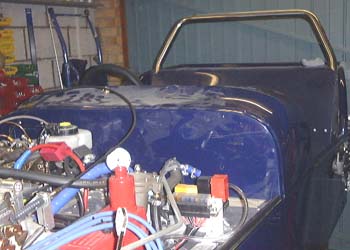
I had established an initial fitting for it a while ago, but decided that I wanted to get it a bit further forward. The front edge of the scuttle is now 33mm in front of the rail across the middle of the car, as opposed to the 25mm that's in the manual. Apparently, Dax themselves make this measurement 37mm (that's 1.5 inches in old money) so I'm about half way between what's in the manual and what Dax say they do. You might justifiably ask why Dax don't write in the build manual what they do themselves, but that's anyone's guess. Kit car manufacturers seem, in general, to be scared to death of the work involved in putting together a decent build manual. Most of this seems to be due to their inability to work out what's actually required (some good drawings which are accurate and up to date would be fine) and how to use modern technology to product it. Oh well...
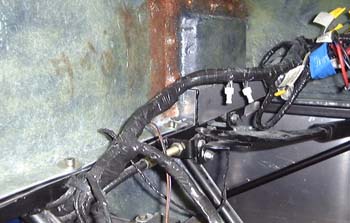 Anyway, after that was done I fitted some (more!) rivnuts to the chassis on
the cross rail and marked up the scuttle to fit them. (That sounds easy, it wasn't!)
Anyway, after that was done I fitted some (more!) rivnuts to the chassis on
the cross rail and marked up the scuttle to fit them. (That sounds easy, it wasn't!)
With that all done I could bolt down the scuttle in the correct place. Even though the car doesn't look any different (apart from the fact the I fitted a black trip strip down the side) it still seems like a step forward.
 Finally, as part of sorting the interior I need to fit the tunnel surrounds.
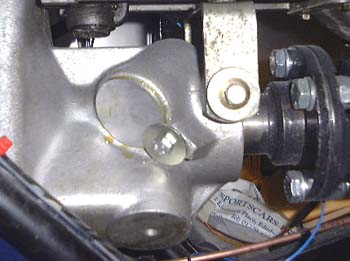
For some time I've been meaning to block up the hole for the speedo takeoff on the gearbox. (I am using an electronic
speedo.) I make an aluminium disc of the right size (which took ages) and clamped it into position with some liquid
gasket. I hope it's oil-tight!.
Finally, as part of sorting the interior I need to fit the tunnel surrounds.
For some time I've been meaning to block up the hole for the speedo takeoff on the gearbox. (I am using an electronic
speedo.) I make an aluminium disc of the right size (which took ages) and clamped it into position with some liquid
gasket. I hope it's oil-tight!.
December 3rd
All of a sudden I feel as though I can see the end of all this, something like six months away. As such, I spent some time peering all over the car and making a to-do list. I'll try and keep this up to date.
December 5th
I finally got around to ordering the wheels and tyres today, it's taken me months to work around to it. Of course, they won't be available until about the end of January. The sizes of the wheels I've ordered (Compomotive MOs), isn't quite what Dax recommend, but I think it's close enough. I never heard from Revolution, to whom I spoke about wheels ages ago, and supposedly ordered some. How they can carry on a business like this is beyond me...
I've been thinking about the to-do list, as mentioned above. It's occured to me that if it takes about a week to do every job that's on it, then the car'll take me nearly another year to finish! Groan....
 All the same, I got stuck into it this weekend. The first job was marking out
the rear tub for the rear lights, which for this part of the bodywork are the high-level brake light, number plate
light, fog lamp and reversing light. The reason for the high-level brake light, by the way, is that personal experience
is that people don't see little cars like these, and lots of illumination is a good idea to make the other idiots
on the road realise that you're really there.
All the same, I got stuck into it this weekend. The first job was marking out
the rear tub for the rear lights, which for this part of the bodywork are the high-level brake light, number plate
light, fog lamp and reversing light. The reason for the high-level brake light, by the way, is that personal experience
is that people don't see little cars like these, and lots of illumination is a good idea to make the other idiots
on the road realise that you're really there.
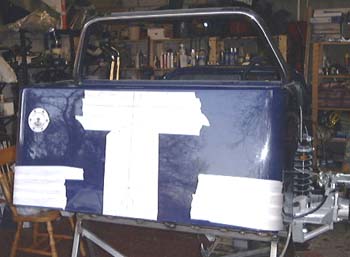
So, after a lot of sticking masking tape all over the rear tub, and a lot of measuring and re-measuring I set about the tub with drill, jig-saw, file and dremel. The marking and measuring bit was what took the time really, as I find I have to keep checking things.
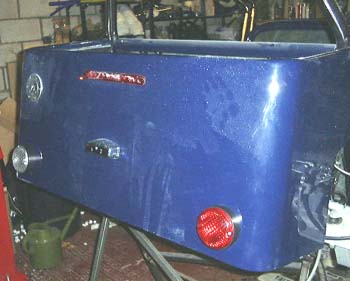 I ended up with it looking like this photo here.
One problem is that the lights are mounted on spacers which I bought for them. It would be possible to "french" them in completely into the back panel. However, I'm reluctant to do this at the moment for two reasons. Firstly, the hole required in this case is much larger and there would be a much higher probability of screwing it all up. Secondly, I'm concerned that SVA regulations might require the angle of the lights to be varied, which would rather more easily be performed by chopping away at the spacers.
So, I'll probably leave them mounted on these things for now, perhaps until after SVA.
I wired up all the lamps apart form the high level brake light, as I'd already sorted out the wiring for them. I'll do the other one later.
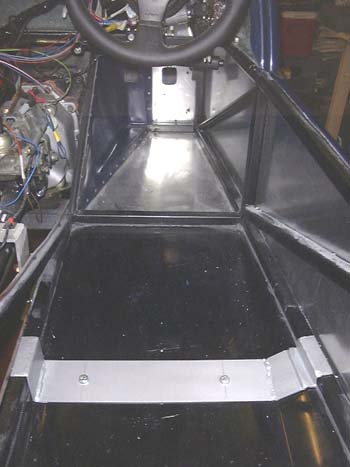 Next, I wanted to bolt in the seat supports/exhaust supports that I made
a while ago. The intention is that these should just bolt straight through the seat itself into a plate unde
the seat which will form the exhaust support. This support is going to take quite a while to make well, but just
for now I want to make the inner supports fixed, which was easily done.
Next, I wanted to bolt in the seat supports/exhaust supports that I made
a while ago. The intention is that these should just bolt straight through the seat itself into a plate unde
the seat which will form the exhaust support. This support is going to take quite a while to make well, but just
for now I want to make the inner supports fixed, which was easily done.
You will notice from the photo that I've cleared out at least some of the crap from inside the car....
One of the reasons for fixing these supports is that I wanted to get on and fit the tunnel mouldings.
 Other people have had terrible trouble with these, and it was obvious that it
was not going to be easy, not least because the mouldings have a flange on the bottom of them that is meant to
bolt to the flat floor of the chassis. Of course, this flat floor just isn't there is my case, due to the lowered
floor of the LWB chassis.
Other people have had terrible trouble with these, and it was obvious that it
was not going to be easy, not least because the mouldings have a flange on the bottom of them that is meant to
bolt to the flat floor of the chassis. Of course, this flat floor just isn't there is my case, due to the lowered
floor of the LWB chassis.
So, just about the first job was to cut this flange off. Of course, this meant dust went all over the place and made the newly cleaned-out car mucky again. Oh well...
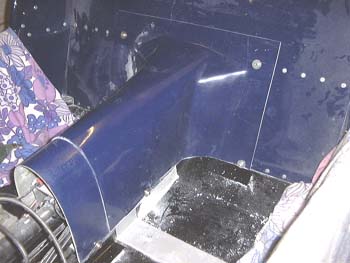
This, by the way, the rear of two mouldings that cover the tunnel. They form a sort of telescopic arrangement to account for varying chassis lengths.
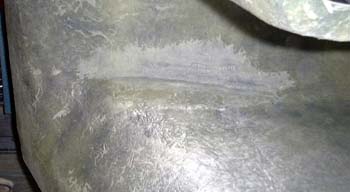 Then I tried to fit the moulding to the car, and that when the trouble started.
Essentially, it was just not wide enough to go across the chassis around the propshaft. The only thing that could
be done was to try and relieve the situation by grinding away some of the inside of the moulding, which was accomplished
with a flap wheel. All the same it was very slow work, and the garage was filling up with dust. What's more, as
I progressed it was obvious that I just wasn't going to be able to get it to fit really well, the chassis was just
too wide. I couldn't grind away enough of the tunnel really, as I was worried about going all the say through.
As it was there were a couple of little bits of gel-coat peeping through.
Then I tried to fit the moulding to the car, and that when the trouble started.
Essentially, it was just not wide enough to go across the chassis around the propshaft. The only thing that could
be done was to try and relieve the situation by grinding away some of the inside of the moulding, which was accomplished
with a flap wheel. All the same it was very slow work, and the garage was filling up with dust. What's more, as
I progressed it was obvious that I just wasn't going to be able to get it to fit really well, the chassis was just
too wide. I couldn't grind away enough of the tunnel really, as I was worried about going all the say through.
As it was there were a couple of little bits of gel-coat peeping through.
I have to admit to a lot of dissatisfaction with the DAX GRP. In general it seems too thick and worst of all it just doesn't fit properly. For example:
- The rear tub didn't reach the correct place on the chassis rail under the body.
- The side panels don't fit the front suspension mountings.
- The side panels, in my case, don't fit with the floor mouldings and have to be chopped seriously to fit.
In fact, now I think about it, none of the mouldingss that I've fitted so far is really satisfactory. It makes the minor problems I had with the Westfield bodywork seem trivial in comparison. The Westfield panels are a model of control of the moulding process and pretty much fit. (With the exception of the windscreen fillet, which was a pain in the arse...)
However, I have hopes that the end result will look fine. It will take a fair bit of covering up though.
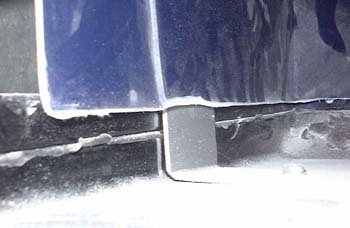 The end result of this non-fitting is that the moulding doesn't go down far
enough. This photo is take from just about floor level in the car, and you can see the bottom of the moulding and
the chassis frame that it's supposed to attach to sticking down a long way below the moulding.
The end result of this non-fitting is that the moulding doesn't go down far
enough. This photo is take from just about floor level in the car, and you can see the bottom of the moulding and
the chassis frame that it's supposed to attach to sticking down a long way below the moulding.
You can also see a lot of dust and the crappy finish that results from cutting off the flange on the bottom of the moulding. Hopefully this can all be hidden under some carpet.
 Finally, I attached the moulding by mounting some rivnuts in the chassis and bolting the
moulding in place. I used some penny washers on the bolts to make them overlap the moulding enough.
Finally, I attached the moulding by mounting some rivnuts in the chassis and bolting the
moulding in place. I used some penny washers on the bolts to make them overlap the moulding enough.
I need to drill some more holes, to clear the seatbelt mountings, but I'll do that next time.
Hopefully, when I get in the garage next, the dust will have settled a bit...
in case you've got to this frame directly and can't get out, go here.