This bit's a bit late, but better than never! Hence some of the stuff here happened a couple of week's ago. Apart from work, one of the reasons for being late is that I've taken over as the webmaster for the Dax Rush Owners Club website. I was obviously not concentrating at some point there...
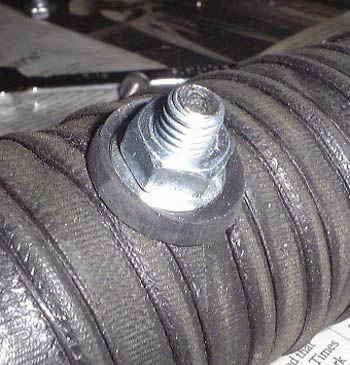 William mentioned that he was having the same
sort of trouble that I was with the fuel fillter air blocking. He's effected a cure that I decided to copy. The
approach is to provide an air bleed from the auxiliary tank pipe back into the inlet hose. William, and I, made
the air bleed by drilling a hole down an M8 bolt and sealing it into the input hose, as in the picture here.
William mentioned that he was having the same
sort of trouble that I was with the fuel fillter air blocking. He's effected a cure that I decided to copy. The
approach is to provide an air bleed from the auxiliary tank pipe back into the inlet hose. William, and I, made
the air bleed by drilling a hole down an M8 bolt and sealing it into the input hose, as in the picture here.
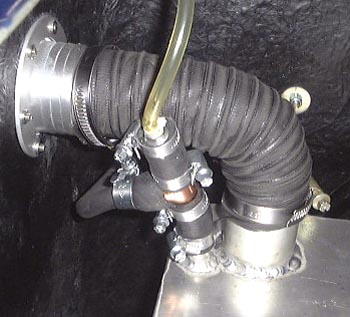 This device is then connected into the
auxiliary pipe using a tee piece. There's rather a lot of jubilee clips here but is seems OK.
This device is then connected into the
auxiliary pipe using a tee piece. There's rather a lot of jubilee clips here but is seems OK.
First experiences are quite good. It's definitely better, although it's still not possible to just shove in the hose and pull the trigger but it isn't the long-drawn out experience it was before.
One of the reasons for wanting to fix the fuel filling was that I'd booked the Dax into its inaugural track day, in this case at an airfield circuit (I thought lots of run-off would be a good idea!) at Bruntingthorpe.
We got up to Bruntingthorpe early on Saturday that the track day was to take place (August 24th) and it looked a fine day. After the usual preliminaries I went out on the familiarisation laps. It was all pretty flat, although there was one nice little right/left/double apex right complex. Plenty of cones had put in a couple of chicanes and one fast (very!) left/right/left sweep.
After that I queued up to go out properly and after a fairly short while it was obvious that the dampers needed to be much stiffer than they were. It's odd how these things are so much more obvious on a circuit. I went into the pits and disappeared under the car to put another turn on the adjusters.
Next time out I had Tom in the passenger seat and this time I could go a lot quicker. So much so that one lap, at a hard right after the fastest bit of the circuit, I performed a particularly lurid spin. One of those where the car goes one way, bites and goes back the other way. About half way through the spin I just gave up, declutched and waited for the world to stop moving around.
After I moved off again and started down the pit straight I noticed that my legs were getting wet, and warm. What's more there was distinct smell of antifreeze. After glancing at the off-the-end-stop temperature gauge I stopped and we pushed the car into the paddock. After a short amount of rooting around the problem became obvious in that alternator/water-pump drive belt was missing. In fact, it was lodged in the bottom of the engine compartment looking very much the worse for wear.
I refitted it and went out again, only to have the wet-leg syndrome again pretty quickly. This time I wasn't so lucky in that the belt had disappeared this time. So, we drove off to Leicester to find a Halfords and came back with their entire stock of belts. (One!) I fitted that, went out again and the same thing happened again. So, after a long drive to find another source, we found the other Halfords in Leicester and bought their entire stock of belts. (Two this time.) However, after re-fitting that the day had finished. Worser, the heavens decided to open so driving home was a bit of a damp experience. So, it was a bit of a damp squib really. I never really got the car up to speed. although I was getting there. It overheated three times by losing the drive belt, oddly at the same point on the circuit each time.
Initial theories about all this are that either:
- my home made alternator mounting is a smidgeon out of line or
- the engine was moving forward and bashing the belt on the chassis.
First thing is I'm going to try and get one of the kosher brackets that William found so that I can be sure it all lines up before I try again...
Best bit about the day was that it made a lovely noise though...
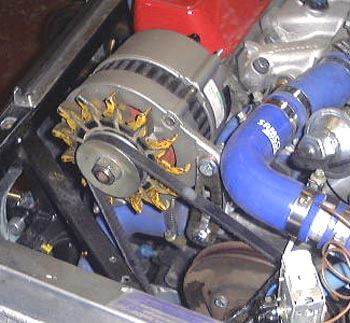
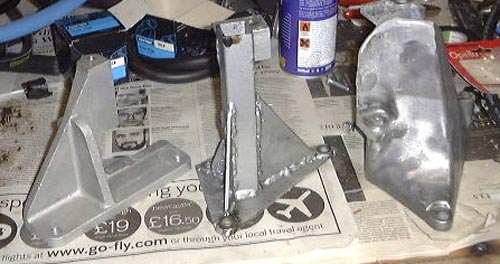 So now we're back
up to date. I phoned up JE Developments and ordered an alternator bracket at about 4:30 on Friday afternoon. It
arrived in the post on Saturday morning, which I thought was rather exceptional service, It's essentially what
I made myself, albeit cast in aluminium rather than fabricated in steel. The only problem is that it'll obviously
need a spacer to get it in the right position. Apparently, some SD1s had such a spacer but mine didn't. The photo
here shows, from left toright, the JE bracket, the one I made and the original SD1 one. (Actually, it's not quite
the original one, as I started trying to modify it orginally before I made the one in the middle.
So now we're back
up to date. I phoned up JE Developments and ordered an alternator bracket at about 4:30 on Friday afternoon. It
arrived in the post on Saturday morning, which I thought was rather exceptional service, It's essentially what
I made myself, albeit cast in aluminium rather than fabricated in steel. The only problem is that it'll obviously
need a spacer to get it in the right position. Apparently, some SD1s had such a spacer but mine didn't. The photo
here shows, from left toright, the JE bracket, the one I made and the original SD1 one. (Actually, it's not quite
the original one, as I started trying to modify it orginally before I made the one in the middle.
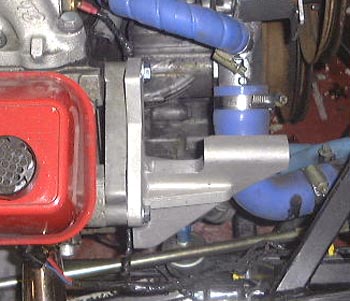 I made a suitable mounting spacer by slicing off the bottom of the original bracket and using a few
cunningly placed washers. I had a bit of a faff fitting the alternator adjustor as the alternator is in a slightly
different postion with the new bracket. I finally solved this by mounting the adjuster bracket (also provided by
JE) upside down.
I made a suitable mounting spacer by slicing off the bottom of the original bracket and using a few
cunningly placed washers. I had a bit of a faff fitting the alternator adjustor as the alternator is in a slightly
different postion with the new bracket. I finally solved this by mounting the adjuster bracket (also provided by
JE) upside down.
 However, after a while it was all
back together and I could try it. All I had time to do was just start the engine and everything seemed much as
it was before. Problem is, I now need another track day to try it out! If such a thing makes it fall off again
then it'll be back to the drawing board...
However, after a while it was all
back together and I could try it. All I had time to do was just start the engine and everything seemed much as
it was before. Problem is, I now need another track day to try it out! If such a thing makes it fall off again
then it'll be back to the drawing board...
After using the car for a while, the alternator attachment seems to be working fine. Still, it needed another track trip.
 So, a small group of us from Cambridge, including
Richard, William,
Jim and Chris set off for the show at Donington Park on Sunday. This show has the feature that it is
also a track day with access to the Donington National circuit. This circuit has the reputation for being one of
the nicest around for se7en type cars. We started in traditional cam7 fashion at the Little Chef in Caxton Gibbet
where we had some breakfast and then set off for Donington. Another cam7er had provided details of a cross-country
route which worked rather well, including some nice twisty bits.
So, a small group of us from Cambridge, including
Richard, William,
Jim and Chris set off for the show at Donington Park on Sunday. This show has the feature that it is
also a track day with access to the Donington National circuit. This circuit has the reputation for being one of
the nicest around for se7en type cars. We started in traditional cam7 fashion at the Little Chef in Caxton Gibbet
where we had some breakfast and then set off for Donington. Another cam7er had provided details of a cross-country
route which worked rather well, including some nice twisty bits.
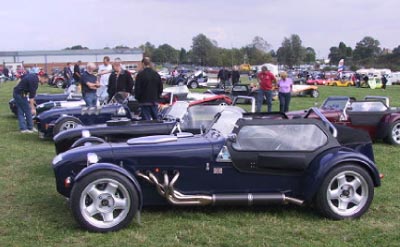
When we got there William and myself, both of us in Daxes, found the Dax group and parked up. If you look very hard at the photo here you can see my car at the back of this line of Rushes.
After a while trundling round the show William and myself paid our £25 for a 20 minute session on the track and after a lot of faffing about finally managed to get ourselves together and onto the circuit. In may case with Chris in the passenger seat providing some additional ballast.
The circuit was fabulous, fairly twisty and with quite a lot of ups and downs, which is a nice contrast to things like airfield circuits. I got into things fairly well, and was speeding up (and passing most things on the circuit) but it was clear that everything wasn't too happy in the engine front. I seemed to be suffering from oil surge and after a while I decided to give it a rest to avoid any additional engibe damage. However, when I got back to the pits it was clear that the oil pressure, which was never very good, was now indicating about half what it normally did.
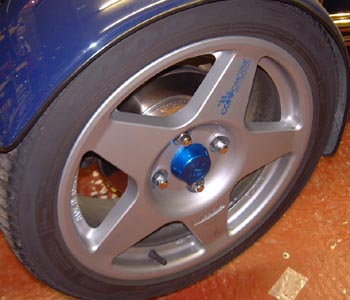
 Another odd thing was the the rear wheels looked like this.
That is, they're thick with brake dust.
Another odd thing was the the rear wheels looked like this.
That is, they're thick with brake dust.
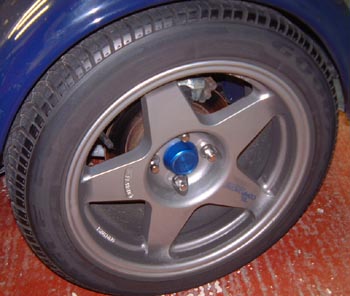
 Whereas the front ones looked liked this. That
is, they look alarmingly shiny.
Whereas the front ones looked liked this. That
is, they look alarmingly shiny.
I can think about various options here but as I've never been convinced about the brake balance I think I'll change the rear master cylinder for the 3/4" one that I've got lying around, instead of the 5/8" one that's there at the moment. This should move the brake balance towards the front. This will mean that I've got the master cylinders exactly the other way round from what I started with.
So back home this evening I started having a look to see what was up with the oil pressure. I started by draining and filtering the oil, and then I dropped the sump. There was a very small amount of grot in the oil, but no obviously very bad news such as bits of bearing. So, I'm left thinking that the oil problem could have been caused by the pressure relief valve sticking a smidgeon open. This is certainly a known problem with these engines and there's a solution that involved machining the oil pump cover and using a so-called "tadpole" PRV. These are not cylindrical (they're a bit like a ball on a stick) and supposedly don't stick.
The other thing is that I really ought to use a baffled sump, which various suppliers sell, albeit at a cost of about £250. I was wondering about making my own, as Real Steel make a kit that provides the flaps and things to be welded into the sump. However, I'm not sure my welding's up to it.
 I had decided that the best strategy
was to put the engine back together and make sure that I knew what the oil pressure really was, as the Greengauges
gauge doesn't seem too accurate really. Anthing more exhaustive would be done after checking that I really knew
what the situation was.
I had decided that the best strategy
was to put the engine back together and make sure that I knew what the oil pressure really was, as the Greengauges
gauge doesn't seem too accurate really. Anthing more exhaustive would be done after checking that I really knew
what the situation was.
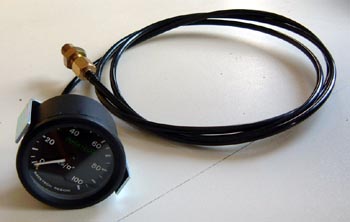
So, I had ordered a capillary oil pressure gauge from Merlin yesterday, as these are reputed to be much more accurate. It arrived this morning (the service if always wonderful from Merlin) and I must admit that it's a really nice looking gauge. I'd never thought about it before but it's much cheaper using mechanical gauges because of not needing senders. If I were to build another car...
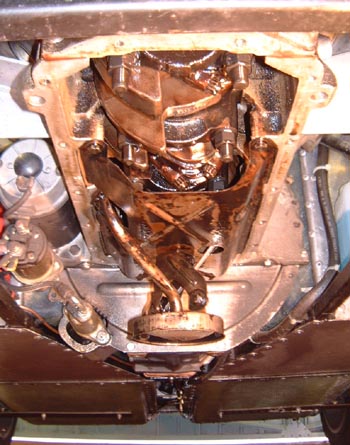 So, back in the garage I put the sump back, just
after having taken this photo here. One issue with this car is the film of oil on everything under the car. Some
of this is due to the leak at the back of the gearbox, but I think the rest is best summed up as "it's a Rover,
Sir, they all do that" which someone on the dax mailing list used. I refilled with Valvoline Racing 20w50
oil, just the sort of old-fashioned oil that this engine needs.
So, back in the garage I put the sump back, just
after having taken this photo here. One issue with this car is the film of oil on everything under the car. Some
of this is due to the leak at the back of the gearbox, but I think the rest is best summed up as "it's a Rover,
Sir, they all do that" which someone on the dax mailing list used. I refilled with Valvoline Racing 20w50
oil, just the sort of old-fashioned oil that this engine needs.
Having put the sump back I checked that the PRV piston would move freely and the put it back together. This time I used a spring that should in any case give a higher cut-off pressure. I bought the spring for this originally from Real Steel, but had not used it until now.
I rigged up the capillary gauge and gaffa taped it to the driver's side mirror.
The problem now was that removing the PRV effectively drains the oil out of the pump, meaning that it needs to be primed again. After a couple of ineffectual attempts at doing it a different way, I resorted to taking the distributor off (making sure that I knew exactly where it was) and driving the pump around with the priming tool that I used when I first put the engine together. This worked fine and the capillary gauge (which of course works without any power) registered some pressure.
After that I could put everything back together and try starting the engine. I did so and the oil pressure jumped up to about 22psi at idle, which is higher than it's ever been at that speed. However, the oil was of course cold. So, I left it idling on the drive for a long time and, not surprisingly, the oil pressure dropped as the oil warmed up. Eventually, when everything had stabilised the oil pressure at idle was about 11psi, still fine. If I held the engine at 1500rpm then the pressure shot up to about 25psi and as the engine speed was increased the oil pressure went up to about 45psi at 4000 rpm. Presumably, this is a result of the different spring but it's certainly a lot higher than it's ever been before, and lot higher (gauge inaccuracy not allowed for) than it showed on the drive back from Donington.
Tomorrow I'll re-connect the electrical gauge and see what sort of pressure that shows.
Next, I wanted to change the master cylinder for the rear brakes, as part of the effort to move the braking effort forward. Thinking about driving the car at Donington I've realised that the smell of brakes that I kept attributing the cars in front (not for long!) of me was probably the over-tortured rear brakes on my car. After I changed the master cylinder, which necessitated taking out the dash and loosening the scuttle again, I needed to bleed the rear brakes so removed the rear wheels. The rear discs certainly must have got a bit hot as they look rather glazed now. I wonder if I should replace them?
 I put the electrical gauge back together, expecting
to see some sort of change. After struggling away (it's pretty difficult to get at things now the side panels are
in place) then I started the engine and was rather dismayed to see that the indicated oil pressure was exactly
where it had been before. So, perhaps the whole thing was just and artefact of the electrical sensor being bust.
Sigh... I'm beginning to think that a long term project should be to change the instrumentation to: a) put the
most important gauges in front of the driver and b) use mechanical gauges if possible.
I put the electrical gauge back together, expecting
to see some sort of change. After struggling away (it's pretty difficult to get at things now the side panels are
in place) then I started the engine and was rather dismayed to see that the indicated oil pressure was exactly
where it had been before. So, perhaps the whole thing was just and artefact of the electrical sensor being bust.
Sigh... I'm beginning to think that a long term project should be to change the instrumentation to: a) put the
most important gauges in front of the driver and b) use mechanical gauges if possible.
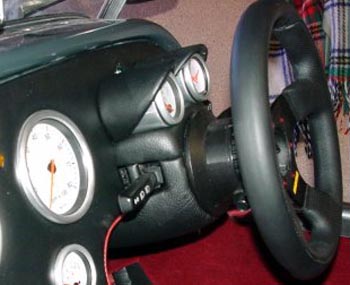
The problem with this is that there is precious little room on the Rush for things in front of the driver. Some people manage something though. The photo here is of a Rusg belonging to Andy North, one of the members of the Dax Rush Owners Club. (The photo is from Adrenaline Rush, the club website that I'm also webmaster of.)
I must admit that after a couple of days thinking about all this I'm still in a quandary. I phoned Dave Ellis and John Eales today to ask about prices for baffled sumps. £300 and £220, respectively, they said. I also had a chat to Dave and we discussed things like oil coolers which is definately something that I needs to do. It's obviously a winter project...
in case you've got to this frame directly and can't get out, go here.