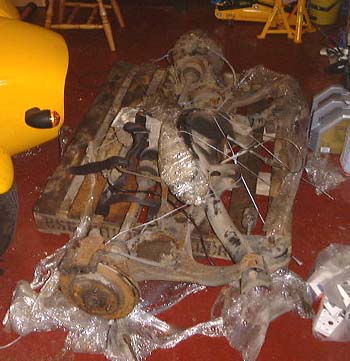
 As promised, the first of the bits arrived. A large truck pulled up outside
carrying a complete Sierra rear subframe. It looked very dirty, with a lot of surface rust and it's obvious that
the diff has at least weeped oil at some point.
As promised, the first of the bits arrived. A large truck pulled up outside
carrying a complete Sierra rear subframe. It looked very dirty, with a lot of surface rust and it's obvious that
the diff has at least weeped oil at some point.
A closer inspection showed that it was an LSD, which means it probably is from a Sierra XR4x4. It was amusing to note that someone had ground straight through the anti roll bar to get the subframe off. To compensate they had supplied me with another ARB. This will go straight in the debris pile, to be honest.
The discs look pretty poor, they could probably be used but I suspect I will just get some new ones.
When evening arrived I couldn't stop myself from starting to take it all to pieces. The brake calipers are probably serviceable, but I suspect that I'll just try to find some exchange ones. Duncan arrived later on and we set about it with a vengeance.
The hub nuts came off easily, albeit with the attack of a huge spanner and lump of tubing that Duncan brought round.
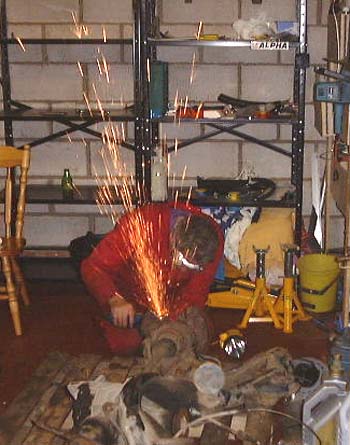 After that we took off the wheel flanges and the hub carriers. One of the bolts
for the latter was very recalcitrant and had to be assisted off with a grinder.
After that we took off the wheel flanges and the hub carriers. One of the bolts
for the latter was very recalcitrant and had to be assisted off with a grinder.
After that we rapidly got down to a situation where the diff and driveshafts were all attached but everything else had been removed. The next job was to look at the diff a bit harder.
There's a procedure in the Haynes manual describing how to test an LSD. We went through this and it seems as though this one is just about within range, although at the top end. (That is, it's stiffer.)
After that we thought we'd take the backplate off to see if everything looked kosher in there. It's obvious that someone in the past has taken off the backplate because the remainder of the silicone sealant used as gasket (the recommended approach) was still there.
 I suppose in retribution for the hub nuts coming off so easily the back plate
bolts were much more difficult. In fact, after only getting a few of them undone we left eveything soaked in WD40
(must go and buy some Plus Gas tomorrow) and left it for the night. I wouldn't be surprised if the angle grinder
makes a reappearance tomorrow.
I suppose in retribution for the hub nuts coming off so easily the back plate
bolts were much more difficult. In fact, after only getting a few of them undone we left eveything soaked in WD40
(must go and buy some Plus Gas tomorrow) and left it for the night. I wouldn't be surprised if the angle grinder
makes a reappearance tomorrow.
At the end of the proceedings we had an impressive pile of debris. I'll have to tidy up the resultant mess tomorrow.
 I went to the local Ford dealers and got some new parts for the rear wheel bearings. I
suspect they don't really need to be replaced, but as I've got them all in bits I might as well do it while there.
One thing that I really do need to replace is the hub nuts, which are nyloc locking nuts and should really be replaced.
I went to the local Ford dealers and got some new parts for the rear wheel bearings. I
suspect they don't really need to be replaced, but as I've got them all in bits I might as well do it while there.
One thing that I really do need to replace is the hub nuts, which are nyloc locking nuts and should really be replaced.
I spent a while hacking at the brake calipers to get all the rust off. Although it's quite feasible to do this for the open areas it's really rather hard in the corners. I can't see how I can do this and end up keeping the bores as clean as they need to be, so I have reluctantly decided that I will need to get reconditioned brake calipers.
I did actually buy reconditioning bits for the brake calipers too--which are essentially new pistons and all the seals. However, they're going to have to do back.
 The next thing was to try and get the diff cover plate bolted loosened. I eventually managed
this, with the aid of a cold chisel. I haven't taken the back plate off yet though, as I think I ought to clean
up the outside properly first.
The next thing was to try and get the diff cover plate bolted loosened. I eventually managed
this, with the aid of a cold chisel. I haven't taken the back plate off yet though, as I think I ought to clean
up the outside properly first.
I still haven't decided what to do about an engine, although I'm leaning a bit towards and intensively do-it-yourself process. I spoke to Dave Ellis today (of D.J. Ellis) who supply just about everything for Rover V8s. He was a very pleasant person to talk to on the phone and said that would do just about whatever was wanted. So perhaps the thing is to buy a gash old engine via Loot and build it up from that?
Today I spent a short amount of time starting to get the clag off the diff. It's going alright, but very slowly. I wonder if I need to get some better stuff from somewhere. The se7ens listers speak highly of two things: Jizer, which is apparently the big brother of Gunk which is what I am using at the moment, and Mr Muscle oven cleaner, although that might be more appropriate to thick layers of grease. A lot of what's stuck on this diff is just road clag, soil essentially.
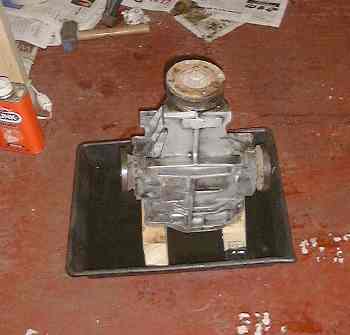
 The weekend again, and some progress, of a sort. I managed to clean up the diff,
with a combination of Mr Muscle, Gunk and wire brushes. It's not quite shiny in parts, although a lot of the ribs
have clag in the corners that's almost impossible to get at.
The weekend again, and some progress, of a sort. I managed to clean up the diff,
with a combination of Mr Muscle, Gunk and wire brushes. It's not quite shiny in parts, although a lot of the ribs
have clag in the corners that's almost impossible to get at.
Unfortunately, the day had started with a letter from Dax confirming my order. However, the originally quoted manufacturing date of August 12th has mysteriously moved to September 5th. I can't say I pleased about this. Not really the date, which is probably just the way it is, but with the perceived lack of straightforwardness that I thought I would get from Dax. With luck I'm over-reacting.
I put in some more work on the brake calipers, having decided again to have a go at the rebuilding lark. One of the problems with this is freeing in the gubbins that's inside the caliper cylinder that's concerned with the handbrake. I made up a little tool to help in compressing the spring in here, with the aid of an angle grinder and the old adjuster nut from the existing piston.
This all went well until I got the handbrake mechanism out. The handbrake actuator shaft and the bush it runs in are, essentially, crap. As far as I can see the only remedy for this is to press in a new bush, if they are available, and get a new shaft. This is all getting perilously close to the cost of a recon caliper anyway.
 We went up to Hollis's breakers today to get the other bits I had ordered. We came away
with a Sierra steering column, complete with horrid steering wheel and a single key (must get another one cut)
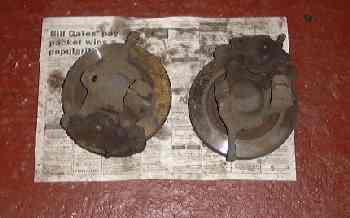
and the front uprights off a fairly newish Sierra.
We went up to Hollis's breakers today to get the other bits I had ordered. We came away
with a Sierra steering column, complete with horrid steering wheel and a single key (must get another one cut)
and the front uprights off a fairly newish Sierra.
The photo here doesn't do them justice, as they don't look too bad. With luck I think the discs will be usable, and there's a lot of material on the pads.
 At the end of the day I removed the driveshafts from the diff. I was not looking
forward to this as Duncan had had real trouble getting the bolts out, to the extent of eventually freeing one of
the shafts inside the diff by removing a circlip. However, in my case they all came apart very easily and I was
finally left with a diff and two driveshafts. One of the CV joint boots has a couple of cracks in it, although
on inspection they don't actually seem to have got all the way through, yet. So, I'll have to get some new boots.
At the end of the day I removed the driveshafts from the diff. I was not looking
forward to this as Duncan had had real trouble getting the bolts out, to the extent of eventually freeing one of
the shafts inside the diff by removing a circlip. However, in my case they all came apart very easily and I was
finally left with a diff and two driveshafts. One of the CV joint boots has a couple of cracks in it, although
on inspection they don't actually seem to have got all the way through, yet. So, I'll have to get some new boots.
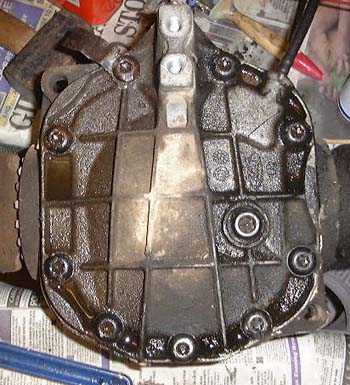
I also wanted to drain the oil from the diff, as I think from the condition of the outside of the diff that I ought to replace the oil seals. What's more, Duncan has some seals that he did not use. Consequently, I finished the day with the diff upside down draining its oil out.
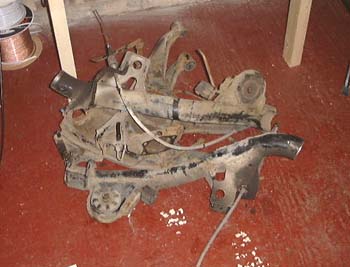
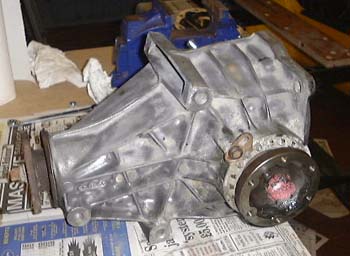 The diff now looks fairly clean, as you can see in the photo. I now want to replace the
oil seals and the first one to have a go at is the pinion shaft one. (On the left in the photo.)
The diff now looks fairly clean, as you can see in the photo. I now want to replace the
oil seals and the first one to have a go at is the pinion shaft one. (On the left in the photo.)
Unfortunately, after grunting away at the nut for a while I decided that it would be easier to update this web page. I'll try a bigger spanner tomorrow.
 In order to change the seals in the output shafts, I need a vernier depth gauge.
As I've wanted to buy such a measuring tool for some time this was just the excuse I needed so an electronic order
was despatched to Mssrs Screwfix at the first opportunity.
In order to change the seals in the output shafts, I need a vernier depth gauge.
As I've wanted to buy such a measuring tool for some time this was just the excuse I needed so an electronic order
was despatched to Mssrs Screwfix at the first opportunity.
The problem with changing these seals is that the output shafts have to be removed by loosening the circlips inside the diff itself. The only problem is, I can't see anything that looks quite like a circlip. There is a sort of hole there which I guess I'll just stuff a bit of a circlip plier (in the singular) into and do a bit of levering.
The viscous coupling (the limited slip part of this diff) is inside the rather large crown-wheel housing in case you're wondering.
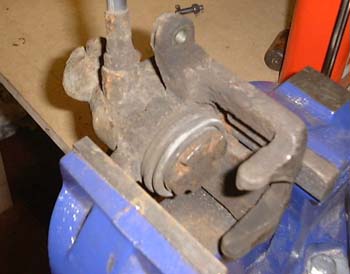
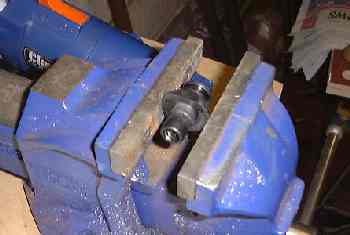
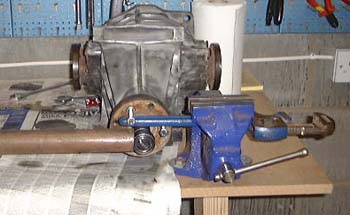 I set up the diff with a couple of bolts through the input flange and a large
Stilson wrench through my vice to hold everything stiff, as in the photo here. I then turned hard on the input
flange nut. Although I was using a long extension piece on the socket wrench nothing of note moved.
I set up the diff with a couple of bolts through the input flange and a large
Stilson wrench through my vice to hold everything stiff, as in the photo here. I then turned hard on the input
flange nut. Although I was using a long extension piece on the socket wrench nothing of note moved.
 Other, that is, than the Stilson wrench itself which ended up this shape!
I think I'll go and buy a really thick lump of steel bar to bolt to the flange to hold everything still. In readiness for this I stood the diff on its back and soaked the flange nut in penetrating oil. With luck this might ease things a little for the next attack.
Having failed on that I started to take apart the front brakes. The immediate hitch is that I need a 7mm Allen key, which of course I don't have as everyone uses either 6 or 8.
Back to this web site...
in case you've got to this frame directly and can't get out, go here.