 I phoned up the people at the Kit Car Workshop and, sure enough, I was being
an idiot about the location of the gearchange bracket. It mounts rather higher up (obviously!) than I was looking
at, on a couple of the bolts on the alternator housing.
I phoned up the people at the Kit Car Workshop and, sure enough, I was being
an idiot about the location of the gearchange bracket. It mounts rather higher up (obviously!) than I was looking
at, on a couple of the bolts on the alternator housing.
However, the cable really does seem to be too long. Also, following Adrian's experience, keeping extreme curves out of the cable is a really good idea. Consequently, I've arranged to get a shorter cable. It's actually about 1/3 shorter than the original, which is a pretty large difference.
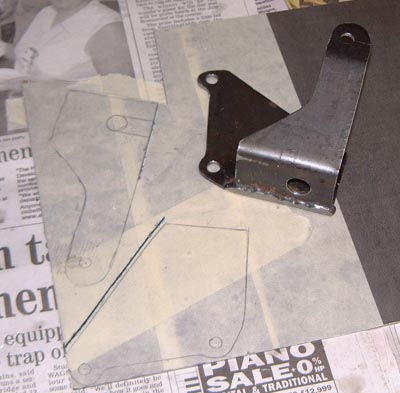
As I seem to be understanding things now, I started making a copy of the KCW bracket, as shown here.
I also phoned Allins (the local Honda people) and ordered the actuator arm that's supposed to go on the selector shaft. I was planning on making something, but is seems silly not to get the right device. I'm pretty sure, though, that it will still need considerable fettling to fit.
However, another problem appeared later on. After some experimentation it appears that a clockwise movement on the selector shaft of my engine changes up. The way the gearchange brackets and the lever itself are set up this would be caused by a forward movement of the gearchange lever. Although there are a couple of dissenting voices, I reckon the majority are right in that a rearwards movement of the lever should cause a change-up.
The solution to this is either to make some sort of new bracket for the engine end, or to reverse the sense of the lever by pivoting it at the bottom. I suspect the latter is the one of these to do and I'll work towards that.
 The only thing there was time for this evening was a while sorting out some
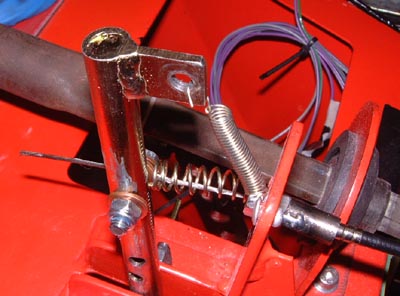
little issues with the pedals. First of all, I added another spring to the throttle pedal so that it doesn't reverse
backwards beyond idling. It was doing this which just means that the pedal flops down. With this new spring it
just sits at the 0 throttle position happily.
The only thing there was time for this evening was a while sorting out some
little issues with the pedals. First of all, I added another spring to the throttle pedal so that it doesn't reverse
backwards beyond idling. It was doing this which just means that the pedal flops down. With this new spring it
just sits at the 0 throttle position happily.
I also remade the adjuster but drilling a hole down the middle of some M6 studding and pressing that into service. There was a similar issue with the clutch pedal, and this was fixed in the same sort of way.
One thing about all this is that I think I ought to cover up the hole in the top of the pedal box. I seem to remembr that the Blue Book says that there shold be a fireproof bulkhead between driver and engin.
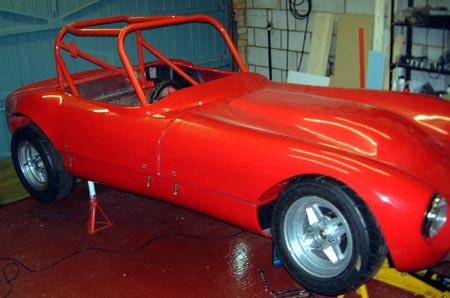 It's another bank holiday weekend and I'm planning on doing all sorts to the car. First
thing was to try the clearance with the roll cage and the bodywork on together.
It's another bank holiday weekend and I'm planning on doing all sorts to the car. First
thing was to try the clearance with the roll cage and the bodywork on together.
It doesn't look quite as large as it did before like this. Still not sure about it though. One problem was that the rear of the cage and the tub conflicted with each other, and I had to relieve the tub with a Dremel slightly to make them fit together.
However, the side bar on the roll cage is a real pain. I have to figure out what to do about this. Realistically, the only possibilities are taking it to Martin and asking him to sort it, and taking it to Safety Devices (quite near to me in Soham) and asking them to do something. For now, though, I'm going to have to put up with it.
 I had ordered a actuator arm for the gear selector yesterday and it came in at the local Honda emporium
today, so I went and picked it up and tried it for size, as seen here.
I had ordered a actuator arm for the gear selector yesterday and it came in at the local Honda emporium
today, so I went and picked it up and tried it for size, as seen here.
However, I'm still completely unsure how the gear selection is going to work. In fact, I'm half considering doing something with some rods instead of the cable. I certainly can't see how using the bracket discussed above will work with this arm, as it would have to face the other way and would then foul the water pump. Unless, of course, it would work at some funny angle which is just possible.
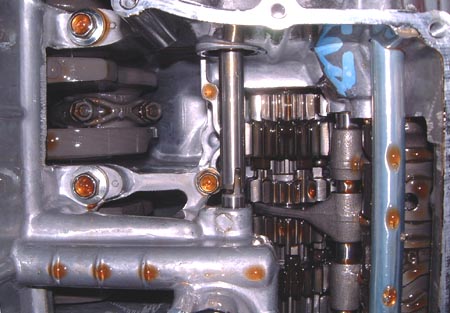 In the meantime I moved onto other things. I decided it was about time I fitted the baffled sump so
I drained the oil out of the old one, straight into the can as I said I would do. Taking off the old sump was easy
and fairly soon I could peek right up into the engine.
In the meantime I moved onto other things. I decided it was about time I fitted the baffled sump so
I drained the oil out of the old one, straight into the can as I said I would do. Taking off the old sump was easy
and fairly soon I could peek right up into the engine.
You can see a big end on the left of this photo and the gearbox on the right. At the far right is the selector drum which drives the selector forks around (you can see all three of them) in a fancy pattern so as to get the sequential effect. Note that all the gears are straight-cut, unlike the hypoid gear that are in car gearboxes so they don't sound so horrid.
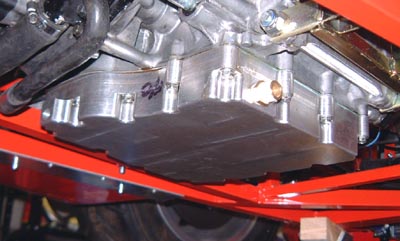 Then I started fettling the baffled sump I had to grind some of one of the ribs away so as to clear
the pressure relief valve. (Why isn't this done in a specially manufactured part?) I also drilled and tapped the
sump to mount the sender for the oil temperature gauge. That the thing that you can see poking out of the right
of the sump in this photo. (At least, that's the mounting bush for it.)
Then I started fettling the baffled sump I had to grind some of one of the ribs away so as to clear
the pressure relief valve. (Why isn't this done in a specially manufactured part?) I also drilled and tapped the
sump to mount the sender for the oil temperature gauge. That the thing that you can see poking out of the right
of the sump in this photo. (At least, that's the mounting bush for it.)
This photo disguises the incredible faff getting this sump on. As it is, you have juggle the sump, a baffle plate, two gaskets and a little aluminium device that sits under the PRV and stops it falling out into the sump.
Still, after a while I got it together and refilled the oil system. I thought I'd better check the oil pressure first. So, I took the plugs out and twirled the engine over.
Nothing. The oil pressure warning light stayed resolutely on and the pressure gauge didn't twitch. Oh dear.
I faffed around for a while and then took the sump off again just in case I'd got the pickup blocked somehow. It all seemed fine and so I put it back againl. At least I'm getting better at doing it. So, I tried the engine again.
Nothing. Oh dearie, dearie me.
The manual doesn't talk about priming the pump at all, but it seemed to me that it might be worth trying a few things. So, I took the low oil pressure sender out and squirted lots of oil up the spout. With the sender out I turned the engine over. At first there was a little dribble of oil and then something started chucking loads out. So, I put the sender back and tried again. This time the light went out and some pressure was registered on the gauge.
Huge relief!
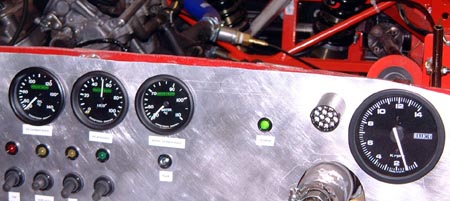 I put the plugs back in and started the engine. This time the pressure gauge
shot up. The photo here shows the tacho at about 1000rpm and the oil pressure gauge at about 50 psi which is fine.
(The light in the middle says it's in neutral, by the way.)
I put the plugs back in and started the engine. This time the pressure gauge
shot up. The photo here shows the tacho at about 1000rpm and the oil pressure gauge at about 50 psi which is fine.
(The light in the middle says it's in neutral, by the way.)
Tomorrow, when I'm not going to disturb everyone, I'll check the PRV operation. (I noticed a while ago that at high-ish revs you can see the PRV operating by the rather skittish display on the pressure gauge.
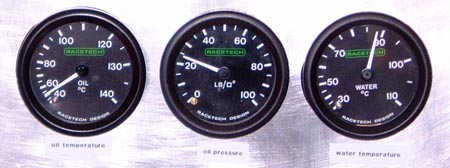 As it was now daylight, and not the wee small hours of the morning, I could run the engine
for a while and see if the oil temperature gauge started working.
As it was now daylight, and not the wee small hours of the morning, I could run the engine
for a while and see if the oil temperature gauge started working.
As you can see from the photo, all three do work. This was before it really heated up properly as there isn't much point letting it run for ever.
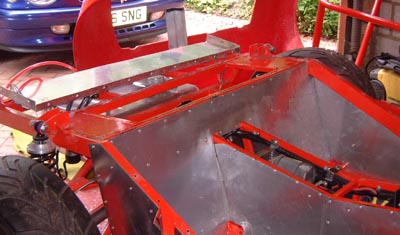 For some time I've been promising myself that I would sort out the "boot floor" which doesn't
fit sensibly at all. I finally bit the bullet and removed the rest of the GRP panels today. The plan it to remake
the sides in aluminium, and while I'm at it to fill in the gaps that still exist in front of the wheels. In fact,
as I look at it it should be possible to take the panels more along the line of the side impact protection and
actually make them less intrusive than usual.
For some time I've been promising myself that I would sort out the "boot floor" which doesn't
fit sensibly at all. I finally bit the bullet and removed the rest of the GRP panels today. The plan it to remake
the sides in aluminium, and while I'm at it to fill in the gaps that still exist in front of the wheels. In fact,
as I look at it it should be possible to take the panels more along the line of the side impact protection and
actually make them less intrusive than usual.
In this photo, you can see what it looks like with the GRP moulding removed.
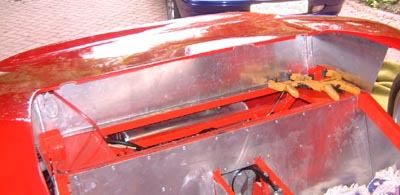 Here, I've added the first two panels, cut out with the aid of a cardboard template.
Unfortunately, at this point I ran out of aluminium. What's more the local purveyers of such stuff are closed for the millenium. I'll have to see if I can blag some off someone else around. Someone must have some.
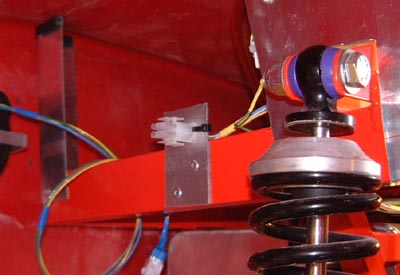 So, I turned to something else and fitted some new connectors for the real lights
so that I can more easily connect up the lights when the rear tub is removed/replaced. These connectors are mounting
on little brackets at the rear of the car. This photo is taken from inside the wheelarch (with the wheel not on!)
So, I turned to something else and fitted some new connectors for the real lights
so that I can more easily connect up the lights when the rear tub is removed/replaced. These connectors are mounting
on little brackets at the rear of the car. This photo is taken from inside the wheelarch (with the wheel not on!)
Doing this seemed to take ages but it's now done which means I've completely finished the electrics. Until, that is, I think of something I've forgotten.
I seem to have made glacially slow progress today. Hopefully the rest of the weekend won't be so bad.
 Tomorrow I'd like to get a first setup of the suspension. One observation, though is that
I can't get the rear suspension down far enough. This probably just needs some new springs. Luckily, I think they're
fairly easy to get.
Tomorrow I'd like to get a first setup of the suspension. One observation, though is that
I can't get the rear suspension down far enough. This probably just needs some new springs. Luckily, I think they're
fairly easy to get.
 It's the end of May and I'm beginning to wonder if I'm going to get this thing done in
time. There still seems to be a lot to do and everything seems to be taking ages.
It's the end of May and I'm beginning to wonder if I'm going to get this thing done in
time. There still seems to be a lot to do and everything seems to be taking ages.
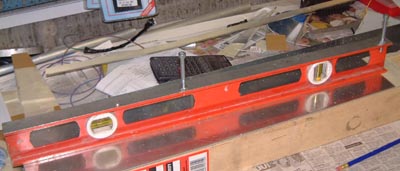
It was time to set up the suspension so it was time for the return of the camber device, as seen here. This is just a spirit level modified with a couple of M6 cap-head bolts. With the addition of some trigonometry the bolts are set to the desired camber and then you just press it against the wheel and get the bubble in the middle.
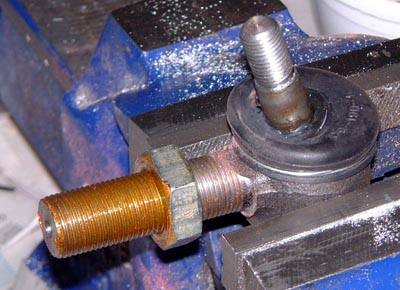 Of course, that took me half a day to do for the front suspension. Along the
way I had to modify the bottom ball joints by cutting off some of the thread, as otherwise you just get huge negative
camber. I cut about 7mm off the threads of this joint.
Of course, that took me half a day to do for the front suspension. Along the
way I had to modify the bottom ball joints by cutting off some of the thread, as otherwise you just get huge negative
camber. I cut about 7mm off the threads of this joint.
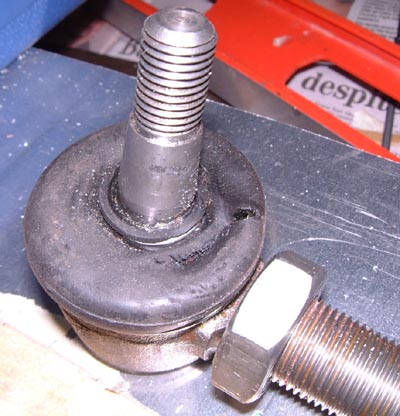 There is another problem with these balljoints, I now realise. Without cutting off this
bit of thread the front suspension doesn't articulate properly. This had had the effect of damaging the rubber
boots on both of the ball joints. I guess I'll have to buy some more at some point, but that won't a be huge issue.
There is another problem with these balljoints, I now realise. Without cutting off this
bit of thread the front suspension doesn't articulate properly. This had had the effect of damaging the rubber
boots on both of the ball joints. I guess I'll have to buy some more at some point, but that won't a be huge issue.
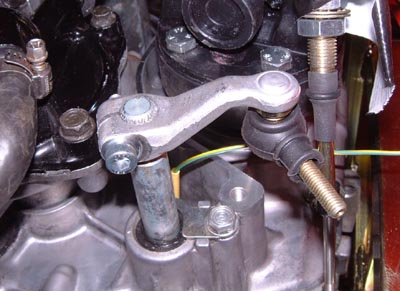
After all that I managed to get the proper camber. I then set up the tracking. Or, at least, I did it as well as I could. I couldn't manage to find a couple of long enough straight rods to do it by the usual method of tie-wrapping a long stick to each wheel.
I did it half well though. However, I think I'll have to chop some threads off the front track rods though.
 At the back of the car I took the springs out and let the car just sit on its bump stops for a while,
as I had problems the other week getting the ride height far enough down.
At the back of the car I took the springs out and let the car just sit on its bump stops for a while,
as I had problems the other week getting the ride height far enough down.
This showed that the dampers are an acceptable length. However, the springs are perhaps a bit too long. I'll phone Martin next week and ask him to swap mine.
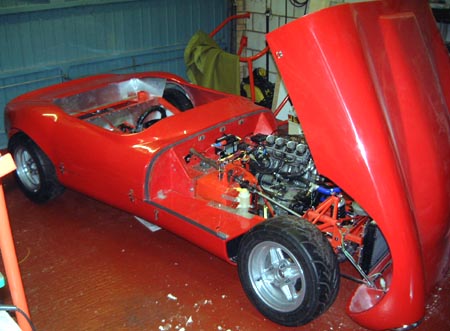
 For a bit of light relief, I spent a while fitting the air filter. I did look
at fitting the dynojet kit but it looks a bit of a fiddle. (For example, drilling out the air corrector and super-gluing
another brass doobrie in its place.) I'll do that as soon as I've got the first run out of the way.
For a bit of light relief, I spent a while fitting the air filter. I did look
at fitting the dynojet kit but it looks a bit of a fiddle. (For example, drilling out the air corrector and super-gluing
another brass doobrie in its place.) I'll do that as soon as I've got the first run out of the way.
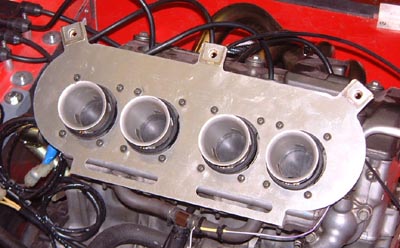
This is the backing plate for the air filter, held in place by the set screws that hold the carb trumpets in place.
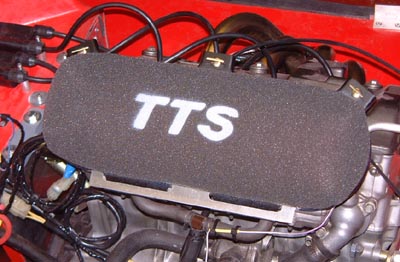 And this is the final thing.
Of course, the inevitable occurred and this doesn't really fit under the bonnet. I'm going to have to cut some sort of hole, but I'm not sure how or where yet.
 Another day now, and having blagged some aluminium off Chris, another
cam7er, I finished making the aluminium supports for the rear tub. These still need a bit of fettling but I'm much
happier with them.
Another day now, and having blagged some aluminium off Chris, another
cam7er, I finished making the aluminium supports for the rear tub. These still need a bit of fettling but I'm much
happier with them.
 After that I spent an absolute age fitting the roll cage. This wasn't difficult, just very time-consuming
getting everything measured, and drilled. Most difficult of all was getting the nuts that are effectively inside
the sidepods. This was eventually solved by drilling a large (50mm) hole in the top of the side pods near the bolts
and then making a special right-angle spanner by cutting up and old 17mm spanner and welding it back together in
an innovative shape.
After that I spent an absolute age fitting the roll cage. This wasn't difficult, just very time-consuming
getting everything measured, and drilled. Most difficult of all was getting the nuts that are effectively inside
the sidepods. This was eventually solved by drilling a large (50mm) hole in the top of the side pods near the bolts
and then making a special right-angle spanner by cutting up and old 17mm spanner and welding it back together in
an innovative shape.
However, it still doesn't fit me properly. I'm beginning to wish that I hadn't specified these side bars on the cage. I think the standard arrangement woiuld have been just fine.