October 17th
The studs supplied by Westfield don't fit! Sigh... They are just to wide to go through the hub properly. However, I managed to convince myself to take the wheel spacers out and bend the supports a bit so that it all fits. The only problem, as mentioned before, is that the brake pipe fowls the wing support, which I still think is poor. Perhaps I'll take a trip to Terry Nightingale's, a dealer in Saffron Walden who specialises in Westfields and see what others are like.
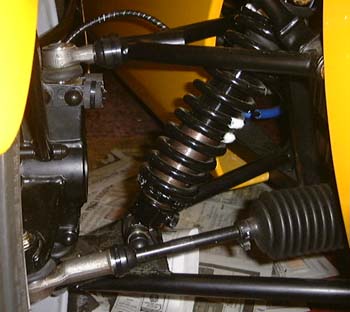
I had another go at bleeding the brakes. They are still very spongy and it seems as if one of the copper washers that supposedly seals the connection between the caliper and flexible hoses is not sealing properly. I'm not sure if this is the cause of the sponginess, but it is at least not clever. Not sure what to do about this.
October 21st
I've not had a chance to look at the Westfield for a few days, as I've been teaching a course in London and when I get home it's far too cold to go in the garage.
Today though I phoned Chris to ask about the leaking sealing washer. He suggested taking the pipe off and making sure there was no grot about, he also suggested turning the washer the other way round.
He said that when Westfield build the cars after the brakes are first bled then they jam a piece of wood between the pedal and the floor so that the pedel is held down and leave it overnight. The suggestion seems to be that the seals and everything benefit from the overnight pressure. I have to say that it sounds a bit unlikely but can't cause any harm.
One correspondent has suggested that the washers must be tightened and then filled up with fluid soon afterwards as otherwise they leak. Perhaps if the earlier suggestion fails then I'll just try replacing it.
October 23rd
 It's
the weekend again and I'm taking most of next week off so there should be lots of opportunities for Westfielding.
It's
the weekend again and I'm taking most of next week off so there should be lots of opportunities for Westfielding.
I started today by taking off the flexible hose that had the leaking sealing washer. Strangely, there wasn't huge quantities of fluid all over the place, just a bit. I cleaned up around the hose/caliper connection, inverted the sealing washer and put it all back together again. After bleeding the front brake circuit for the 876th time I did as Chris had recommended and jammed a piece of wood between the pedal and the chassis so as to keep the pedal hard on, with the intention of leaving it overnight.
At first sight, the sealing washer--as in the photo, is holding up.
I slapped some stuff on the inside of the front wings that might stop stones bashing up underneath and crazing the gelcoat. It's actually designed for shed roofs but it leaves a nice bungy layer behind. I can't quite decide if I need another coat or not.
 After
that I turned my attention to the bonnet. Ever since I fitted it I have been aware that one of the clips (needless
to say, the first one that I fitted) really needed moving, as the fit on one side was rather better than the other.
Of course, you can't move the catch that's actually in the bonnet so the bit that was attached to the chassis inside
the engine compartment would have to move.
After
that I turned my attention to the bonnet. Ever since I fitted it I have been aware that one of the clips (needless
to say, the first one that I fitted) really needed moving, as the fit on one side was rather better than the other.
Of course, you can't move the catch that's actually in the bonnet so the bit that was attached to the chassis inside
the engine compartment would have to move.
I made a bracket out of some aluminium angle, which involved quite a bit of cutting and bending, and attached the bonnet clip about 2mm away from where it was before. The end result was that, although not perfect, the bonnet fits rather better now. The only problem is this rather Heath Robinson clip inside the engine compartment.
October 24th
 It's
now time to start trying to set up the suspension, at least until I can get it to somewhere to set it up properly.
First of all I set up the ride height. This is fairly easy to do, the only problem is that the engine sump ends
up rather closer to the ground than the ground clearance that's quoted in the manual. I started to wonder if the
sump was actually the correct part, as there's lots of stuff around about making sure that the correct sump is
used with the Zetec engine. I think I'll phone Westfield tommorow and ask.
It's
now time to start trying to set up the suspension, at least until I can get it to somewhere to set it up properly.
First of all I set up the ride height. This is fairly easy to do, the only problem is that the engine sump ends
up rather closer to the ground than the ground clearance that's quoted in the manual. I started to wonder if the
sump was actually the correct part, as there's lots of stuff around about making sure that the correct sump is
used with the Zetec engine. I think I'll phone Westfield tommorow and ask.
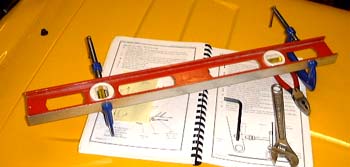
Next it was the camber. I measured this by using this device made from a spirit level and a couple of g clamps. The idea is that you can put the ends of the g clamp rods against the wheel edge and see whether or not the wheel is vertical. The addition of some washer of various thickness and some trogonometry allowed me to adject the camber settings of all four wheels. The problem is, all the taking of wheels off and on and jacking the car up and down is positively tedious.
The next adjustment is the tracking. The recommended technique is to stretch a length of string along the sides of the tyres along the side of the car. The only problem is, the wheel arches are in the way! More thought needed, I think.
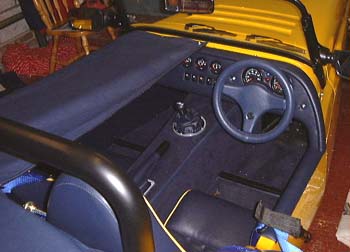
 I
made the long promised extended mounting for the steering wheel. This was made with 36mm worth of MDF and some
high-tensile bolts acquired from the usual place. I covered it in vinyl of the correct colour and the eventual
result looks quite good. However, I think I need to read the SVA manual again to see whether there's some problem
with doing this.
I
made the long promised extended mounting for the steering wheel. This was made with 36mm worth of MDF and some
high-tensile bolts acquired from the usual place. I covered it in vinyl of the correct colour and the eventual
result looks quite good. However, I think I need to read the SVA manual again to see whether there's some problem
with doing this.
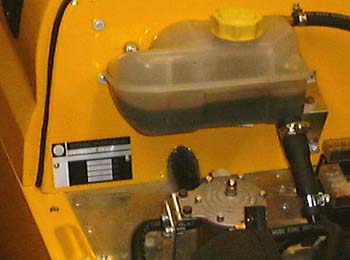
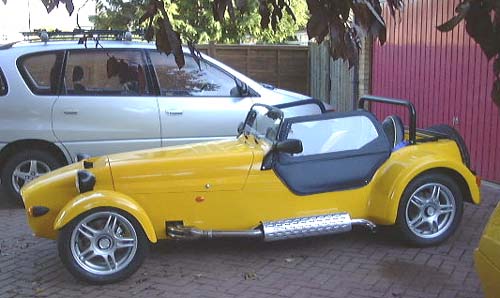
Finally, at the end of the weekend I mounted the VIN plate in the position shown here. That is, it's a real car now!
October 25th
Well, I managed to use the string techique to adjust the tracking, by just making sure the string went below the arches. This is clearly less accurate but as I'm going to have to have the thing properly set up anyway this seems a minor problem. Adjusting the front tracking is, of course, easy as you just have to twiddle the track rod ends. Doing the rear is a pain in the bum as you essentially have to take half the rear suspension to bits to move the appropriate rose joint.
 I
booked the car in for a pre-MOT test at the local(est) garage in Teversham today. Unfortunately, they can't fit
me in until Thursday. I might try for somewhere else tomorrow. The chap in the garage seemed a little phased by
the fact that he'd never heard of Westfield, along with the complete absence of a registration number.
I
booked the car in for a pre-MOT test at the local(est) garage in Teversham today. Unfortunately, they can't fit
me in until Thursday. I might try for somewhere else tomorrow. The chap in the garage seemed a little phased by
the fact that he'd never heard of Westfield, along with the complete absence of a registration number.
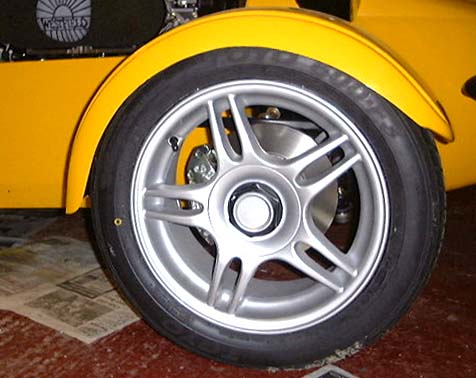
Fitted the caps that go in the middle of the wheels.
Fitted the rear view mirror. This is a standard Ford item that blocks off a significant amount of forward vision. Things would be a lot better, I think, with something mounting sticking up from the dash, but I'm a bit unsure about SVA compliance. I did note that according to the SVA manual a rear view mirror must be fitted unless it would provide no rearward vision. Does this mean that one could block up the "hole" in the middle of the roll bar completely and then leave off the mirror?
One thing I noticed today is that whenever I run the engine, the inside of the temperature gauge mists up?! What the hell can that be?
October 26th
 It
occurred to me that the bezels painstakingly detailed earlier would perhaps have sharp edges that would cause an
SVA failure. So, I took them off again and blunted them with the aid of some neoprene tubing. I'll have to think
of a more long term solution though.
It
occurred to me that the bezels painstakingly detailed earlier would perhaps have sharp edges that would cause an
SVA failure. So, I took them off again and blunted them with the aid of some neoprene tubing. I'll have to think
of a more long term solution though.
I managed to find another garage that could do a pre-MOT tomorrow. This one actually knew what a Westfield was, although I had to try hard to convince them that a MOT would not be better, on account of the fact that as it was not registered I could not get an MOT at all. (I wonder if this is actually true?)
Of course, the new place is further away. What a shame...
 The
other thing that needs "blunting" on the car is the various bits of the front suspension. The Dax Rush
has this rather nice bar that hold the front indicators that effectively exempts all the front suspension. For
the Westfield you get a bag full of assorted nut covers. Still, after a few hours they were all attached, although
it will be a real pain when I keep having to remove these and put them back.
The
other thing that needs "blunting" on the car is the various bits of the front suspension. The Dax Rush
has this rather nice bar that hold the front indicators that effectively exempts all the front suspension. For
the Westfield you get a bag full of assorted nut covers. Still, after a few hours they were all attached, although
it will be a real pain when I keep having to remove these and put them back.
In this photo you can't see, for example, the locknut on the top ball joint, because the cover is in place. Of course, as soon as the camber is adjusted then it will all have to come off again...
October 27th
 So,
it was pre-MOT day and I got the car out of the garage--miraculously the sun was shining--and set off for Bottisham,
a nearby village. I drove though the village that we live in making a lot of noise first though... The drive made
me really remember what I was doing this for as it was huge fun. I took it fairly carefully though, especially
over the level crossing as I'm very concerned about the (lack of) ground clearance. On the way, we drove along
a particular piece of road that we had measured, just using another car's odometer, at 1 mile the day before. The
Westfield reckons that it's 1.2 miles, so we need to check that.
So,
it was pre-MOT day and I got the car out of the garage--miraculously the sun was shining--and set off for Bottisham,
a nearby village. I drove though the village that we live in making a lot of noise first though... The drive made
me really remember what I was doing this for as it was huge fun. I took it fairly carefully though, especially
over the level crossing as I'm very concerned about the (lack of) ground clearance. On the way, we drove along
a particular piece of road that we had measured, just using another car's odometer, at 1 mile the day before. The
Westfield reckons that it's 1.2 miles, so we need to check that.
The car caused a lot interest at the garage but then we went into the MOT testing bay and went through all the tests. The emissions came out at 1.1% CO and 150ppm HC, which is rather miraculous as we have to get inside 3.5%/1200ppm. The brakes worked satisfactorily, although they are still mega-spongy. (I'm beginning to think that the master cylinder seals need replacing, or something similarly serious.)
Several of the mechanics gathered round for a look and the car was pronounced "very nice", which made me feel rather good.
After that it was time to go home again, sniff. On the way I adjusted the speedo calibration to the second of the two magic numbers that I have got from Westfield. Unfortunately, it still did not seem the same as the other car, although now closer. I'm going to have to try the "measured mile" technique, before the SVA somehow or other. I gave it a bir more welly on the way back, which of course made the journey even shorter.
On the way back I noticed that the car seemed to be running fairly cool, although it was a cold day. I'll have to keep an eye on this. I also need to re-adjust the clutch, which seems to have moved its "biting point" almost down to the bottom.
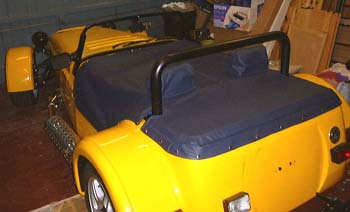 After
a convivial evening at the pub with the cam7 crowd I finished fitting the tonneau cover. I suspect that this particular
Westfield will spend most of its life with the tonneau on. They are usually fairly waterproof, other than the zip
down the middle which might need some fiddling with to help the sealing.
After
a convivial evening at the pub with the cam7 crowd I finished fitting the tonneau cover. I suspect that this particular
Westfield will spend most of its life with the tonneau on. They are usually fairly waterproof, other than the zip
down the middle which might need some fiddling with to help the sealing.
 Of
course, the real point of a tonneau is to unzip just the driver's side and drive like this. I used some Tenax fasteners
at the front corner of the tonneau--you can just about see the one here--to try and make sure that the wind doesn't
lift up the cover.
Of
course, the real point of a tonneau is to unzip just the driver's side and drive like this. I used some Tenax fasteners
at the front corner of the tonneau--you can just about see the one here--to try and make sure that the wind doesn't
lift up the cover.
While trying the car like this I was prodding the brakes. They are still dead spongy--even though they passed the MOT-thing today easily. The trick with the wood definitely does something for the first few minutes, but the effects fade. Somehow or other I really need to fix this.
October 28th
I decided to go to the other pre-MOT test as a) I realised that the previous place had not adjusted the headlights and b) I felt like charging around the countryside again. So, having worked out the longest possible but still vaguely believable route I set off there.
I got the chap there to adjust the headlights, test the brakes again and the emissions again. This time the brakes were again fine--in fact I think they are getting slowly better. Perhaps the problem was that the pads needed bedding in. I tried to ride the brakes a bit so this could well be the case. The emissions were again wonderful. This time I got a printout of the figures which at 0.79%CO and 89ppm were similarly amazing.
I really am just about done now. I need to cover up the hood studs a bit to make them SVA compliant, and I also want to slop a bit more bungy stuff inside the wheel arches but that will be just about it. What am I going to do now?
10 days to SVA.
October 30th
Slopped some more goo under the wheelarches. This should be the end of this. It's hard to know if it will actually make any difference, and which particular product I should have used, but it must be better than nothing--which is of course what's in the manual!
I've noticed for a while that the engine makes a squeaking noise when it's running. I had assumed that this was because I couldn't seem to get the alternator drive belt tight enough. However, I noticed today that if the clutch pedal is just touched it goes away. I wonder if I should worry about it?
9 days...
October 31st
This was a day to do a few adjustments. I bled the brakes, again, and yet again it made no difference. I'm going to have to assume that they will get better with use. I adjusted the clutch, which may have affected the squeaking noise, although it's hard to say.
I noticed a while ago that the sidescreens fit slightly differently from side to side (you can see the effect in the photo above). So, I took one of them off and filed out the mounting holes slightly. It was rather better when I finished. I fitted the hood again for this, and I noticed that the screen, or something in that vicinity, makes a ferocious vibrating noise when the engine is running. It seems to be something to do with the hood pulling the screen backwards, or possible the screen rattling in the plastic channel that locates the hood to the screen. This could be a long hunt...
And, for the first time, I washed the car. It's so small that it was dead easy, which is more than can be said for the other cars in the family.
8 days...
in case you've got to this frame directly and can't get out, go here.