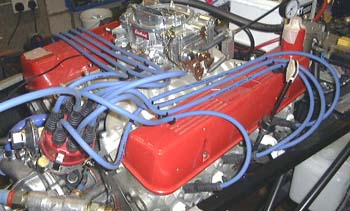
 I managed to get back to the Rush again, after the alarums
with the Westfield. The first job on the list was to tidy up the plug leads. I had bought some more of the clips
that retain the leads on the SD1 and with the addition of a couple of these, one on a specially made bracket attached
to the carburettor, it ended up looking a bit tidier.
I managed to get back to the Rush again, after the alarums
with the Westfield. The first job on the list was to tidy up the plug leads. I had bought some more of the clips
that retain the leads on the SD1 and with the addition of a couple of these, one on a specially made bracket attached
to the carburettor, it ended up looking a bit tidier.
Then it was back to the cooling system and associated bits. I had noticed a while ago that the home made alternator bracket flexed a surprising amount when the fan belt was pushed about. I had decided this was because the triangulation in the bracket didn't lead properly to the mounting points. This and the fact that Trevor Turner had pointed out that you could rotate the front cover of the alternator and put the adjustment lug in a better position made me think it was better to remake it.
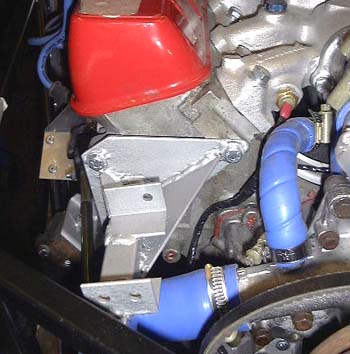 So, I got stuck in and did so. The new bracket is pretty much the same as before,
but hopefully a bit better made.
So, I got stuck in and did so. The new bracket is pretty much the same as before,
but hopefully a bit better made.
With the front cover the other way round, the intention is to brace the alternator to some sort of bracket that hands off the water pump bolts at the bottom right of this photo.
With that done I decided to close up the front of the car again. Before I did this I modifief all the pipework slightly. I had been worried that having home made pipes was find but the lack of a flare or lump at the end of them could make the hoseclips fall off. Dean Heatley, another Rush builder, suggested to me that a rivet through the side of the pipe (on the water side of the jubilee clip) would server the same job which is a dead clever idea.
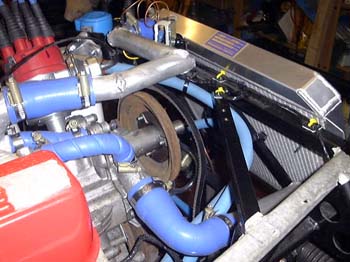 So, I took the pipes off, added some rivets and put the whole lot back together again,
including re-mounting the radiator on the front of the car.
So, I took the pipes off, added some rivets and put the whole lot back together again,
including re-mounting the radiator on the front of the car.
Of course everything is not getting very tight around here, and I haven't added the bleed pipe yet.
I then remounted the alternator bracket and the alternator itself, when I struck a bit of a problem.
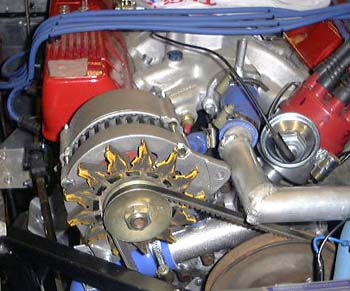 The problem is that with the alternator cover the other way round the adjustment
lug fouls, very slightly, the top hose.
The problem is that with the alternator cover the other way round the adjustment
lug fouls, very slightly, the top hose.
Resolving this seems to imply either getting a slightly longer fan belt (but that puts the alternator fan rather closer to the chassis), grinding a lump off the alternator (but it's still going to be very close) and moving the top hose (which is difficult to do without constraining the static timing advance setting for the distributor.
The obvious thing was to retire hurt for the evening.
 After a bit more rooting about, I decided that grinding a bit off the alternator
would do, although it would still be very tight. So, I did this and made a bracket that is attached to two of the
water pump mounting bolts to provide the drive belt adjustment. This is all very firm now and if you push the taut
belt the alternator doesn't move at all, which is more than can be said about it before.
After a bit more rooting about, I decided that grinding a bit off the alternator
would do, although it would still be very tight. So, I did this and made a bracket that is attached to two of the
water pump mounting bolts to provide the drive belt adjustment. This is all very firm now and if you push the taut
belt the alternator doesn't move at all, which is more than can be said about it before.
I ended the day Hammeriting the bracket. After I've put it all back together, which is only a 5 minute job, I think the front of the engine is all sorted. Doing everything up here has taken absolutely forever, I'm a bit wary about the process of having to take it all apart at some point, for example if the engine has to come out, but for now I'll leave it alone!
in case you've got to this frame directly and can't get out, go here.