 It's now back to tweaking the car in preparation for the next outing. The next race is
scheduled for Silverstone on the bank holiday weekend of 28th and 29th of this month. Before then I'm also planning
on testing at the track on the 27th and I also have a, currently provisional, booking for a track day at Cadwell
on the 19th. Not too sure whether I'll use that though as, to be honest, Cadwell gives me the collywobbles. It's
a great track but it's very narrow and I really don't want to bend the car again. I may not be able to resist it
though, especially as lots of local friends are going.
It's now back to tweaking the car in preparation for the next outing. The next race is
scheduled for Silverstone on the bank holiday weekend of 28th and 29th of this month. Before then I'm also planning
on testing at the track on the 27th and I also have a, currently provisional, booking for a track day at Cadwell
on the 19th. Not too sure whether I'll use that though as, to be honest, Cadwell gives me the collywobbles. It's
a great track but it's very narrow and I really don't want to bend the car again. I may not be able to resist it
though, especially as lots of local friends are going.
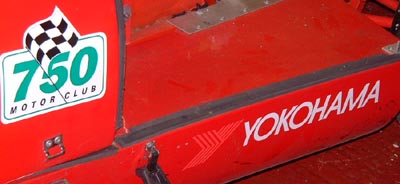
Before then I need to get the car sorted again. When I was at Lydden I managed to get the stickers that I needed for the car, at last. I really like the Yokohama sticker which is one of those clever devices where the separate letters are actually separate stickers, but held so that the spacing is correct.
I've sorted out a system for keeping records of the various races and test sessions. Hopefully so that I can watch how things improve, or otherwise. One consequence of this is that I now know that the car used 0.35 litres of fuel for each minute of the second race at Lydden. I shall be able to use that sort of information to control how much fuel I put into the car. It also means that the tank will last for about 50 minutes. (It's a 20 litre tank but the last 2 litres seem to be beyond the ability of the outlet pipe to suck up.
Back to the car I took it off the trailer again and have cleaned it up. Like the last race it had huge quantities of rubber all over the place. It almost seems as though I've got a tyre's worth in the car.
On a similar note it's clear that the tyres are still rubbing on the bodywork. I shall have to fix this properly now by actually dremelling away from of the bodywork. I didn't start doing that today as it will make a lot of mess and I didn't feel up to it. I had a look at some other cars in the paddock and it's clear than many of them do have bodywork that's modified in this way. I'm a bit concerned that the rear tub will end up even floppier after doing this, so I may just have to bond some more matting in to replace the strength I shall be removing. I shall also have to grind away from of the bonnet, but that seems less serious.
I still have problems with the transmission clonking. I spoke to Mark Fisher about this again at Lydden and he agreed that he could lend me a new diff to try. However, he's been on holiday since then and the chap I spoke to at the factory didn't seem to know where a diff might be anyway.
On with the fettling. This evening I started draining out the engine oil. The decision is to change the oil every other race. I say "started" because I need a filter in order to finish it so I'll go and buy one tomorrow. (With synthetic superbike oil the price it is this is going to be expensive!)
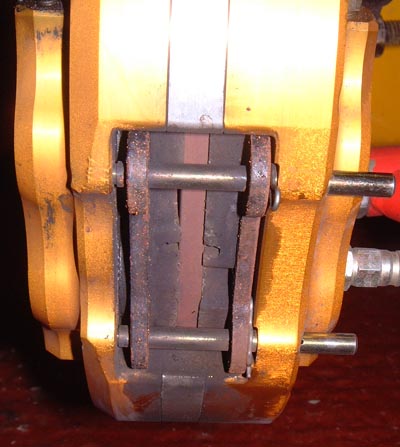 I noticed as I was pushing the car about that it seemed to be more
difficult to move than usual, due to one of the front wheels not moving as smoothly as usual. After every other
outing I've stripped and cleaned the brakes so I started doing it again. The time I found that one of the pad retaining
rods had rotated around and the locating R clip has moved behind one of the pads which was causing the brakes to
bind slightly. (That must explain why I was slow at the last race! See, I'm developing my racer's excuses already...)
I noticed as I was pushing the car about that it seemed to be more
difficult to move than usual, due to one of the front wheels not moving as smoothly as usual. After every other
outing I've stripped and cleaned the brakes so I started doing it again. The time I found that one of the pad retaining
rods had rotated around and the locating R clip has moved behind one of the pads which was causing the brakes to
bind slightly. (That must explain why I was slow at the last race! See, I'm developing my racer's excuses already...)
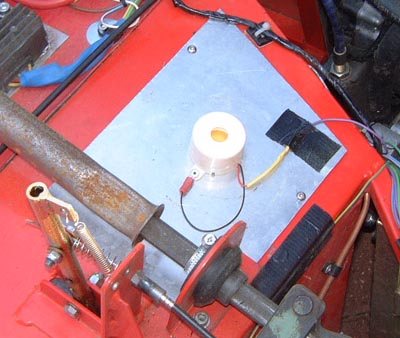
You can see the aforesaid R clip on the lower of the two rods in this photo.
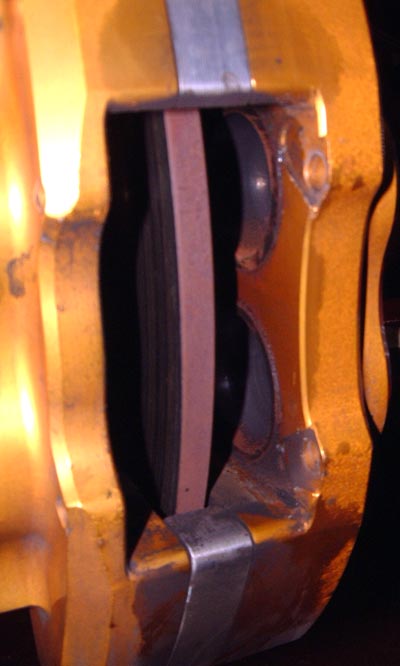 You can also see the general grotty nature of the brakes, seen here after I removed the
pads. That was a non-trivial process on account of the brakes being, sort of, jammed on.
You can also see the general grotty nature of the brakes, seen here after I removed the
pads. That was a non-trivial process on account of the brakes being, sort of, jammed on.
Obviously the brakes get used very hard and get very hot. What's more, modern asbestos-free linings seem to generate much more unpleasant grot than the old poisonous variety.
Previously, I've been cleaning this stuff up laboriously by hand. However, this time I think I might try and get hold of some of the commercial brake cleaning products. They're supposed to clean this sort of stuff up so perhaps we'll see if they're as efficacious as they're claimed to be?
Back on the track front I decided to cave in today and paid my money for the track day at Cadwell on the 19th. Whatever happens, after this I'm going to be really slow through the hairpin...
 At the weekend I got on with a bit more fettling on the car. I cleaned up the brakes with
some brake cleaner (surprise!) and put everything back together. Having drained the oil out I changed the filter
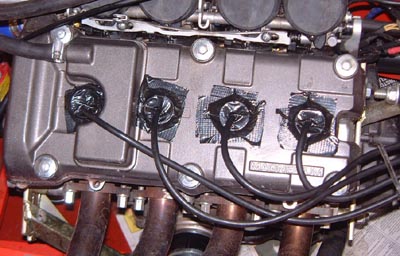
and refilled with some fresh oil. I was about to take the plugs out to spin the engine around and realised that
there was quite a lot of rubbish down the shafts that lead to the plugs. The extended plug leads that I have don't
have the big rubber grommets on the top of them that I think the standard ones do, meaning that there was a possibility
of stuff getting in there. So, I set to with vacuum cleaner and various pliers and prodding devices until I got
all the bits out. They were mostly either bits of rubber or small pieces of gravel. The latter, at least, I don't
want inside the cylinders.
At the weekend I got on with a bit more fettling on the car. I cleaned up the brakes with
some brake cleaner (surprise!) and put everything back together. Having drained the oil out I changed the filter
and refilled with some fresh oil. I was about to take the plugs out to spin the engine around and realised that
there was quite a lot of rubbish down the shafts that lead to the plugs. The extended plug leads that I have don't
have the big rubber grommets on the top of them that I think the standard ones do, meaning that there was a possibility
of stuff getting in there. So, I set to with vacuum cleaner and various pliers and prodding devices until I got
all the bits out. They were mostly either bits of rubber or small pieces of gravel. The latter, at least, I don't
want inside the cylinders.
I could then spin the engine round to check I'd got oil pressure and then put it all back together. This time, though, I put some, inevitably, gaffa tape over the holes. Not pretty but hopefully it will work.
While I had the plugs out I had a good look at them, especially after the problems I had with non-functioning plugs. They looked fine: not too sooty, not too white.
 The one thing I'm aware of where the car could fail scrutineering is that it doesn't at the moment
have a horn. (The cars are supported to be completed to MOT regulations.) A while ago I bought a high power piezo
buzzer and I now wired it in. It doesn't make a noise quite like a car horn but it is moderably loud. Hopefully,
if they do check it, I won't be pulled up for taking the piss.
The one thing I'm aware of where the car could fail scrutineering is that it doesn't at the moment
have a horn. (The cars are supported to be completed to MOT regulations.) A while ago I bought a high power piezo
buzzer and I now wired it in. It doesn't make a noise quite like a car horn but it is moderably loud. Hopefully,
if they do check it, I won't be pulled up for taking the piss.
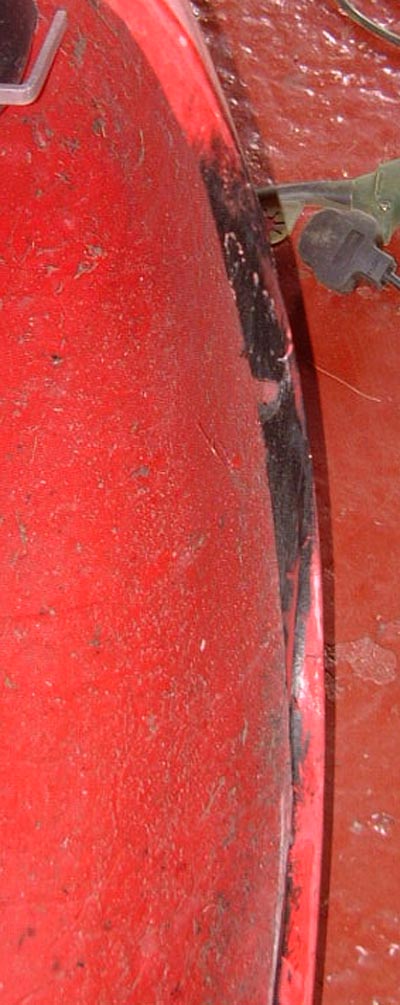 Next, I wanted to do something to the bodywork. It's still the case that it's bashing into the wheels.
In particular there is a small return around each wheel arch and it's mostly this that is touching the wheels.
There's even one place, as in the picture, where the wheel has actually worn through the return.
Next, I wanted to do something to the bodywork. It's still the case that it's bashing into the wheels.
In particular there is a small return around each wheel arch and it's mostly this that is touching the wheels.
There's even one place, as in the picture, where the wheel has actually worn through the return.
So, I set about grinding off the returns using a drill and a flap wheel. An hour or so later, after I'd got a lot of red and yellow dust all over the garage, I'd done. In the places where it was obvious I needed a bit more clearance, such as the bit in the photo, I did grind it back a bit further. I was worried that this was going to look a bit naff but in fact it looks fine.
One problem I did find, though, was that the rear tub is suffering a bit from the Mallory incident. Around the left rear wheel arch there's a couple of patches where the gelcoat is cracking more and more and getting very fragile. So, I set to with some chopped strand mat and some resin and patched it all up. Obviously I've added a bit of weight but it's ended up a lot stronger now. Probably something else will break next.
With a decent amount of clearance I spent a while checking ground clearance again. I'm certainly getting quicker at this!
I phoned Mark Fisher again today to chase up the diff he said he'd let me have to see if it made any difference to the clonking. He said he'd get something out to me soon, which should mean I have to spend a while at the weekend fitting it. Hopefully not too much as I promised Adrian that I'd help him with setting up his Genesis at the weekend, in preparation for a track outing next week. I'm guessing that to get the driveshafts out I will need to take the back plate off the diff to squeeze a circlip together. Tedious, but it will have to be done...
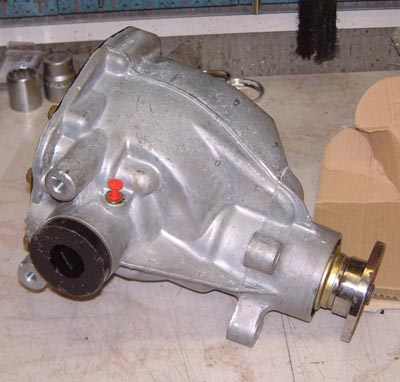 Very promptly, I got a parcel from Mark Fisher today with a new diff in it. This looks
pretty much exactly the same as the one I've already got, which isn't very surprising!
Very promptly, I got a parcel from Mark Fisher today with a new diff in it. This looks
pretty much exactly the same as the one I've already got, which isn't very surprising!
With luck I'll be able to fit this at the weekend so as to try it out soon. One of the problems of having a race only car is that you can't just drive it up and down the road to see what it's like. I suppose I could trailer it to a nearby car park or something, but most of them are either for 24 hour supermarkets or equipped with speed bumps, neither of which is very helpful.
I booked a test day at Oulton Park today, meaning that I have now got the following track outings sorted:
- A track day at Cadwell Park on August 19th
- Silverstone test day on August 27th
- Racing at Silverstone on August 29th
- A test day at Oulton Park on September 3rd
- Racing at Oulton on September 4th
I spend an inordinate amount of time worrying about what happens if I bend the car again, so looking at that lot I feel as if it's inevitable. Ho hum... What's more, after finishing at Lydden all hyped up and wanted to get out again, now I'm getting nervous all over again.
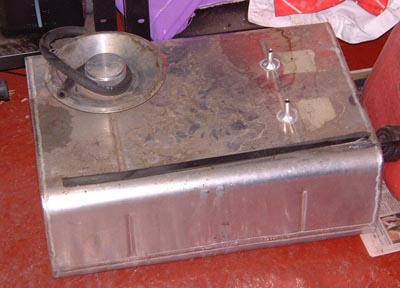 It was time to attack the diff so I removed the rear bodywork of the car and then removed
the petrol tank. I had wondered whether it was sensible having a tank that had both the feed and vent tubes on
the top as it means that there's inevitably a bit of fuel that can't be picked up; in my case about 2 litres. However,
it makes taking the tank out child's play as you don't end up with fuel all over the floor.
It was time to attack the diff so I removed the rear bodywork of the car and then removed
the petrol tank. I had wondered whether it was sensible having a tank that had both the feed and vent tubes on
the top as it means that there's inevitably a bit of fuel that can't be picked up; in my case about 2 litres. However,
it makes taking the tank out child's play as you don't end up with fuel all over the floor.
 After that, it seemed to me that I ought to take the back plate off the diff.
The driveshafts are located by circlips that go in a groove near the end of each shaft. Originally the shafts were
fitted to the diff by just shoving until the shaft went home and the clip clicked out a bit. I am assuming that
I need to prod this clip back so that I can pull the shaft out.
After that, it seemed to me that I ought to take the back plate off the diff.
The driveshafts are located by circlips that go in a groove near the end of each shaft. Originally the shafts were
fitted to the diff by just shoving until the shaft went home and the clip clicked out a bit. I am assuming that
I need to prod this clip back so that I can pull the shaft out.
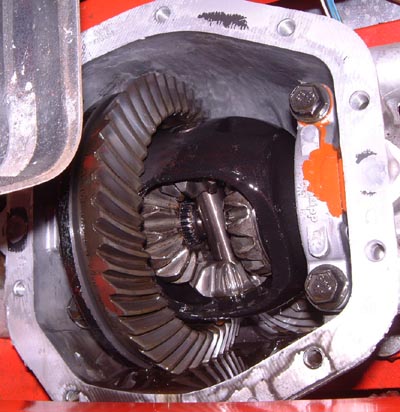
So, I took out the backplate securing bolts (there are an awful lot of them considering that that back plate just stops the oil falling out). As the plate had been set in place with some liquid gasket, which was now solid, I needed to prise the plate off. I did this and, inevitably, got gear oil all down my arms and ultimately onto the desk that I am now typing at. Ho hum...
Once the oil had drained out I could take the plate off totally and have a squint inside. It looks perfectly normal in there. What's more at first sight the gears looked essentially untouched. This probably isn't surprising as this diff is designed for a 4x4 that's intended to crawl up the side of mountains. However, it doesn't help to decide where the appalling clonking is coming from. I have a strong suspicion that changing the diff is going to make diddly-squat difference.
The problem is that, at least at first sight, I can't see the retaining circlips. I wonder if I should have just pulled hard on the shafts? OK, the oil would have all fallen out but that's no big deal. Actually, it may be that it wouldn't have anyway as there isn't that much in there when it's all sitting still.
Oh well, tomorrow I'll see if I can get further with this. I might phone the good folks at the Kit Car Workshop to ask about taking out the driveshafts.
 I phoned Mark Fisher yesterday and asked about getting the driveshafts out. Apparently, the thing to
do is just to lever between the diff and the inner CV joint housing until it pops out.
I phoned Mark Fisher yesterday and asked about getting the driveshafts out. Apparently, the thing to
do is just to lever between the diff and the inner CV joint housing until it pops out.
So, today it was on with the disassembly. It's a bit dispiriting really, taking it all apart. What's worse, I may just have to do it again to put "my" diff back in again. Anyway, I loosened off the wheel hubs so that the driveshafts could move outwards. I'm trying to avoid taking all the bearings apart again but it may well be that I fail. With a bit of movement I could try getting the shafts out and, with suitable bit of chunky aluminium I levered away and they popped out. I can't admit that it was easy but they did come out. With that done I could put the backplate back on the diff, using some liquid gasket to seal it up-I hope.
I then set about disconnecting everything else, which was just tedious really, mainly because the access to things is now worse than when I put it all together as things like the reversing unit are now in place and I was trying to avoid taking too much apart.
Still, everything was disconnected and then I manoeuvred the diff out. That sounds easy but it needed fair amount of pushing and shoving to find a route that was feasible.
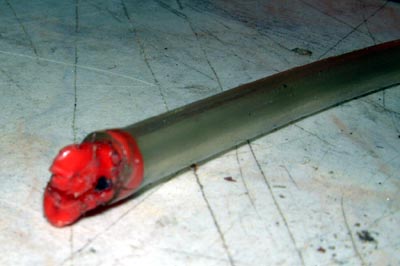 One interesting little snippet is that the plastic gadget to which the breather hose is
attached has melted, and probably sealed up the breather in the process. This seems potentially bad news, although
it's hard to see whether this could have been related to the clonking issue.
One interesting little snippet is that the plastic gadget to which the breather hose is
attached has melted, and probably sealed up the breather in the process. This seems potentially bad news, although
it's hard to see whether this could have been related to the clonking issue.
With that done I could look at getting the new diff in. For some reason, after the messing about that it took to get the old one out, this one just slotted into position very neatly. It was then dead easy to bolt it back in.
With that, I declared that I was knackered! Hopefully I will get some more done tomorrow, although I'm off to help Adrian get his racer set up. The big problem is going to be getting the driveshafts in. It took ages to do this originally and there's rather less room to manoeuvre now as there's all sorts of stuff in the way. I may end up taking more bits off, which is even more tedious...
 It's taken a bit of a while to write this entry, so I'm doubtless going to forget
all sorts of things. First up, as I suspected, I spent ages trying to get the driveshafts into the new diff. After
a few hours struggling away I started to think about it all a bit more. The shafts are held in place by a snap-ring
very close to the end of the shaft. I suspect the reason they're so hard to get in is that it's hard to get the
shaft central, and the snapring concentric to the shaft. What's more, just hitting the end of the shaft with a
big hammer seems very brutal as the force has to be transmitted through the tripods in the middle of the CV joints.
It's taken a bit of a while to write this entry, so I'm doubtless going to forget
all sorts of things. First up, as I suspected, I spent ages trying to get the driveshafts into the new diff. After
a few hours struggling away I started to think about it all a bit more. The shafts are held in place by a snap-ring
very close to the end of the shaft. I suspect the reason they're so hard to get in is that it's hard to get the
shaft central, and the snapring concentric to the shaft. What's more, just hitting the end of the shaft with a
big hammer seems very brutal as the force has to be transmitted through the tripods in the middle of the CV joints.
I had a look through the Ford Sierra manual for the equivalent situation wrt their diff/shafts. The situation there seems to be identical except that the shafts don't have the snap-rings and the shafts just push into the diff and are held in place, I guess by the compression on the CV joints.
So, I wondered what would happen if I just took the snaprings off. A rather radical approach, perhaps, but essential given the fact that time was disappearing before the Cadwell track day. After about a day spent musing about it, I decided to at least try it. Of course, after that fitting everything back together was essentially trivial. I reasoned that I would take it to Cadwell and look at it all very carefully to see whether it was leaking, and whether there was anything like a nasty oscillation of the shafts caused by them not being held in place. However, I did have a careful look at the snap-rings and it's clear from the complete lack of wear on them that they essentially do nothing once they're in place.
With that I put the rest of the car back together and got everything ready to go up to Cadwell on Thursday. As mentioned I was a little wary about Cadwell because of its narrow nature and the memory of previous incidents at the hairpin.
However, when the day came it was great. The weather was fine, even though the forecast had been slightly worrying. As it was a track day and we were forbidden to do any timing it was hard to know if I managed to work up to a decent time or not, but I think I was getting there. Certainly some of the circuit was a real rush. In particular Coppice, which is an uphill left at the end of the pit straight, was fantastic as with a certain amount of work it was possible to take it flat, the uphill aspect making it possible to stay on the road. In fact, Coppice and the following two corners, Charlies 1 and Charlies 2, make a great sequence. I'd never driven at speed around Cadwell before it was really, really, great.
Even better, careful examination of the diff throughout the day showed no sign of oil leaking out. What's more, the clonking, although still there, is dramatically improved; to the point that I didn't think about it at first.
Best of all was that I seemed to be quick enough. During the track day at Croft a while ago I was conscious that loads of people were passing me. Here I was passing loads of people and there were just a couple of people that were quicker than me, both of whom had considerable racing experience. That hopefully means that I'm still on some sort of track.
There were, however, a couple of problems that arose during the day. The first is that I was feeling queasy. I've always suffered from travel sickness and avoid things like theme park rides as a consequence. The usual rule in a car though is that when you're the driver it's no problem. However, I found that Cadwell didn't quite work like this and at the end of one session in particular, admittedly about 25 minutes in, I felt particularly ill and really thought I was about to throw up inside my helmet which would have been no fun at all. I remember reading many years ago that James Hunt suffered from the same sort of thing, although in his case in a cockpit of an F1 car. There were a lot of fellow cam7ers at Cadwell and Matt in particular thought this was hilarious. Hmmphhhh.
However, it could just have been that we got up too early and had therefore only had breakfast a long time before.
The second problem is rather more serious. After I got back to the paddock after my last session a couple of guys there pointed out that I was leaving a trail of some fluid or other. We had a quick look while we were there and it became clear that it was engine oil. This is clearly not good and at the time I couldn't see where it was coming from, although the oil filter must be a good candidate, especially as I had changed the oil and filter just the other day.
But, we just put the car back on the trailer and dragged it home.
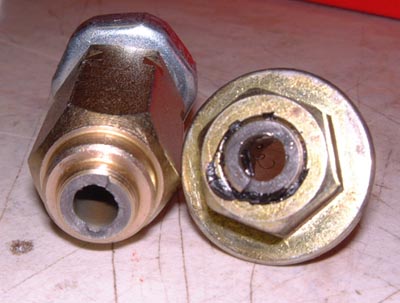 Today I finally got some time to have a look
and see how it was. First of all I cleaned up a bit and it was really unclear where the oil can have been coming
from. I then noticed that the tee-piece that the oil pressure gauge capillary connects to seemed a bit loose. (The
standard engine just has a low pressure light and I fitted the tee-piece so that I could have an oil pressure gauge.)
So, I prodded it around a bit and it came away in my hand! I have to admit that when I fitted this bit I was a
bit concerned that I might have over-torqued this a bit. Luckily, rather than just going into the block the tee
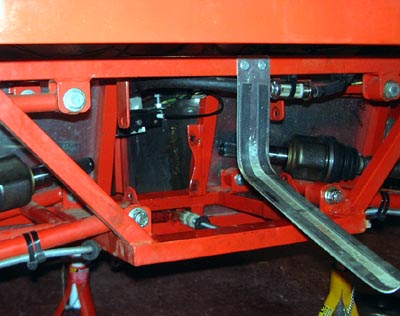
piece goes into bush that bolts into the block. This photo shows the tee piece on the left (with the low pressure
warning light switch visible at the far end) and the aforesaid bush on the right.
Today I finally got some time to have a look
and see how it was. First of all I cleaned up a bit and it was really unclear where the oil can have been coming
from. I then noticed that the tee-piece that the oil pressure gauge capillary connects to seemed a bit loose. (The
standard engine just has a low pressure light and I fitted the tee-piece so that I could have an oil pressure gauge.)
So, I prodded it around a bit and it came away in my hand! I have to admit that when I fitted this bit I was a
bit concerned that I might have over-torqued this a bit. Luckily, rather than just going into the block the tee
piece goes into bush that bolts into the block. This photo shows the tee piece on the left (with the low pressure
warning light switch visible at the far end) and the aforesaid bush on the right.
I managed to get the broken piece out of the bush with an extractor (the sort that you just bang into the end) and i could then reassemble the engine, albeit now without a pressure gauge. With it like this I refilled with oil. It seems as though it must have lost about half a litre, which isn't a huge amount so with luck not too much damage has been done. Next week I'll order a new tee piece (from Think Automotive) and hopefully be able to get it all back together in time for Silverstone at the end of the week.
I got the finals details for Silverstone this week. There's an all-comers race scheduled for the Saturday that I just might think about doing. It would add another race to the weekend if nothing else.
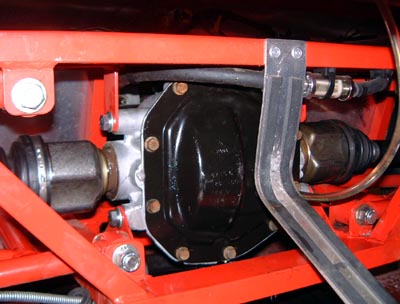
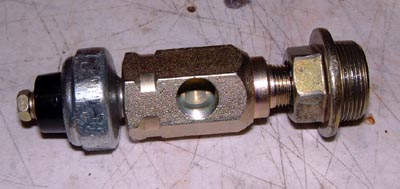 The new bits arrived from Think yesterday and in the evening I put it all back together
again. This photo shows the new tee piece screwed into the bush from the block and with the low pressure warning
light switch screwed into the other end. The hole facing towards the camera is where the adapter goes for connection
to the oil pressure gauge capillary.
The new bits arrived from Think yesterday and in the evening I put it all back together
again. This photo shows the new tee piece screwed into the bush from the block and with the low pressure warning
light switch screwed into the other end. The hole facing towards the camera is where the adapter goes for connection
to the oil pressure gauge capillary.
Once I'd got that lot back together properly (after a short hiatus caused by confusing 1/8" BSP and 1/8" NPTF; you really would think the world had got enough pipe thread standards by now) I started the engine again and everything seemed to be back to normal. However, I shall have to look carefully at the oil pressure when I get out at Silverstone at the end of the week.
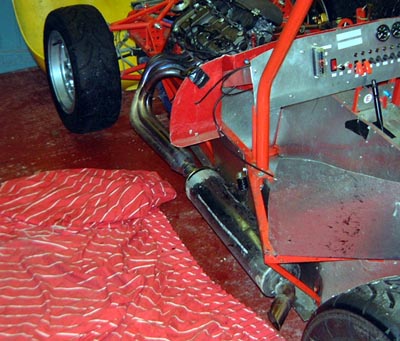 With that sorted I got back to prepping the car for the next outing: cleaning
up the wheels and bodywork mostly. I did take the precaution of taking off the left hand sidepod again. It seems
as though the bolts holding the can to the flange on the exhaust headers work loose over time and, sure enough,
they had done so again.
With that sorted I got back to prepping the car for the next outing: cleaning
up the wheels and bodywork mostly. I did take the precaution of taking off the left hand sidepod again. It seems
as though the bolts holding the can to the flange on the exhaust headers work loose over time and, sure enough,
they had done so again.
Apart from that, I took the chance to clean up some of the oil that had got into here.
One interesting observation is that the paint from the front most part of the exhaust can seems to be falling off. I suspect this is because the can gets a lot hotted in here that it would when attached to a 'bike.
With the sidepod back, I put all the bodywork back and re-torqued (for the several hundredth time) the wheel nuts. I just need to sort out my tools now and I'm ready to get to Silverstone testing on Friday. Unfortunately, the weather forecast is rather grim at the moment.
I've also sent in an entry for an additional race that's happening on Saturday. This is a "closed wheel all-comers" race which are reckoned to be quite fun by those in the know. I'm slightly concerned about mixing it with a lot of adrenaline-crazed stock hatch drivers but it could be fun to be in a race with lots of different cars.