 One of the other consequences of the accident was that the front right wheel
looked like this. Unfortunately, this is one of the "good" set of wheels that I originally got from Martin
Bell in that they were blasted and powder coated. The others that I bought later were in original condition and
a fair bit naffer, if that's a word.
One of the other consequences of the accident was that the front right wheel
looked like this. Unfortunately, this is one of the "good" set of wheels that I originally got from Martin
Bell in that they were blasted and powder coated. The others that I bought later were in original condition and
a fair bit naffer, if that's a word.
However, I seem to have located (with the aid of my racing God friend Matt and the Bookatrack web site) another set of similar Ford alloys. At least that will mean that I've got a few spares for next time.
I took the chassis up to the Kit Car Workshop the other day. The current plan is to cut the entire front end off it and weld in the front of a new chassis. Hopefully that'll mean that it's almost as good as new.
I must admit that the Fury chassis, though, is starting to look distinctly second rate. The latest Phoenix chassis, as seen on the Stuart Taylor website, is a work of art in comparison. If I was starting to build a race car now it's very unlikely that I would build a Fury. I know that I couldn't fit in the older Phoenix chassis but Ian Gray (from Stuart Taylor) assures me that there's much more room in the new one. In fact, full marks to him for trying to sell me one of his new chassis about 30 minutes after the accident!
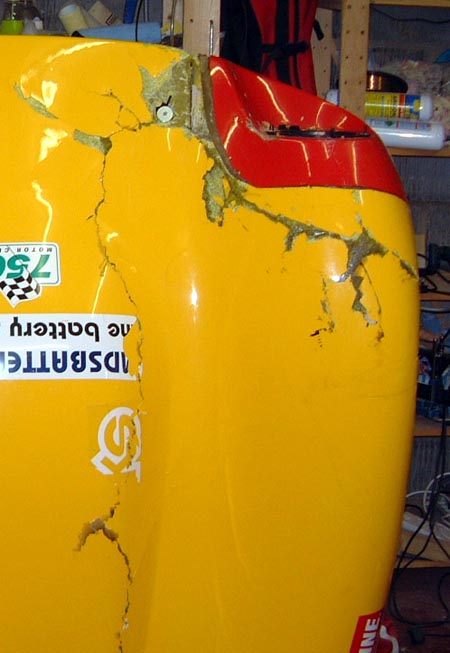
 With the chassis off, attention has turned to the bonnet. This was in this sorry state.
Luckily, I have most of the bits for it which the marshals picked up from the track and put into the car.
With the chassis off, attention has turned to the bonnet. This was in this sorry state.
Luckily, I have most of the bits for it which the marshals picked up from the track and put into the car.
All the books say that you can repair GRP like this by holding the bits in the right position and bonding new matting on the back and then fixing the surface. This is essentially what I did with the Mallory crash but this is going to be rather more difficult to do, As you can see, in addition to the missing corner there's a long crack which has almost cut the bonnet in half.
Still, I set too with the bits and some sticky tape and tried to solve the 3D jigsaw puzzle that I had.
 It took rather a long time, but it eventually looked like this. (I started off with black
tank tape but eventually decided that masking tape worked better.
It took rather a long time, but it eventually looked like this. (I started off with black
tank tape but eventually decided that masking tape worked better.
This doesn't seem to be too bad. However, there's a problem in that...
 ...this bit was missing from the jigsaw box. Either someone's hidden it so that they can
be the last person to put a bit in the jigsaw, or it was vapourised by the accident.
...this bit was missing from the jigsaw box. Either someone's hidden it so that they can
be the last person to put a bit in the jigsaw, or it was vapourised by the accident.
This photo is actually of the bonnet after I'd bonded together all the bits on the back, although I plan on adding another layer.
However, I have a cunning plan in that this bonnet is still sitting outside my back door. I can't see why I shouldn't be able to cut away a chunk of that and bond it into this bonnet. Admittedly the construction's different-the red one uses woven matting and the yellow one chopped strands-but that shouldn't cause too much of a problem as it's really only being used as a sort of one-time mould.
As you can tell, though, I'm going to have to do a lot of surface preparation once all this is done. I've ordered some more wet and dry paper, borrowed a spray gun and I'm going to try and get some matching paint from somewhere. If the worst comes to the worst, I may just end up spraying the whole of the bonnet a slightly different yellow.
 I eventually decided to indeed respray the whole of the bonnet as I haven't managed to
find a decent match for the yellow of the bonnet. In fact, I suddenly thought about getting some Triumph Inca Yellow
paint. Back in the 80s (or was it the 70s?), I nearly bought a Triumph Dolomite Sprint in this colour and I always
wished I had done. Anthea also had a Mini on order in this colour which never actually arrived. So, once it was
suggested to me then for old time's sake it seemed such a good idea. So, I ordered 2 litres of cellulose in this
colour and I need to get the bonnet into one piece for my first attempt at serious spraying.
I eventually decided to indeed respray the whole of the bonnet as I haven't managed to
find a decent match for the yellow of the bonnet. In fact, I suddenly thought about getting some Triumph Inca Yellow
paint. Back in the 80s (or was it the 70s?), I nearly bought a Triumph Dolomite Sprint in this colour and I always
wished I had done. Anthea also had a Mini on order in this colour which never actually arrived. So, once it was
suggested to me then for old time's sake it seemed such a good idea. So, I ordered 2 litres of cellulose in this
colour and I need to get the bonnet into one piece for my first attempt at serious spraying.
As I said above, I cut a bit out of my old red bonnet and started stitching it into the yellow one. It was rather tricky working out where to cut things, due to the complex shape of the curves. However, after a while it started to make some sort of sense and I manage to bond in the new bit in the position shown here. To be honest the red bit is not in the best of condition either. It does, though, have the complete shape without a bit being missing. So, hopefully I can just keep patching it up if necessary.
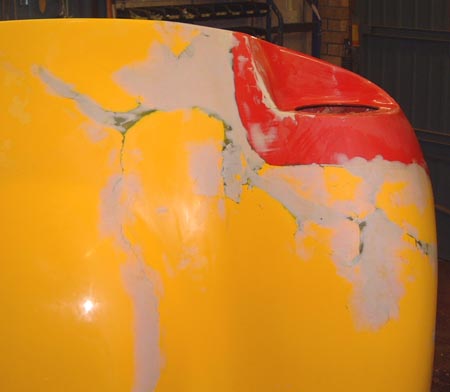 I spent a long time with the bonnet. First of all grinding away the worst of the irregularities
and then working with some more resin and eventually filler and lots and lots of wet-and-dry.
I spent a long time with the bonnet. First of all grinding away the worst of the irregularities
and then working with some more resin and eventually filler and lots and lots of wet-and-dry.
After many iterations it looked like this. To be honest up close it isn't that good but I was just knackered. All the same, it is a race car and the same thing might happen again at the next race. Assuming there ever is a next race of course...
 When I ordered the paint I ordered some primer too. However, I thought I'd have a quick
spray of this bonnet to see what it looked like. Experience is that once you spray something it makes all the imperfections
much more obvious.
When I ordered the paint I ordered some primer too. However, I thought I'd have a quick
spray of this bonnet to see what it looked like. Experience is that once you spray something it makes all the imperfections
much more obvious.
Once done it looked like this, which is pretty good when compared with some of the photos further up this page.
Tomorrow I shall finish preparing this in anticipation of some paint arriving and then get on with sorting out some of the rest of the debris.
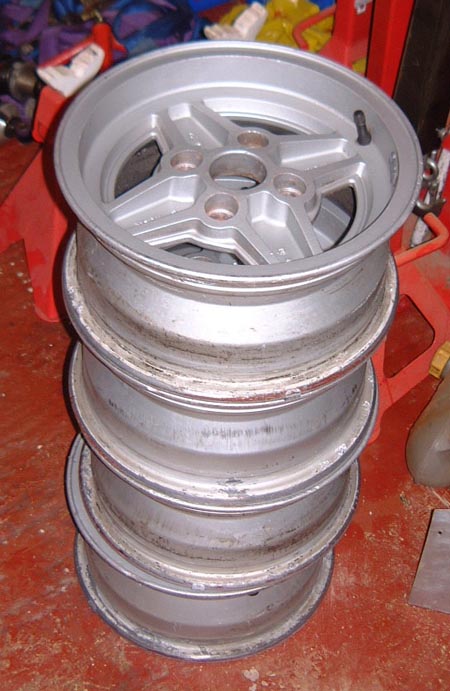 I'm actually running out of things to do, while I wait for the paint and the chassis. However,
a couple of things did get done. One was to drive over to Ipswich and pick up these wheels. Once I throw away the
bent one this should mean that I've got three spares which I'll hang on to so as to ward off the evil crashing
demons. It's a good job that Ford made loads of these wheels a few years ago as they have become pretty much the
mainstay of many forms of low cost motor sport.
I'm actually running out of things to do, while I wait for the paint and the chassis. However,
a couple of things did get done. One was to drive over to Ipswich and pick up these wheels. Once I throw away the
bent one this should mean that I've got three spares which I'll hang on to so as to ward off the evil crashing
demons. It's a good job that Ford made loads of these wheels a few years ago as they have become pretty much the
mainstay of many forms of low cost motor sport.
I also put some time into sorting out the rest of the bits. I checked the uprights for cracks and they seem to be OK. (Heaven knows why though, as the impact must have been huge through the right hand one.)
The dash was all bent by the crash and I had thought about making a new new. However, sanity prevailed and I flattened the existing one using a hammer instead.
Final job for the weekend was to remake the brake hard lines from the front of the car. I never like working these lines around and I had to push and pull them a fair bit to get them out of the car. So, I borrowed Steve's super-duper brake pipe flaring tool and remade all the lines, assuming that that just making them same length as they were before was satisfactory. Checking things over in this area though did remind me that I need to replace the right hand brake flexi hose. So, I shall order some bits from Think Auto tomorrow to replace that.
 I've spent the last couple of days getting even grubbier than usual, albeit in a new way.
That is, I've been teaching myself to spray paint by the simple technique of painting the bodged together bonnet
without faffing around with any tedious details like practising or knowing what I was doing. About the best thing
that I can say is that I'm now better at it than when I started.
I've spent the last couple of days getting even grubbier than usual, albeit in a new way.
That is, I've been teaching myself to spray paint by the simple technique of painting the bodged together bonnet
without faffing around with any tedious details like practising or knowing what I was doing. About the best thing
that I can say is that I'm now better at it than when I started.
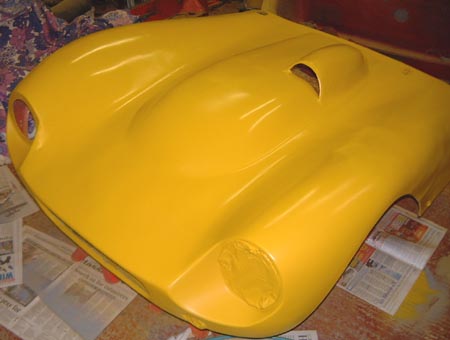
I've also gone yellow.
In fact, the garage has gone yellow too. There's an astonishing amount of yellow-ish dust everywhere. I guess this is made up of solidified particles of paint which, having failed to poison me by getting in my lungs, have just decided to mess the place up horrendously.
The end result is not, to be honest, that wonderful. However, I'm sticking by the mantra that: a) it's a race car and only has to look good from 100m away, b) if I do it too well someone will only smash it up again and c) really horrible bits I can cover up with stickers.
It's clearly not the same sort of yellow as it used to be. At first I wasn't too sure about it. (Although this is a colour whose name I remember, I now think that the colour I remember was actually called Mimosa. Oh well.) However, the colours grown on me and I really can't be arsed changing it.
I was originally planning on re-spraying the bulge red. However, now I'm not so sure and I might leave it as it is. Anyone got any thoughts on what I should do?
The stuff for a new flexi brake hose arrived today and made up the hose in between bouts of being asphyxiated.
Assuming that I don't decide to do any more painting I shall probably spend the rest of the time this week cleaning up the garage. Having spoken to Martin Bell yesterday I'm hopeful that I'll get the chassis back on Saturday. If I don't then making the next race will be really, really tricky.
 Well, ignoring the couple of responses I'd had, I decided to spray the bulge
red again. I realised that although the bonnet does look better all in yellow, when it's on the car the red bulge
helped (I thought) to make it look as if I'd reallly meant the car to be red and yellow. I had wondered about spraying
the bonnet red and making the bulge yellow but I did have a couple of requests from other RGBers to keep the overall
colour scheme. That is, it's now recognised as me!
Well, ignoring the couple of responses I'd had, I decided to spray the bulge
red again. I realised that although the bonnet does look better all in yellow, when it's on the car the red bulge
helped (I thought) to make it look as if I'd reallly meant the car to be red and yellow. I had wondered about spraying
the bonnet red and making the bulge yellow but I did have a couple of requests from other RGBers to keep the overall
colour scheme. That is, it's now recognised as me!
So, I sprayed it like this. If nothing else I'm getting better at this spraying lark and (most of) the finish on the scoop is pretty good. What's more, I put on four coats of paint, at varying levels of viscosity, all in about 3 hours or so. Of course, it helps that it's a lot smaller. It occurred to me while I was spraying it that the scoop is GRP with the yellow pigmented gel on top of it. On top of that is a layer of red paint, a layer of yellow and a layer of red. In fact, there must be about 15 coats. No wonder the finish is quite good...!
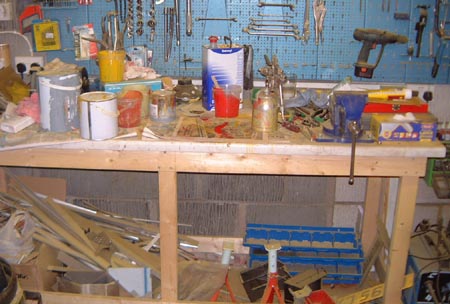 And, the garage continues to degrade in tidyness. Not only is there a thick layer of yellow
dust everywhere but the bench is covered in paint pots, measuring jugs and so on. I really have to have a huge
tidy up, ideally before the chassis gets back.
And, the garage continues to degrade in tidyness. Not only is there a thick layer of yellow
dust everywhere but the bench is covered in paint pots, measuring jugs and so on. I really have to have a huge
tidy up, ideally before the chassis gets back.
In fact I had an email about that today. I have a feeling that I'm not going to get it by the weekend now. (I'm just reading between the lines.) If so, I have no idea whether it's at all realistic to get the car together in time for the Cadwell race. I spent a while today trying to work out what tasks had to be done to rebuild the car and what the dependencies are. (Slightly anal perhaps but if I manage to arrange some help it'd probably be useful to have some idea what needed to be done and in what order.)
The only problem is there's an awful lot of stuff...
 Well, I didn't get the chassis back as I suspected. I spoke to Martin about it and asked
when he was confident that he could get the chassis to me. Wednesday is the right answer it seems. Of course, just
to make things more difficult the Monday's a bank holiday this week.
Well, I didn't get the chassis back as I suspected. I spoke to Martin about it and asked
when he was confident that he could get the chassis to me. Wednesday is the right answer it seems. Of course, just
to make things more difficult the Monday's a bank holiday this week.
But, I've decided to have a go at getting it together anyway. It seems very unlikely that I'll be able to make testing on Friday but racing on Sunday might be a possibility. (After all this, it's bound to piss down with rain, of course.) One other possibililty is that there's an all-comers race on Saturday. If I don't make testing on Friday this would, at least, offer some chance of remembering which way the corners go. Actually, I already know, but racing at Cadwell is new to me. Actually, getting to the end of a race is something I've almost forgotten.
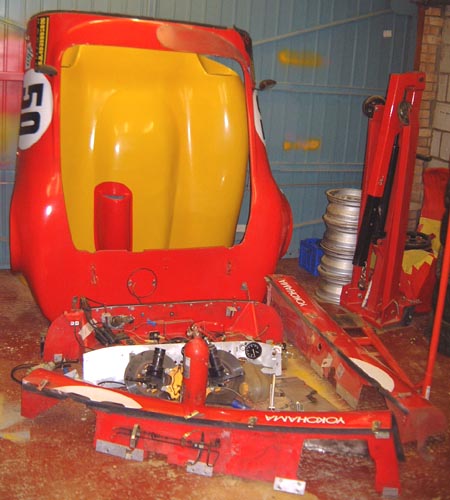
So, to make matters easier I've worked out what all the activities are and I've started organising all the bits. The photo here is the pile of bits that has to be fitted. It actually doesn't look as daunting as I thought it would.
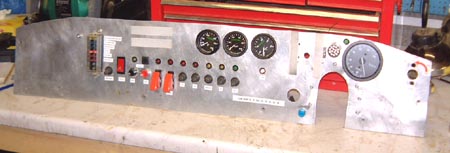 One thing I've wanted to do for a while is to modify the dash to make it a bit easier to fit. The problem
is that you can't really easily get it off when the steering column and gearchange are in position, at least without
taking apart the bearing on the gearchange cross member which is a bit fiddly. Hence I decided to modify the dash
so that the hole that the column previously went through was now a socking great slot, as you can see in the photo.
Given that the bit of aluminium at the top of the slot is mostly made up of the big hole that's got the tacho in
it I actually made a little frame up that goes around the back of the slot to make the dash a bit more rigid. Of
course, as soon as someone hits me again it'll all be bent all over the place again.
One thing I've wanted to do for a while is to modify the dash to make it a bit easier to fit. The problem
is that you can't really easily get it off when the steering column and gearchange are in position, at least without
taking apart the bearing on the gearchange cross member which is a bit fiddly. Hence I decided to modify the dash
so that the hole that the column previously went through was now a socking great slot, as you can see in the photo.
Given that the bit of aluminium at the top of the slot is mostly made up of the big hole that's got the tacho in
it I actually made a little frame up that goes around the back of the slot to make the dash a bit more rigid. Of
course, as soon as someone hits me again it'll all be bent all over the place again.
 I also started on the tasks on the dependency
diagram that I could do. The first of these was to fit the electrics to the bonnet, which essentially means
the lights. These were fitted easily, one of the bits that the marshalls put into my car was the bonnet wiring,
that at least means I don't have to remake the connectors.
I also started on the tasks on the dependency
diagram that I could do. The first of these was to fit the electrics to the bonnet, which essentially means
the lights. These were fitted easily, one of the bits that the marshalls put into my car was the bonnet wiring,
that at least means I don't have to remake the connectors.
With this done I also had a go at making the finish a bit better with some T-cut and polish. It's not that the bonnet has an orange-peel finish, it's more like a layer of small yellow oranges it's so awful. Still, I made it a bit better. I suspect that if I lacquered the whole thing it would be better but I really can't be bothered with that.
Finally, to make me feel a bit better about things, I put a new race number on the front of the bonnet. At least it looks like a race car again now. Notice in the photo that the right hand light is all shiny and new, unlike the rather claggy one on the left.