 Yes,
I know, late again. All the same, there's lots to mention to you so stop complaining.
Yes,
I know, late again. All the same, there's lots to mention to you so stop complaining.
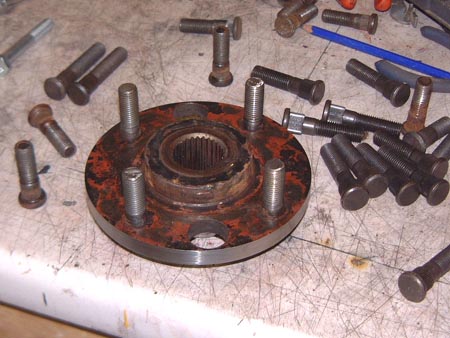
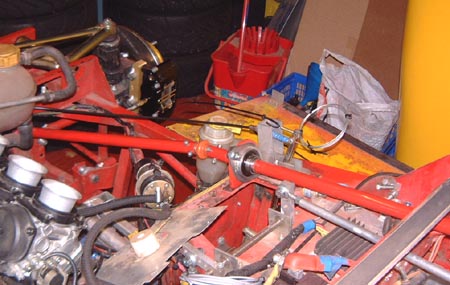
After last month's mention of the rear discs I got on with it. The first job was to turn down the hubs slightly as they wouldn't fit inside the discs. This was done with Dan's most useful lathe which explains the shiny rim around the hob in the photo.
The reason for the photo is that it was obvious that with the disc in position the wheel studs were not really long enough. To be honest, they'd probably have been fine but they were right on the very edge of being OK and it seemed sensible to change them. Especially as I had the hubs off and they would be fairly easy to change. So, I did so and made a test ...
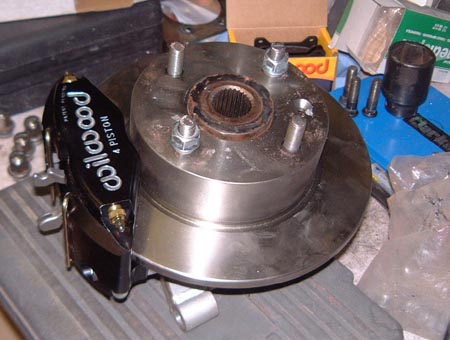 ...assembly
of the upright, hub and brake, as shown here. What you can't see is that there's an aluminium bracket that the
(radially mounted) caliper uses to connect to the bearing carrier itself. This all went together pretty well although
I was slightly concerned that it was all going to fit properly inside my 13" wheels. The problem is that the
handbrake levers, as seen on the left, protrude rather a lot.
...assembly
of the upright, hub and brake, as shown here. What you can't see is that there's an aluminium bracket that the
(radially mounted) caliper uses to connect to the bearing carrier itself. This all went together pretty well although
I was slightly concerned that it was all going to fit properly inside my 13" wheels. The problem is that the
handbrake levers, as seen on the left, protrude rather a lot.
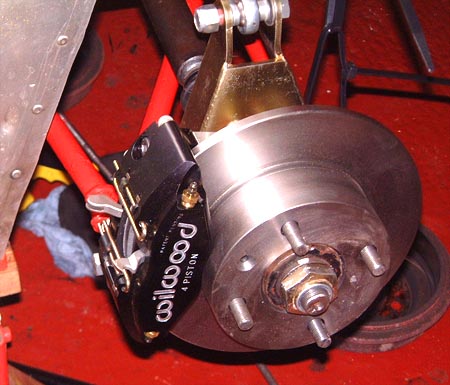 As
it turned out, that was a sensible concern as when I mounted the upright on the suspension the outermost of the
two handbrake levers did indeed foul the inside of the wheel. However, that's really to do with the shape of the
Ford alloys and smarter wheels would be fine.
As
it turned out, that was a sensible concern as when I mounted the upright on the suspension the outermost of the
two handbrake levers did indeed foul the inside of the wheel. However, that's really to do with the shape of the
Ford alloys and smarter wheels would be fine.
However, I don't have smarter wheels, at least not yet, so I made do with grinding a lot of stuff off the handbrake lever. I've got to make a cable up somehow anyway so this won't make things much more difficult.
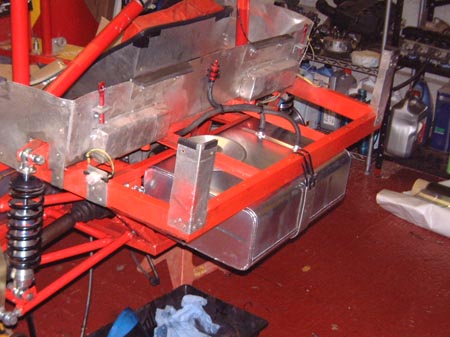 While
I was worrying away at the back end of the car I fitted the new fuel tank. I'm not sure if I mentioned this but
I managed to lunch the last one by dropping the car off the jack so that the jack held up the car by the tank which
was not good for the tank's piece of mind.
While
I was worrying away at the back end of the car I fitted the new fuel tank. I'm not sure if I mentioned this but
I managed to lunch the last one by dropping the car off the jack so that the jack held up the car by the tank which
was not good for the tank's piece of mind.
Anyway, I had bought what was supposedly the identical product from Rally Design. However, as it turned out it had two vital modifications:
- The vent and feed pipes are the other way round from before, meaning I had to mess about finding a longer bit of hose for the vent.
- The foam inside didn't have a cutaway under the filling hole. This meant that I couldn't stick my trusty calibrated stick in the hole to see how much fuel there was in the tank. So, I pressed the cake-knife into service again and cut away the foam so that I could get the stick in. (And, for those of you that worry about such things, I then filled the tank, pumped it all out and changed the filter element to make sure that that there's no bits of foam around still to clog something vital up.)
 At this point I was getting onto a bit of last minute thing so that I could make the track day that
I'd booked at Snetterton on February 24th. So that you don't die of excitement waiting for the cliffhanger's
dénouement I should tell you that I did make it.
At this point I was getting onto a bit of last minute thing so that I could make the track day that
I'd booked at Snetterton on February 24th. So that you don't die of excitement waiting for the cliffhanger's
dénouement I should tell you that I did make it.
But, before that, I also put the steering column together, after painting it a fetching shade of red and rubbing a good deal of that off so that I could get it into the bearings. (It fits exactly.) Certainly, there's no play to speak of in the steering. What's to bet that it doesn't feel different at all?
 Just
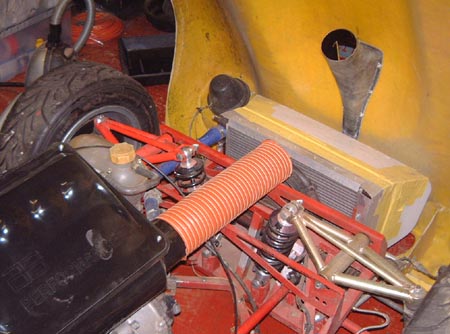
about the last job before Snetterton was to fit a new throttle cable. (I always worry about them catching and not
letting the butterflies shut so I tend to replace them fairly frequently. This time I bought a super quality brake
cable from wiggle.co.uk and also this neat little "noodle
tube" to make the 90° bend before the carbs a little more pleasing.
Just
about the last job before Snetterton was to fit a new throttle cable. (I always worry about them catching and not
letting the butterflies shut so I tend to replace them fairly frequently. This time I bought a super quality brake
cable from wiggle.co.uk and also this neat little "noodle
tube" to make the 90° bend before the carbs a little more pleasing.
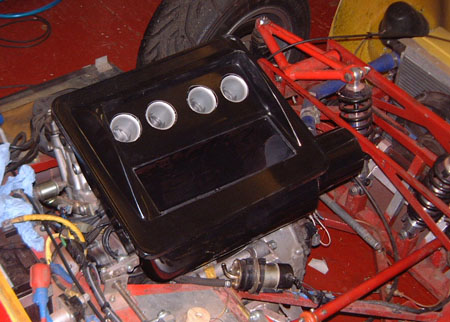
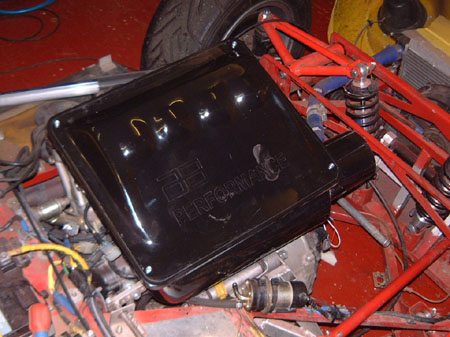
 Looking
at the carburettors, though, the other thing that I had wanted to do at Snetterton was to try the engine with an
airbox again, as Andy assures me that it should work. As I think I've mentioned I've bought one of Andy's snazzy
high-tech airboxes but I just don't have time to fit that right now, so I thought I'd have a go with the kosher
Honda one.
Looking
at the carburettors, though, the other thing that I had wanted to do at Snetterton was to try the engine with an
airbox again, as Andy assures me that it should work. As I think I've mentioned I've bought one of Andy's snazzy
high-tech airboxes but I just don't have time to fit that right now, so I thought I'd have a go with the kosher
Honda one.
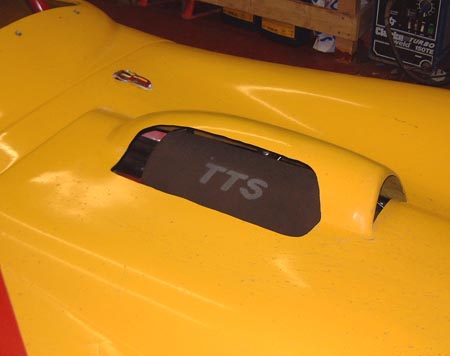
The problem is that fitting this means cutting a big hole in the bonnet. So, in for a pound I did so and this is what it looked like. (Although, just to confuse you, it's not actually fitted here.)
So, that was the state before going up to Snetterton. Well, apart from the small issue of aligning the suspension which, of course, takes about half a day of faffing about. I'm better at this than I used to be, not the least because I've made all sorts of special alignment tools myself. The one thing I haven't done is corner weighted the car (nor set the ride height properly really) as the local scales seem to have gone walkabout somewhere and we're trying to find out who's got them.
I finished all this at about 0100 on the morning of the track day. So, Anthea and I loaded up the motorhome and set off for Snetterton. Of course, when we got there the track was all locked up so we had to park up outside the gates... However, in the morning the day dawned drizzly and wet and we looked to a day of getting rained on. That wasn't too much of a worry as I had to spent at least half the day running the rebuilt engine in.
So that was what happened. I spent the morning trundling round with a self-imposed rev limit of about 8000rpm and everything seemed to be fine. Apart from me getting wetter and wetter that is. The car, as usual for A048s in the wet, was a bit of a handful but the new brakes were clearly working. The only problem with them was that I had to wind the balance right to the back. I don't know what this will be like in the dry so I'll just leave it there for now. It may be that I need to get a smaller master cylinder for the rear circuit.
Mind you, it took me half a day to remember that the thing with A048s is that once they lock up in the wet and start sliding you have to take your foot completely off the brake pedal to get them rotating again. You can't just modulate the pressure as you'd like. I spent quite a few laps slithering up to Sear wondering how I was going to slow the car down before I remembered that!
The other thing I wanted to fiddle with was the new dampers. This is hardly going to be possible in the wet and I left them on full soft for most of the day. However, towards the end of the day there was a dry patch and all of a sudden I could start leaning on the suspension. So, I came in, wound on a couple of clicks and it poured with rain! Doooh. I did try it like that and it was clear that that was not the right configuration to drive the car in. Might be OK in the dry though...
I was a bit bemused by the airbox though. To be honest, it did seem as though it might have been pulling from lower revs rather better than does with the sausage filter. However, it just wouldn't rev beyond about 10,500 rpm. Since I got back I've been wondering if the filter in the airbox, which is a K&N one, is actually OK. I should have thought of that at the time. Whatever, on the day I converted back to the sausage filter and I'll probably have to go to the first race, at least, like that as I just don't have any time to do any more testing. Much as I'd like to.
At the end of the Snetterton day, though, it had to be seen as fairly successful as at least the car went and handled to some extent. That is, it didn't break down...
 Once
back home it was time to get the car sorted for the first race. The main thing missing was a handbrake cable which
was completely lacking at Snetterton. I bought some motorbike cabling from Vehicle Wiring Products with which to
make this. The biggest problem was attaching the cable to the lever on the calipers but this was solved by just
bending the cable around the lever and soldering a spare ferrule around the cable. I tried breaking such a connection
to see if it was strong enough but only managed to hurt myself when I slipped and crashed across the garage...
Once
back home it was time to get the car sorted for the first race. The main thing missing was a handbrake cable which
was completely lacking at Snetterton. I bought some motorbike cabling from Vehicle Wiring Products with which to
make this. The biggest problem was attaching the cable to the lever on the calipers but this was solved by just
bending the cable around the lever and soldering a spare ferrule around the cable. I tried breaking such a connection
to see if it was strong enough but only managed to hurt myself when I slipped and crashed across the garage...
As you can see in the photo the cable is relatively small stuff (the core's about 2mm diameter). It's not as small as the cable I used for the throttle cable but it isn't anything like as chunky as the stuff that Rally Design sell as the handbrake cable to go on these cables. I reckon that's OK as that stuff is real handbrake cable that's designed to withstand frost on Alpine villages which the Fury won't have to stand up to. In fact, I'll probably never use the handbrake in real anger...
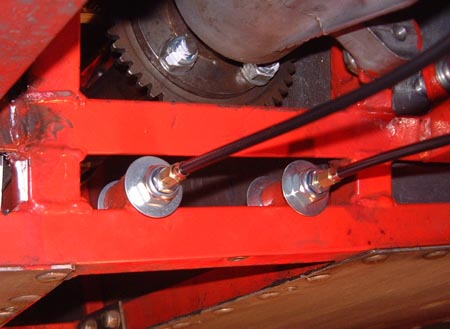 I
used a couple of adjusters mounted in the chassis clips that are normally used for the (Sierra) cable. These were
made out of some ally tubing that I put some M10 threads down the outside of so that I could bolt them in place
like this.
I
used a couple of adjusters mounted in the chassis clips that are normally used for the (Sierra) cable. These were
made out of some ally tubing that I put some M10 threads down the outside of so that I could bolt them in place
like this.
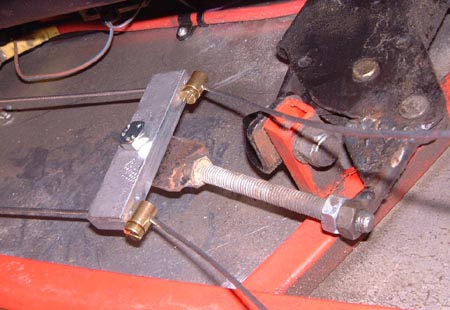 Finally, I made the world's simplest compensator out of a chunk of aluminium that is attached to the
original, and gruesome, Fury handbrake lever. The cable's just secured with a couple of solderless nipples. (Stop
sniggering at the back...)
Finally, I made the world's simplest compensator out of a chunk of aluminium that is attached to the
original, and gruesome, Fury handbrake lever. The cable's just secured with a couple of solderless nipples. (Stop
sniggering at the back...)
After all that, it does seem to work. The only problem is that I've got it together with the minimum of slack in the cable and I can only get the lever onto the first click of the ratchet. However, I reckon that's OK as it will only loosen up as the cable stretches and the pads wear.
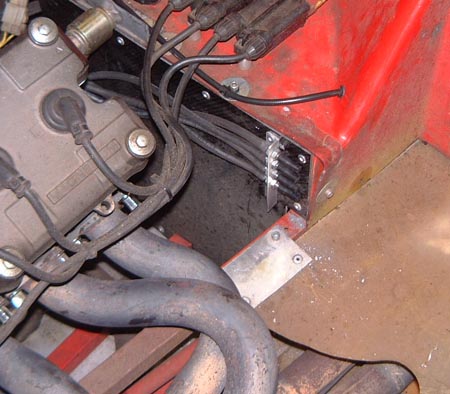
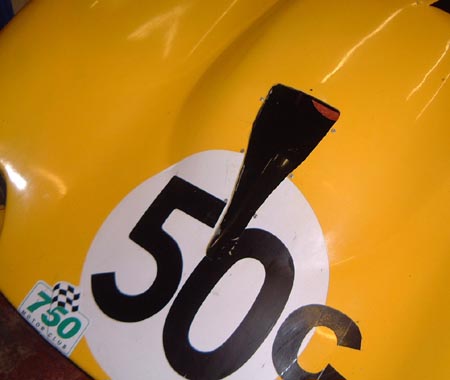
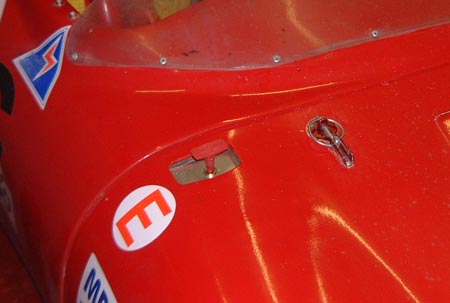 I
got the extinguisher serviced before the start of the new season and I also replaced one of the extinguisher release
cables. I also remade the extinguisher release mounting which I'd ever been happy with. The new one is made so
that the release sticks through the bonnet whereas the old one was inside that hole that you can see. I always
thought that some scrutineer was going to complain about that so I'm much happier with it like this.
I
got the extinguisher serviced before the start of the new season and I also replaced one of the extinguisher release
cables. I also remade the extinguisher release mounting which I'd ever been happy with. The new one is made so
that the release sticks through the bonnet whereas the old one was inside that hole that you can see. I always
thought that some scrutineer was going to complain about that so I'm much happier with it like this.
Can't help the aerodynamic drag though!
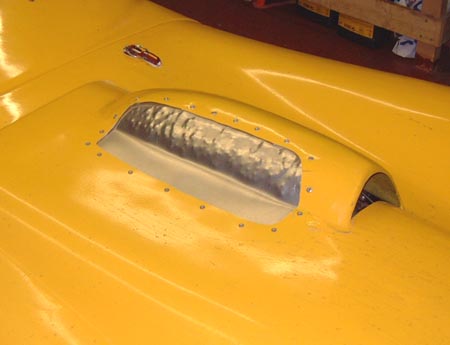 And,
having cut a big hole in the bonnet I patched it up with a chunk of alumiunium. As you can probably tell I set
about this with a big hammer to get some sort of curve into it. One of these days I'm going to buy one of those
special sand bags and a collection of the various wierd hammers that panel beaters use so as to do this sort of
thing properly.
And,
having cut a big hole in the bonnet I patched it up with a chunk of alumiunium. As you can probably tell I set
about this with a big hammer to get some sort of curve into it. One of these days I'm going to buy one of those
special sand bags and a collection of the various wierd hammers that panel beaters use so as to do this sort of
thing properly.
So, I'm just about ready to go to Mallory Park. I've even got the video permission form sorted. I could probably do with re-looking at the suspension alignment but it's not a big deal. I've a lousy history at Mallory which includes:
- A test where I skittered off in the wet at the hairpin and smashed it into the barriers
- A race where I got the first corner, spun and got tee-boned by someone arriving some while later, under waved yellows, with all four wheels locked up.
- A trip half the way round the green flag lap before a race, in the pouring rain, until a big-end seized and came out of the engine sideways.
So, with that, I'd be perfectly happy to start and finish the race, even if I get lapped twice...
Well, I'm back and to save you skipping to the end, I didn't bend the car. So, that's at least a qualified success. I didn't exactly set the world alight either but seeing as I haven't driven a single lap of the place since the last visit in March 2005 that's hardly surprising. Although I know where the corners go I don't know more than that. And, I've learnt that I really, really, need a good period of time to get up to speed on a circuit.
We left home about 3pm on Saturday and trundled up to Mallory in the new[er] bus. Much nicer to drive this one on the motorway but the fuel consumption is frightening... We got to the circuit at about 1730 and joined the normal queue outside. If you've not been there Mallory is kind of odd in that you have to drive around the circuit, backwards, to get from the gate into the paddock which makes for a slightly surreal experience. Hence, you end up queuing outside the circuit until the previous event, and there always is a previous event, has finished.
In the paddock we parked with a nice view of the lake, got the car off the trailer, walked the circuit with some of the other RGBers who had arrived, had dinner and went to the pub.
Sunday morning dawned bright but cold. As usual I was up early, this time assisted by the wildlife on the aforesaid lake who made a hell of a racket at about 0500. There was plenty of time yet for the weather to adopt its usual guise. At this same meeting last year it snowed so we were expecting some sort of RGB weather. As it was it didn't do anything untoward all day which was a relief as I wasn't looking forward to driving round this place in the wet. We got scrutineered after sitting in the queue for hours, the general view was that the scrutes had all forgotten what to do over the winter. The only problem I had was that the scrutineer told me that my catch tank was too small. As it's supposed to be a 1 litre bottle, and it was, I was slightly miffed. Still, he agreed with me eventually. The thing was, I'd upgraded from a naff old Coke bottle to an up-market San Pellegrino bottle too and got no credit for that...
Anyway, onto the circuit for qualifying. There were an awful lot of us out there: 30 which is the current track limit. Well, to be fair there were only 29 as the Aeon Blaze wouldn't go. It was found to have one of the multitudinous interlocks on the 'busa engine disconnected which meant it stopped when put in gear. The fact that it had been driven to scrutineering was causing much head-scratching.
As for me, well I just sort of bumbled round really trying very hard not to bend things. However I was slowly learning the circuit properly and it's interesting to note from the lap times that just about every lap I did in qualifying was faster than the previous one. Half way through qualifying one of the newbies, the entertainingly named Buzz Billsbury, managed to park his Genesis on top of the armco on the inside of the hairpin exit. I can just about imagine how he did that. What I have trouble with is that they got it moved by the next lap. Apparently, 180 marshalls had turned up for the day and they were joking that if there were any problems it'd be easy just to pick the car up and carry it back to the paddock, so perhaps that's what they did.
Anyway, I qualified a lowly 21st which is rubbish really but counts as a success as the car was still in one piece. What's more, I was beginning to think that the new brakes were really working ok. After the wet session at Snetterton I still had the brake bias wound full to the back and I hadn't moved it far before the session, and hadn't wanted to adjust it as we were going. However, I was now a bit more confident with them and I could try harder from now on to really feel what they were like. First impressions in the dry were that I really can lean on them a bit more spiritedly than I could before and there was a suspicion that I can feel a bit better when the wheels stop going round. With the HiSpecs the only real indication that the wheels had locked was that the car stopped slowing down. Other people have agree with me about this so hopefully it isn't just me. I have a theory it's because the calipers are just so light that they're distorting and not providing a useful feedback.
What's more, the guessed damper settings were working ok-ish. However, it'd be nice to have a proper test session to really play with them.
I suppose the really important point is that the lap time in qualifying was 53.7 seeconds, which is actually faster than I've ever managed here before, and it was clear that I could go a lot, lot, quicker. As it was, I was 3 seconds off Derek who was the class leader...
So, much, much later in the day it was time for our race to start, at about 5pm and it was now fairly parky but there was no sign of any significant doom and pestilence in the meteorological department. We trundled round to the grid with me doing my best to get some heat into the tyres and brakes. Mike in front of me almost overdid this and only just managed to keep it on the black stuff...
Eventually the lights went out and I got a half-way decent start. Then there was a stationary STM thing in front of me and there was no where to go. So, I braked and half took to the grass only for the aforesaid thing to get going again and leave me with just about the entire field passing me. Down into Gerrards and I saw Doug plough off into the infield and come to a halt. Apparently there was some of drive failure the car just stopped. Luckily that meant that they red-flagged the race so I could have another go at the start.
Amusingly, one of the newbies this time is a chap called Marc Norton who is part of the MNR concern from whom I stupidly tried to buy something a while ago, before giving up because they were such a complete shambles. Two of his cars (MNR Vortexes) had turned up for this race driven by the man himself and a chap called Garry Franks. Marc's really got up many people's noses by announcing how clever, and quick, he was and how superb the car was. That might well turn out to be the case but the jury's out at the moment.
As it was even I out-qualified both of them and when the aforesaid red flag went out Mr Nordon drove straight into the back of Mike's car when Mike took his foot off the loud pedal. Luckily this put Marc out but not Mike.
So, the race started again and there was the normal fracas into the first corner but I was very, very careful... After a couple of laps I was rather surprised by Mike Allen who managed to barge past me, on the outside, at the hairpin. I still don't really understand that. After that I was just stuck behind Mike who has much more grunt out of the corners than me. I'm not sure what he's done to his car over the winter but I notice that he's become a class A bod so I guess he must have an engine with more grunt. The annoying thing was that on every lap I was coming shooting up behind him on the entry to Gerrards, the Esses and the Hairpin but didn't manage to get past. To be honest I didn't try very hard as I was still trying to lay the Mallory ghost but it makes the video frustrating to watch. I reckon I was really a couple of seconds quicker than Mike but I just couldn't put it to effect. All the same, he's a nice guy...
And that was how it finished. A rather dismal result but, most importantly, a result... So I guess that's a sort of half-success.
Oh, it was 18th overall, and 11th in class. Not too good really in that I'd decided it was going to be top ten finishes all the way this season. Perhaps I will go and buy those CXRs that I've been lusting after...
 In
fact, that's exactly what I decided to do. Realistically, I could have found someone to turn some significant amounts
off the wheels I've already got but I decided to go for something a bit blingy. So, I phoned George Polley's today
and ordered four new wheels and tyres that I'll go and pick up next week. I could just have picked them up at Donington
but there's always the chance of some horrible problem with wheel nuts or offset so it seems sensible to get them
first.
In
fact, that's exactly what I decided to do. Realistically, I could have found someone to turn some significant amounts
off the wheels I've already got but I decided to go for something a bit blingy. So, I phoned George Polley's today
and ordered four new wheels and tyres that I'll go and pick up next week. I could just have picked them up at Donington
but there's always the chance of some horrible problem with wheel nuts or offset so it seems sensible to get them
first.
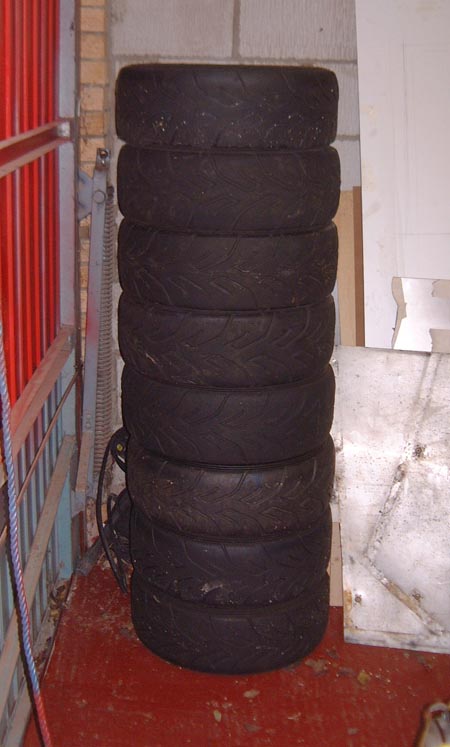
Problem is, the tyre mountain is getting a bit out of hand. This is the current stack in the garage, which doesn't include the four that are actually on the car. There's actually 5 wheels in this stack too.
Of course, buying some new wheels means that I'm still going to have some naff wheels as spares. So, I might get George to swap some wheels and tyres around a bit for me so as to get the best ones on the best rims. Sometime or other I'm going to have to buy some more rims anyway, but for now four new ones will have to do.
 So,
that's another slight weight saving, which is the main thing I need to do to make the car go faster really. Of
course, getting some weight off the fat git in the driver's seat would be a superb idea. But, he's proving to be
a recalcitrant grumpy old bugger.
So,
that's another slight weight saving, which is the main thing I need to do to make the car go faster really. Of
course, getting some weight off the fat git in the driver's seat would be a superb idea. But, he's proving to be
a recalcitrant grumpy old bugger.
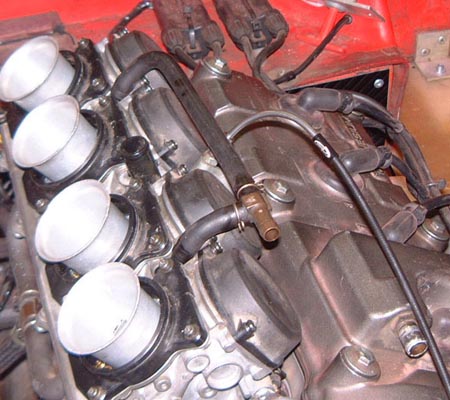
So, I decide to try and get the fancy Andy Bates airbox fitted before Donington. Andy assures me that this is the bees knees but it's not easy to fit. Before I even start on the box itself I mounted this 'ere little just by the engine. The problem with the airbox is that it makes access to the balance ports on the engine just about non-existent. They're hard enough anyway but with the airbox in the way it's a complete non-starter. So, I got this little thing from Andy which just allows me to mount the ports elsewhere so that I can attach a balancing gadget. (Or, more likely, get Andy to have a fiddle for me.)
 Then
I needed to fit the airbox itself. I had a look at how Derek had fitted his at Mallory and he certainly found it
non-trivial too. Based on what he said, though, I set about things and immediately struck a problem in that the
inlet port fouled the cooling system header tank.
Then
I needed to fit the airbox itself. I had a look at how Derek had fitted his at Mallory and he certainly found it
non-trivial too. Based on what he said, though, I set about things and immediately struck a problem in that the
inlet port fouled the cooling system header tank.
So, I took off the undertray, drained the cooling system and removed the header tank. I'll have to work out a different place for mounting it later.
Looking back at the box itself at first sight it looks as though I'll be able to fit it a little more easily than Derek, probably because his engine's in a slightly different position from mine. The immediate problem, though, is that the holes that go around the inlet ports are not in quite the right place and I need to relieve the airbox itself slightly. It was rather late so I called it a night and went off to write up this gripping missive. See, how lucky are you?
 Yet
another diary entry when I don't have to start off with an apology for being late. Never mind, I'll soon fall off
the wagon again.
Yet
another diary entry when I don't have to start off with an apology for being late. Never mind, I'll soon fall off
the wagon again.
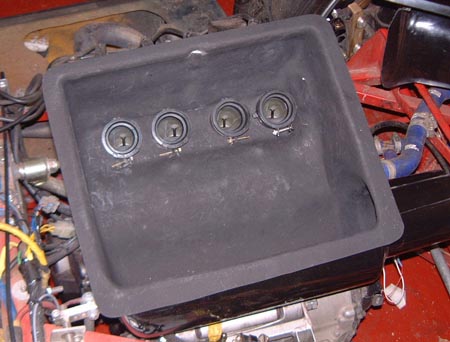
I've pressed on with fitting the airbox. This is the inside of it with the carb mounting rubbers in place. I've always assumed that these rubbers do the same job as the Thackray washers that are usualy used for mounting things like Weber DCOEs in that they provide a bit of compliance in the mounting so that the engine vibrations doesn't foam the fuel sitting in the float chambers.
All the same, with the airbox here they serve a double role in that they actuallly hold the airbox in place too.
As I was to discover though, making this work was a bit tricker than you would have thought. First of all I realised that the airbox wasn't sitting down properly and this was due to one of the hose clips in the cooling pipework. So, I twizzled that around and it fitted much better. Perhaps I was lucky but Derek was telling me at Mallory of the problems he had fitting one of these 'boxes. In his case he had to cut holes in the box to avoid a bolt on the [non] thermostat housing and also the other side of the chassis. In my case none of this was necessary. I spent a while deciding what I must have done wrong but decided that I hadn't really.
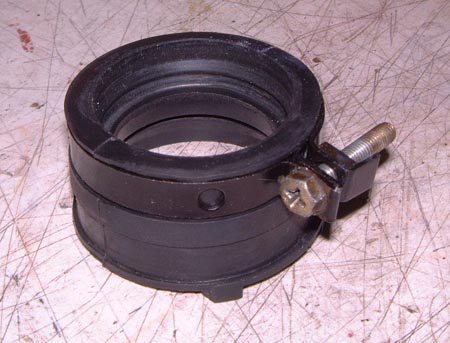 However,
it still didn't fit quite right and I realised that there just wasn't room between the bottom of the rubbers and
the head for the airbox to fit. At least, this was so if the rubbers were mounted properly. The photo on the left
is one of the rubbers and you can just see, inside at the top, that there's a lump in the rubber. This is intended
to fit inside a groove that's cut around the inlet port. The clamp, as seen, is then tightened up and the lump
is forced into the groove and that keeps the rubber, and the carb, in place.
However,
it still didn't fit quite right and I realised that there just wasn't room between the bottom of the rubbers and
the head for the airbox to fit. At least, this was so if the rubbers were mounted properly. The photo on the left
is one of the rubbers and you can just see, inside at the top, that there's a lump in the rubber. This is intended
to fit inside a groove that's cut around the inlet port. The clamp, as seen, is then tightened up and the lump
is forced into the groove and that keeps the rubber, and the carb, in place.
When the rubber fitted into the groove snugly I just couldn't get the airbox on.
So, after thinking about it for a while and reminding myself that I had a spare set of mounting rubbers, I finally pared down the surface of the rubber so that there was a little more space there. A bit brutal but it seemed to work fine. The only problem I did have was that with this done and everything snugly pushed down I just could not get the clip around the inlet to the number 4 cylinder because of the clip's close proximity to the airbox itself. So, for that one inlet I took off the metal hose clip and relied on a tie-wrap, tightened up bloody tight, to hold the rubber in place. I'll have to check on this a few times to make sure it isn't falling off. However, the other three are all properly in place.
 The
next problem was about the other side of the rubbers. These again have a clamp around them that tightens onto the
carb itself. I just couldn't manage to get at the clips with the carbs in the airbox. So, eventually I succumbed
to a Gordian Knot solution and just cut a couple of access holes in the airbox. Once I'd tightened up the clamps
here I just covered up the holes with the tape. I'm pretty sure that should be OK. As the tape I used is black
you can't even see it that well.
The
next problem was about the other side of the rubbers. These again have a clamp around them that tightens onto the
carb itself. I just couldn't manage to get at the clips with the carbs in the airbox. So, eventually I succumbed
to a Gordian Knot solution and just cut a couple of access holes in the airbox. Once I'd tightened up the clamps
here I just covered up the holes with the tape. I'm pretty sure that should be OK. As the tape I used is black
you can't even see it that well.
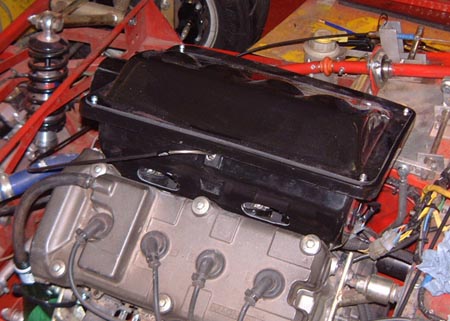
 With
that done I could mount the central part of the airbox, as seen here, which has the filter element mounted in it.
Although, it's not there in the photo.
With
that done I could mount the central part of the airbox, as seen here, which has the filter element mounted in it.
Although, it's not there in the photo.
 And
then I could put the top on the 'box. This was done by mounting some rivnuts on the rim of the box so that fitting
the lid wasn't too onerous.
And
then I could put the top on the 'box. This was done by mounting some rivnuts on the rim of the box so that fitting
the lid wasn't too onerous.
Rather miraculously, I discovered at this point that the box fitted into the existing bonnet scoop. I might decide later to do a snugger bump in the bonnet but for now the old one can do. I might tape up the inlet hole to the existing duct as that isn't required any more. I've always worried that it might pressurise the inside of the bonnet for no good reason. However, I never believe simplistic aerodynamics and it might equally as well actually suck air out.
 This
did leave, though, the issue of getting cool(ish) air into the airbox. In order to do this I'd bought a 100mm NACA
duct off Andy when I bought the airbox. I spent a while deciding where to put this and decided that slap bang in
the middle of the car was probably the best place. So, after much faffing around and fiddling with Clekos and the
like I ended up with it mounted in the bonnet like this.
This
did leave, though, the issue of getting cool(ish) air into the airbox. In order to do this I'd bought a 100mm NACA
duct off Andy when I bought the airbox. I spent a while deciding where to put this and decided that slap bang in
the middle of the car was probably the best place. So, after much faffing around and fiddling with Clekos and the
like I ended up with it mounted in the bonnet like this.
I had bought some 100mm ducting a while ago and the plan had always been to connect the NACA duct to the airbox with that ducting. However, there were two obvious ways of connecting the two.
 First
of all, I could mount the duct in the bonnet and rely on reconnecting the ducting every time I close the bonnet.
Alternatively, I could permanently connect the duct and airbox and mount the duct to the bonnect using something
like Dzus fasteners. Then, I'd just have to disconnect the fasteners before I could open the bonnet.
First
of all, I could mount the duct in the bonnet and rely on reconnecting the ducting every time I close the bonnet.
Alternatively, I could permanently connect the duct and airbox and mount the duct to the bonnect using something
like Dzus fasteners. Then, I'd just have to disconnect the fasteners before I could open the bonnet.
After some experimentation, I decided to try the former for now. The photo here shows the inside with the bonnect up. You can see the duct and the ducting, the latter being attached to the airbox. Now when you close the bonnet you have to shove you arm up the duct, James Herriott style, and pull the ducting into place.
Incidentally, in this photo you can also see where I've moved the cooling system header tank to. It used to be right in the middle of the car, just where that ducting is now.
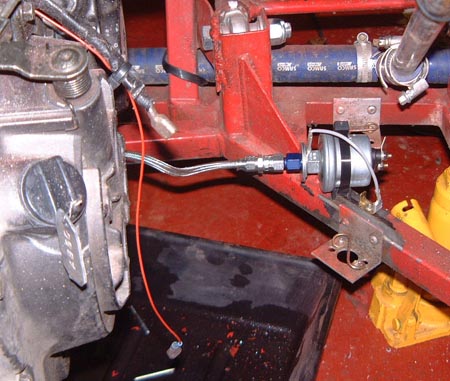 While
I was doing all this, I also re-located the oil pressure sender and switch. Before I had been using an adjustable
pressure switch, set to a highish pressure so that the light might perhaps give me more warning. However, I became
concerned about that because once the engine's warmed up the lights on most of the time when the engine's idling.
That means that I think I was getting de-sensitised to the light, because it was on a lot of the time. Hence I've
reverted to the switch that's in the oil pressure sender. This all meant that I could simplify the connection to
the engine and it now looks like this.
While
I was doing all this, I also re-located the oil pressure sender and switch. Before I had been using an adjustable
pressure switch, set to a highish pressure so that the light might perhaps give me more warning. However, I became
concerned about that because once the engine's warmed up the lights on most of the time when the engine's idling.
That means that I think I was getting de-sensitised to the light, because it was on a lot of the time. Hence I've
reverted to the switch that's in the oil pressure sender. This all meant that I could simplify the connection to
the engine and it now looks like this.
For those that haven't been reading this for ever, by the way, the reason for the hose connection is that experience is that mounting anything chunky directly to the engine causes a relatively rapid failure, oil all over the place and important bits of the engine making a bit for escape.
So, I'm now in the run-up to the Donington race this weekend. What's more, I've entered the allcomers race so as to get a bit more runnning before the RGB race proper. After the horrible weather today it's time to start praying for sun, or at least the absence of rain...
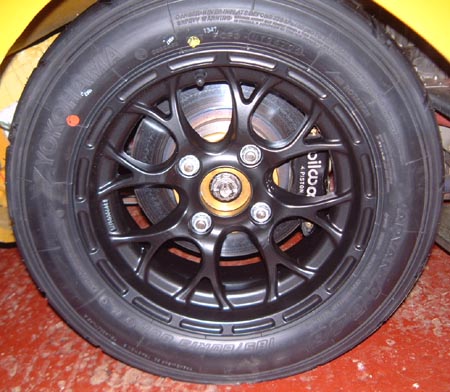 I went
up to George Polley's today and picked up the CXRs and a new set of A048s. Here's one of them on the front of the
car.
I went
up to George Polley's today and picked up the CXRs and a new set of A048s. Here's one of them on the front of the
car.
Before I put them on I checked the weights and they do indeed save in the region of 1kg per corner. So, that's about £100 to save a kilogram then. (All those of you reaching for your email to point out the much easier way of saving a kilogram can just keep quiet. I know, all right?)
These new wheels actually fit rather better than the other ones. This is especially so for the rear wheels where the handbrake levers on the calipers are a good distance away from the wheel.
Of course, the obvious problems with all this are:
- I've only got 4 CXRs
- The tyre mountain is now even higher than it was before.
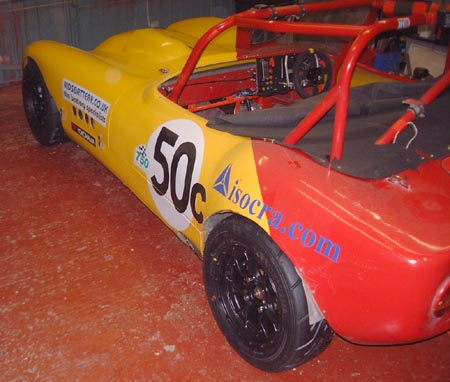 I got
the black CXRs because I thought it'd look better and the silver ones would inevitably just get filthy with brake
dust. This is what the whole car looks like with them. To be honest, I'm not sure that I shouldn't have got the
silver ones after all.
I got
the black CXRs because I thought it'd look better and the silver ones would inevitably just get filthy with brake
dust. This is what the whole car looks like with them. To be honest, I'm not sure that I shouldn't have got the
silver ones after all.
Oh well...
 I've also been looking a bit harder at the data logs from Mallory and I spotted
something interesting. Something suggested in my book on data logging is plotting lateral acceleration against
steering angle and I did so. You get a graph, for just about all the laps I did of Mallory, that looks like this.
I've also been looking a bit harder at the data logs from Mallory and I spotted
something interesting. Something suggested in my book on data logging is plotting lateral acceleration against
steering angle and I did so. You get a graph, for just about all the laps I did of Mallory, that looks like this.
At first sight this probably looks daft. However, look harder and you can see that most of the wiggles form essentially a straight line going between -0.9g and +1.2 g. This bit essentially tells of a linear relationship between steering angle and lateral acceleration. (Which is appparently a Good Thing.)
However, there's a thing sticking out of the right hand side which still goes to about 1.2g (not surprising as that's what the tyres are capable of) but at a much greater steering angle (in this case about 180° instead of the earlier 50°ish). This bit of the graph represents the car going around the hairpin and essentially says I was having to turn the wheel right around in order to get around the corner.
To be honest, I'm not really sure what this means. It could mean that the car was just understeering at the low speed around the hairpin. Or, it could mean that I was just getting over-excited with the steering wheel and moving it so fast that I was loosing traction at the front. Perhaps I'll ask someone who knows more than me about this...