 With SVA approaching, I needed to have a real go at the car, otherwise I'm going
to have to delay the appointment. So, with a list of things to try and get done, I set about the car.
With SVA approaching, I needed to have a real go at the car, otherwise I'm going
to have to delay the appointment. So, with a list of things to try and get done, I set about the car.
First thing was to calibrate the speedo. I measured how far the car went for a revolution of the rear wheels, with the aid of a long tape measure and some chalk marks on the ground. I could then convert this into a setting for the speedo. The only problem is that calibrating this is going to be quite hard.
Having got the dash back together I put it back in the car and bolted everything down. This was the first time the dash had been in with the rest of the interior done and it looks pretty good. Anthea commented that it looked pretty good when so many of the kit cars one sees have awful interiors.
However, after starting the engine again so as to get the cooling system going again I realised that when Greengauges were testing the instruments they had put the tachometer back to the setting for a four cylinder engine. So I had to take it all apart again.
Actually, it took some time to get all the air locks out of the cooling system. I suspect that with the expansion tank a little bit lower it's just that bit more difficult. It's clear that the technique is to jack the rear of the car waaaay up in the air before trying.
Next it was time to take the nose cone off again and mount the SVA bar in the nose. This was just Würthed in position. I'm a bit wary about it as it's not exactly a snug fit but it seems to be how everyone does it. I'll try and leave this alone for a while so that it can set properly.
Next I wanted to have a go at the rear wings. This has a reputation of being a bit of a fiddle so I was expecting a long slog.
 In the event it didn't turn out too difficult, although there isn't much clearance between
the tyres and the rears of the wings. I know some people have had trouble with the tyres rubbing the wings. All
the same, the car now looks much better , although the rear wings are a very inviting looking seat, and really
aren't strong enough to sit on.
In the event it didn't turn out too difficult, although there isn't much clearance between
the tyres and the rears of the wings. I know some people have had trouble with the tyres rubbing the wings. All
the same, the car now looks much better , although the rear wings are a very inviting looking seat, and really
aren't strong enough to sit on.
Mind you, it might not have been difficult but it took a very good proportion of the day to do it. At least the end result is that the mess of the non-fitting side panels seems to be well hidden by all this stuff.
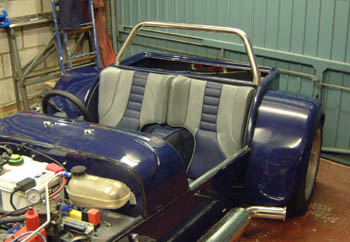
 In an effort to get some more done, I finished the day by attaching the windscreen. This
was really pretty easy, although just looking at it made me realise how much I really need to get some side screens
of some form as soon as possible.
In an effort to get some more done, I finished the day by attaching the windscreen. This
was really pretty easy, although just looking at it made me realise how much I really need to get some side screens
of some form as soon as possible.
Actually, the windscreen support seem to be one of the best manufactured bits of the Rush. They actually seem to be highly polished aluminium, and fitted really well, which was a nice change from things like the side panels.
I just realised, while updating this page, that the grand count has now gone over 600 hours. Eeeek.
I was planning on another long bash today, but events conspired against me and I didn't really manage to get very much done. However, I might have managed to sell my Fiat Coupé which, although a lovely car, is really surplus to requirements now and is just sitting on the drive depreciating.
 I had planned on getting the lights all sorted today. First thing was the headlights
and I realised (i had known but managed to forget) that I had to make some sort of mounting brackets for them.
These were cut out of some steel angle and Hammerited smooth black. However, I need to leave them for 24 hours
to go off properly.
I had planned on getting the lights all sorted today. First thing was the headlights
and I realised (i had known but managed to forget) that I had to make some sort of mounting brackets for them.
These were cut out of some steel angle and Hammerited smooth black. However, I need to leave them for 24 hours
to go off properly.
After that I turned to the rear of the car. First thing to do was to turn the car round, by driving it out onto the road and reversing back into the garage! One obvious thing was how difficult it is to drive a car without mirrors... On the way back in a zoomed along a bit, and it was nice to see that the speedo at least is registering something.
After much consultation of the SVA rules and measuring I ended up with the rear of the car looking like the photo here. I must admit that I'm quite pleased with this. The other side, of course, has the reversing lamp rather than the fog lamp.
 However, there was a problem, in that the indicator lights are pretty close
to the tyre, and with the connector plugged in the back of the light would be just about touching. At first this
caused a rather black depression. It probably explains why Dax use those horrible little weedy Mini lights at the
rear.
However, there was a problem, in that the indicator lights are pretty close
to the tyre, and with the connector plugged in the back of the light would be just about touching. At first this
caused a rather black depression. It probably explains why Dax use those horrible little weedy Mini lights at the
rear.
Luckily, I think I've come up with a solution. This was to saw off the back of the connector housing on the back of the lights and solder/heat shrink/Würth some wires directly on that leave the light at 90° instead of the usual straight-on position. The photo here shows the difference. You have to imagine that the one on the right has the other part of the connector plugged on the back, making it about another 2cm longer.
I think this is going to provide enough clearance, but I worry about an enthusiastic SVA inspector.
 I finished the day by wiring up one side of the rear of the car. Luckily the
electrics actually worked...
I finished the day by wiring up one side of the rear of the car. Luckily the
electrics actually worked...
 The SVA date is pressing and I still need to press on. I keep thinking I'm spoiling this
by rushing the last bit really...
The SVA date is pressing and I still need to press on. I keep thinking I'm spoiling this
by rushing the last bit really...
Anyway, I started off today by wiring up the right hand rear lights, which all went fine.
Then I moved to the headlamps. The lamps I got were dead cheap Czech imports (although they've got all the E marks) and I'm not sure how wel they are going to work. However, they were a) cheap and b) shiny. The latter being the main criterion.
I spent a while working out what the wiring of the halogen lamps was, but having done that it didn't take long to get them on board.
 Having done that I tightened up the front suspension/SVA bar again. The headlights
have sidelights in them, but the lights on the SVA bars are needed for the indicators at the moment. With all that
done I could put the front bodywork on again. Anthea appeared at this point and commented that it all looked rather
good.
Having done that I tightened up the front suspension/SVA bar again. The headlights
have sidelights in them, but the lights on the SVA bars are needed for the indicators at the moment. With all that
done I could put the front bodywork on again. Anthea appeared at this point and commented that it all looked rather
good.
 Finally, I stuck these horrible little reflectors on the rear of the car. I
wonder if the sticky pads are going to keep these in place...?
Finally, I stuck these horrible little reflectors on the rear of the car. I
wonder if the sticky pads are going to keep these in place...?
 Last day of the month and just over a week to go! First thing today was to fix something
that's been bugging me for ages. When I did the fuel
filler a while ago I put the breather vent that I got from Think into the filler hose itself, with the aid
of some fibre washers and blanked off the spare inlet connection.
Last day of the month and just over a week to go! First thing today was to fix something
that's been bugging me for ages. When I did the fuel
filler a while ago I put the breather vent that I got from Think into the filler hose itself, with the aid
of some fibre washers and blanked off the spare inlet connection.
I decided to change this as the vent actually gets in the way of hoses that are put in to fill up the tank and I had realised that I could put the vent into the additional inlet hose. I had wondered for a while whether I had the bottle to drill into the tank to install the vent that way, but I decided I didn't. This is the way that Westfield supply their tanks and seems rather more sensible, although to be fair the Dax tank is injection capable and using the simple vent I have with a pressurised tank would not be sensible.
 The other re-doing issue relates to the foglight. There is apparently a new
view that the light has to be vertical. This seems rather daft to me as there is no reason why a reflector can't
send light in any old direction. However, if I want to get it through the SVA here goes.
The other re-doing issue relates to the foglight. There is apparently a new
view that the light has to be vertical. This seems rather daft to me as there is no reason why a reflector can't
send light in any old direction. However, if I want to get it through the SVA here goes.
I took the fog light off and cut the existing support ring at an angle so that the light ends up vertical, or nearly so anyway. It actually looks alright and the only reason I didn't do the reversing light to is due to shortage of time.
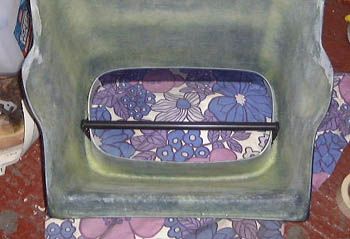
 Finally, I had a got at the boot box. This needed a certain amount of chopping about to
fit neatly. Once done I attached it, using yet more edging strip, using rivnuts and some nice stainless steel M5
bolts. However, it will have to come off again to fit the seat belts.
Finally, I had a got at the boot box. This needed a certain amount of chopping about to
fit neatly. Once done I attached it, using yet more edging strip, using rivnuts and some nice stainless steel M5
bolts. However, it will have to come off again to fit the seat belts.
It's occurred to me that I've just about finished the bits that could be called building. There's other things such as adjusting and tightening suspension, but they're all bits and pieces. Also, there's a distant possibility that with the boot box in I've finished chopping up bits of GRP and filling the garage with dust...
in case you've got to this frame directly and can't get out, go here.