 So, I was aiming to get the engine started today, so there was quite a lot to do.
The first job was to check that the oil system was going to work, especially as Rover V8s are reputed to have lots of problems caused by the low pressure oil system. What's more, the engine has been sitting around for a long time not doing anything, so it would be good to make sure that things worked properly.
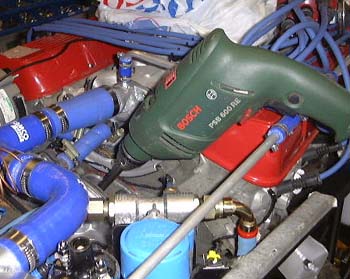
Luckily, a while ago I had bought a device to drive the oil pump with from Real Steel. This is just a 13mm diameter shaft with the correct fitting on the end to fit into the oil pump drive on the bottom of the distributor. This can be fitted into an electric drill and the pump spun round.
 This was all done, as you can see in the photo above. The oil pressure would
only get up to about 40psi on maximum of the drill (although it was having quite some trouble). At least that's
40psi on the pressure gauge rigged up a while ago. Luckily there was no problem with the pump priming itself, presumably
because packing the pump with Vaseline a long time ago had the desired effect.
This was all done, as you can see in the photo above. The oil pressure would
only get up to about 40psi on maximum of the drill (although it was having quite some trouble). At least that's
40psi on the pressure gauge rigged up a while ago. Luckily there was no problem with the pump priming itself, presumably
because packing the pump with Vaseline a long time ago had the desired effect.
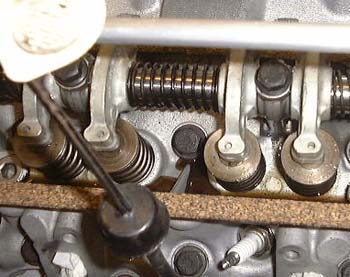
In order to check what was going on I took off the left hand rocker cover so that I could see if oil arrived at the valve rockers. Luckily it did so, and the photo here shows the oil pooled under the rockers.
After that I tried spinning the engine over on the starter (after removing the plugs) while the oil pump was being driven. Hopefully this would make sure that the lifters filled with oil properly. This all seemed to work as while the engine was going round the valves were opening in the appropriate manner.
I think it was about this point that I noticed the charge light on the mini dashboard I had made wasn't on when the ignition was turned on. I've probably wired this up wrong...
 It was time to put some fuel into the tank, so I purloined
the lawn mower's fuel supply (a much better use for it!) and poured it into the tank. Unfortunately, it leaked,
comprehensively, out of the pipe connection to the tank. After much hunting around it was clear that I should have
used a smaller size of filler pipe. Luckily I had bought some of this size too a while ago, as I wasn't sure which
was the best. So, after a certain amount of faffing about that was all in position and I carrying on with ensuring
that the grass grows unchecked.
It was time to put some fuel into the tank, so I purloined
the lawn mower's fuel supply (a much better use for it!) and poured it into the tank. Unfortunately, it leaked,
comprehensively, out of the pipe connection to the tank. After much hunting around it was clear that I should have
used a smaller size of filler pipe. Luckily I had bought some of this size too a while ago, as I wasn't sure which
was the best. So, after a certain amount of faffing about that was all in position and I carrying on with ensuring
that the grass grows unchecked.
I could then check that the fuel pump worked and it did indeed seem to do so.
Next I set the static timing at 6° BTDC, although in order to do that I had to refit the distributor which is a truly horrible job as the bottom of the distributor shaft has to engage in the oil pump drive which means everything has to be just so as the distributor is inserted. Still it all went back together. The rotor arm was in a slightly different position before, but who cares about that as all I had to do was shuffle the plug leads around a bit.
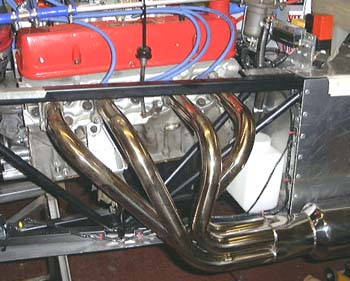
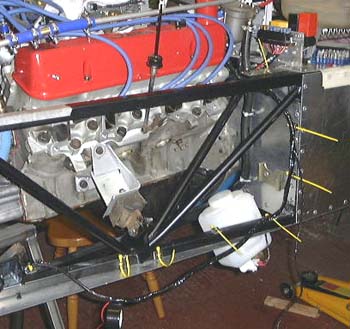
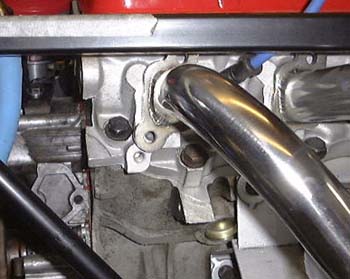 After that things got a bit more difficult. I wanted
to connect up the exhaust systems and struck problems in that the exhausts, as supplied by Dax basically don't
fit. Essentially the headers, which are just welded to the exhaust, are in the wrong position. The photo here shows
the obvious misalignment of one cylinder's header when the two at the other end of the head are bolted into position.
(It's about 2cm out.)
After that things got a bit more difficult. I wanted
to connect up the exhaust systems and struck problems in that the exhausts, as supplied by Dax basically don't
fit. Essentially the headers, which are just welded to the exhaust, are in the wrong position. The photo here shows
the obvious misalignment of one cylinder's header when the two at the other end of the head are bolted into position.
(It's about 2cm out.)
This is totally ridiculous. I paid nearly £2000 for these exhausts and they ought to be perfect for that price.
I managed to get most of the things to fit, although in a couple of cases the flanges are rotated to the wrong position and there's no way I can change this. The only thing to do here is to file the hole in a flange a bit bigger. For now I've left a few of the bolts out. Unfortunately, it's clear that there's no way I could do what I had to do to fit these with the side panels in position. I'm going ot have to make up some sort of template and bend the pipes around (God knows how though) to fit it.
To say I'm annoyed about this is an understatement, this is shoddy manufacture. I realise that things are hard to keep in position when they are welded, but surely they should have a jig to make all this work properly?
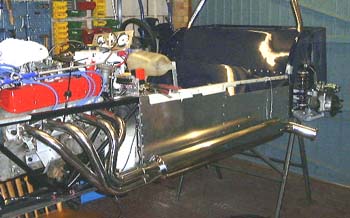 Still the exhausts look fairly nice, it's just that I think I'm never going to get them on again properly!
By the way, the rear of the exhausts is held up with a combination of tie-wraps and wire coat hangers...
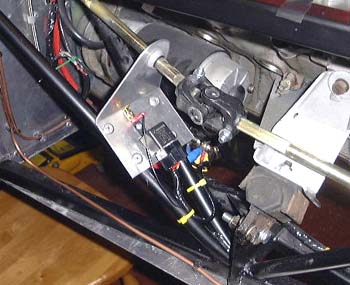
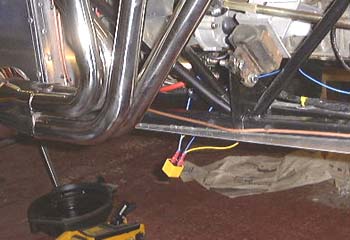 Finally, I wanted to sort the wiring for the ballast
resistor. As I said, I'm going to have to use a relay to provide the bypass current. I lashed this up as I had
ordered a proper relay and base yesterday and it hasn't arrived yet.
Finally, I wanted to sort the wiring for the ballast
resistor. As I said, I'm going to have to use a relay to provide the bypass current. I lashed this up as I had
ordered a proper relay and base yesterday and it hasn't arrived yet.
 By now it was about 10pm and I tried to make myself wait until the morning to try the engine but failed.
I peered down into the carb to see if the accelerator pump was working, which it seems to do. I couldn't think of any more displacement activity so I went round to the ignition switch and twisted it.
It started! The noise was astonishing!
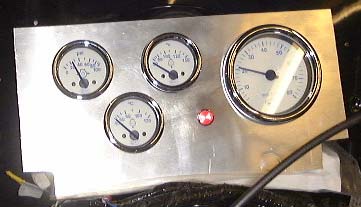
I left it running for a couple of minutes, but decided I should leave the rest until tomorrow as the neighbours will doubtless get a bit pissed off otherwise. The photo here shows the tachometer reading 2000 rpm, along with rather low (but non-zero) oil pressure.
What isn't quite clear is that the charge light is on now. Hmmm, presumably this means the sense of the light is arse-about-face. I'll need to think about this a bit more... What I do need to do is to run the engine for a lot longer so as to make sure the cam is run in, as the folklore is insistent about the importance of this. I'm not sure myself but why not, I suppose.
Still after that it was time to retire. That seems to be quite a milestone that's been passed.
I worked out what was wrong with the charge light (the other side has to go to battery positive, not ground) and fixed that. Then the intention was to run the engine for a while to see whether it all fell to bits or not. So, I started it again and let it run for a while. During this there were several things I noticed:
- There was quite a lot of smoke, although it was reducing so it was probably due to the amount of oil that had been left inside the bores and so on.
- The carburettor didn't seem to be able to get the idle speed below about 1500 rpm (see below).
- The cooling fan isn't up to the job. At 2000 rpm (although see below!) it could just about hold the temperature at about 90° and didn't seem to produce the sort of gale that I was used to with the Westfield.
- The oil temperature was being recorded by the sender that I tapped into the oil filter housing a while ago. What's more, it wasn't leaking! In fact, nothing was leaking!
When all that was over I turned it off for a while. I was musing about the second item above and it occurred to me that the engine didn't seem to have been going that quickly. So, I got the oscilloscope out and with the probe on the contact breaker connector it was quite clear that all the rpm numbers needed to be halved. This was odd, as I had checked that the tacho was set to the right position for an 8 cylinder engine. So, I took the back off the tacho (there's a DIP switch in there with the settings) and it was quite clear that some small creatures had been in there adjusting the settings to those for a 4 cylinder engine... I had checked them, I really had...
 So, I sorted that out and this time tried running the engine again, albeit this time a little faster.
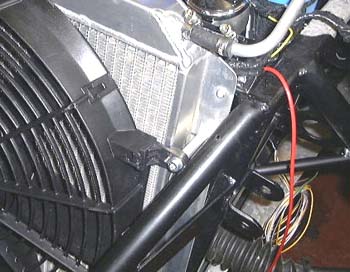
In a fairly period of time it became apparent that problem 3 was serious, as the temperature was skyrocketing. As I was going for the ignition switch there was a pop and the vent pipe came off the aforementioned dodgy vent connection on the radiator. This caused a jet of boiling water to shoot across the garage, luckily nowhere near me. After I'd shut it down there was rather a lot of cleaning up to do.
So, it's clear that I need a better cooling fan. Tomorrow, I'll peruse the catalogues and see what I can find. I also need to find a better way of connecting to that radiator vent. Perhaps I'll phone Dax about this, as I paid a lot of money for this radiator and not being able to connect to it is a bummer.
One bright spot is that the exhaust has gone a nice goldy colour, although it still doesn't bloody well fit right! (Hmmm, looking at that photo, it reminds me I must go and have a look to see if that washer bottle has survived the experience!)
I ordered the biggest fan I could find from Demon Tweeks, with luck that'll help keeping the temperature down. It ought to do something, as the quoted flow rate is about twice what the current one is. I think it should fit, but I'll probably need to make some brackets to bolt it to as the clamp through the radiator core that the current one is using may well not be adequate.
The only problem is the new fan is that the rated current requirement is 19 amps. I'm not sure if the current wiring is up to this, I might need to uprate it. This could well require another relay. (There's getting to be too many of them...)
Peter Walker from Dax phoned up yesterday. He had heard about my problems with the exhausts and agreed that things did not sound too good as it was. He wanted me to get the exhausts back as soon as I can, which I will as soon as I've got the cooling sorted. Luckily the (huge!) fan has arrived from Demon Tweeks today so with luck I can do this at the weekend.
I also spoke to him about the radiator overflow connection and this is apparently outside of Dax's spec too. (Makes you think about goods inwards procedures this...) Again, he asked me to take this in and I'll try and do this at the weekend.
As usual, it was good to talk to Peter, he seemed quite dischuffed that all this was happening to the same person!
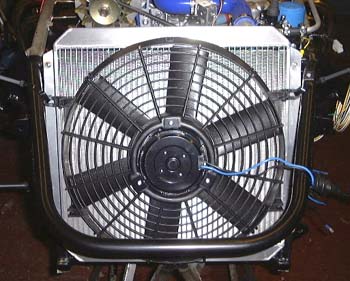 I lashed up the new fan to see if it was going to work. It's certainly huge compared to
the other one, and I'm wondering if the same sort of fittings (essentially
like straight tiewraps that go straight through the radiator core, are going to work OK. However, with the engine
running at 2000rpm (honest!) it seemed capable of bringing down the temperature. However, with it running at 1000rpm
it definitely had a bit more trouble, probably due to the water pump going at half speed and the fact that I'm
pretty sure there's air inside the cooling system at the moment. This latter point is an issue that seems to affect
lots of Rushes. It can only get worse when I get the heater in as that will entail more stuff at a high level.
I lashed up the new fan to see if it was going to work. It's certainly huge compared to
the other one, and I'm wondering if the same sort of fittings (essentially
like straight tiewraps that go straight through the radiator core, are going to work OK. However, with the engine
running at 2000rpm (honest!) it seemed capable of bringing down the temperature. However, with it running at 1000rpm
it definitely had a bit more trouble, probably due to the water pump going at half speed and the fact that I'm
pretty sure there's air inside the cooling system at the moment. This latter point is an issue that seems to affect
lots of Rushes. It can only get worse when I get the heater in as that will entail more stuff at a high level.
It's also just possible that I've made a piece of hose stick to the dodgy vent connection...
September 8th
I took the exhausts back to Dax today and left them there to see what they can do. It was interesting to note that when I put them on the floor of the welding shop there was a distinct and visible difference between the two systems, concerned with the angle that the header pipes left the collector. For one system it was a straight line, on the other there was a distinct turn there.
I'll phone Peter Walker and see what can be done on Monday.
While I was at it I took the rear arches back. I've decided to for the narrower rear tyre option which means narrowing the arches. I've come to think that the back of the Rush looks too wide anyway (presumably it's like this because they just use the standard Sierra driveshaft unlike the Westfield ones which are shorter than Uncle Henry's versions.
 Having made sure that the engine starts and without the exhausts I now needed
to finish off the various things I had had to bodge to get the engine start sorted.
Having made sure that the engine starts and without the exhausts I now needed
to finish off the various things I had had to bodge to get the engine start sorted.
First of all I sorted the relay that I had hacked together. This time I mounted it properly and tidied up all the wiring. For some reason little things like this seem to be taking ages, perhaps as the weather gets cooler I slow down...
 Next I needed to mount the new fan properly and sort out the wiring. The problem with the
wiring is that the current loom wiring is only just beefy enough for the new fan, and I feel the need for a bit
more. So, I soldered a fat lead into the bottom of the fuse box (I'm assuming that the feed side of the box is
good enough) and wrapped that lead into the loom all the way to the front of the car.
Next I needed to mount the new fan properly and sort out the wiring. The problem with the
wiring is that the current loom wiring is only just beefy enough for the new fan, and I feel the need for a bit
more. So, I soldered a fat lead into the bottom of the fuse box (I'm assuming that the feed side of the box is
good enough) and wrapped that lead into the loom all the way to the front of the car.
The new wiring and fan means that I will need a 25 amp fuse instead if the 15 amp that was there before.
 Next I needed to mount the new fan in a way other than using
tie wraps. The previous fan was mounted with some "quickmount" things. These are like linear tie wraps
that go straight through the radiator. However, this time due to the size of the fan I can't do this as the chassis/brake
pipes/stuff are in the way. At least, I can't at the top of the radiator, the bottom is probably fine.
Next I needed to mount the new fan in a way other than using
tie wraps. The previous fan was mounted with some "quickmount" things. These are like linear tie wraps
that go straight through the radiator. However, this time due to the size of the fan I can't do this as the chassis/brake
pipes/stuff are in the way. At least, I can't at the top of the radiator, the bottom is probably fine.
So, I mounted the fan by bolting it at the sides, using some long spacers. At the bottom it fitted alright with the quickmounts. It's actually very firm after all that.
Next I wired the fan in using yet another relay (the car's going to click all the time!) to switch the big fat lead newly added. That is, the original thermostat is now just switching the relay's coil current.
After all that I need to get back to the side panels. I've been putting them off to be honest but I really need to make sure they are going to work....
in case you've got to this frame directly and can't get out, go here.