 I tried to spend a fair while on the car again this weekend. Although I don't
seem to have done a huge amount one particular big job has been done successfully.
I tried to spend a fair while on the car again this weekend. Although I don't
seem to have done a huge amount one particular big job has been done successfully.
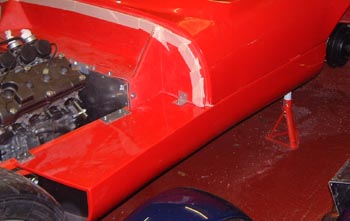
The main thing to start on was fitting the rear tub properly and to do this I needed to fit the sidepods properly. In particular I needed to attach them to the aluminium floor extensions so that they are fixed at both the top and the bottom. The left hand sidepod really needs to be easy to get off, on account of the exhaust being inside it, so I attached that one with bolts and rivnuts. The right hand one was rivetted on.
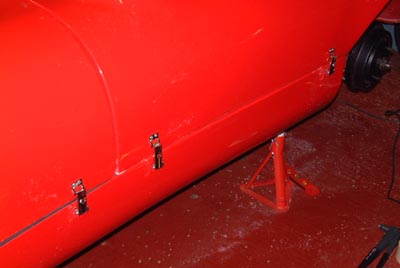 The next thing, working up to removing half of the rear tub, was to attach latches to hold
the rear tub and the bonnet down. So, I attached these in the correct positions all round. The rear tub actually
has two latches each side, although as yet they don't do anything as the front of the scuttle is still bolted down.
The next thing, working up to removing half of the rear tub, was to attach latches to hold
the rear tub and the bonnet down. So, I attached these in the correct positions all round. The rear tub actually
has two latches each side, although as yet they don't do anything as the front of the scuttle is still bolted down.
You can only just about see them in this photo, but they are there! I also fitted some small bits of aluminium angle at the top front of each sidepod that holds the bonnet sides out far enoughso that it lines up properly with the side of the sidepod.
 So, I was now at the point where I really couldn't put it off any longer. So,
after marking what I wanted to do carefully, I cut around the front of the rear tub, separating it from the scuttle
section. This was done on the front vertical surface so that the flange that supports the bonnet remains attached
to the rear tub. Then, when everything is attached, the bonnet will help to hold down the rear tub.
So, I was now at the point where I really couldn't put it off any longer. So,
after marking what I wanted to do carefully, I cut around the front of the rear tub, separating it from the scuttle
section. This was done on the front vertical surface so that the flange that supports the bonnet remains attached
to the rear tub. Then, when everything is attached, the bonnet will help to hold down the rear tub.
The one problem, that I can see so far, with this approach is that it makes the vertical "wall" of the scuttle section rather less well supported.
 I resolved this, I think, by making some positive connections between the scuttle
section and the rest of the rear tub with some Dzus fasteners. (Those quarter-turn things that you use a coin or
a screwdriver to fasten.)
I resolved this, I think, by making some positive connections between the scuttle
section and the rest of the rear tub with some Dzus fasteners. (Those quarter-turn things that you use a coin or
a screwdriver to fasten.)
Certainly, with these in and the latches done up, the rear tub is pretty firm. However, popping open the three Dzus fasteners and the four latches makes the rear tub easily removeable. It'll be a bit more difficult once the cage is in the way!
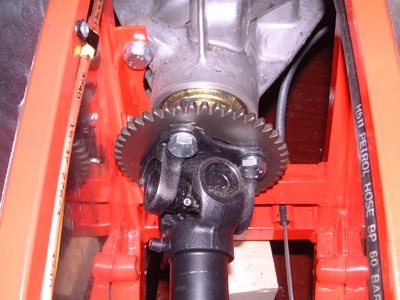 With all that done I could move back to mechanical matters. First up was to
fit the propshaft. This entailed fitting the starter ring gear too to the diff input. This was made a bit tricky
by the holes in the ring-gear not having been drilled in quite the right place but that was resolved with some
very careful dremelling. I'll have to hope that the slight misalignment that the misaligned holes creates will
not create a huge amount of vibration.
With all that done I could move back to mechanical matters. First up was to
fit the propshaft. This entailed fitting the starter ring gear too to the diff input. This was made a bit tricky
by the holes in the ring-gear not having been drilled in quite the right place but that was resolved with some
very careful dremelling. I'll have to hope that the slight misalignment that the misaligned holes creates will
not create a huge amount of vibration.
I also attached the front of the shaft to the engine output adaptor. What remains to be done on the propshaft is to fabricate some sort of mounting for the centre bearing that reduces the prop angles as much as possible. I keep wondering whether I'm going to have to move the engine a bit to get this just right, but probably not. It will need some careful measuring though.
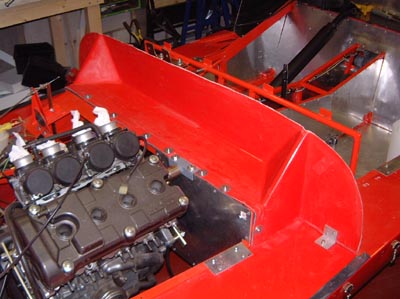
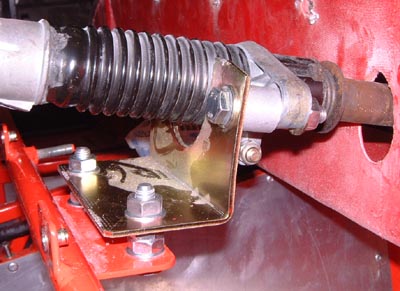
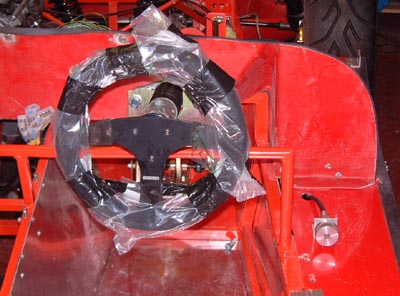 I refitted the steering column, drilling a hole through the scuttle section.
This would have been a lot more fiddly with the rear tub in place, as would mounting the brake bias adjuster on
top of the sidepod as can be seen in the photo. Mind you, I'm not convinced about the length of the bias adjuster
cable. I might phone Rally Design and see if I can get a slightly longer cable.
I refitted the steering column, drilling a hole through the scuttle section.
This would have been a lot more fiddly with the rear tub in place, as would mounting the brake bias adjuster on
top of the sidepod as can be seen in the photo. Mind you, I'm not convinced about the length of the bias adjuster
cable. I might phone Rally Design and see if I can get a slightly longer cable.
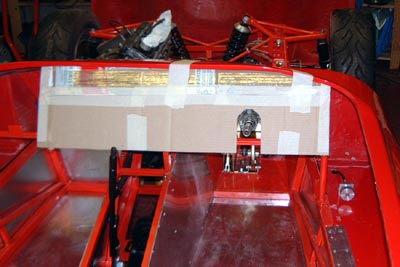 Finally, for the weekend, I started looking at getting the dash made. (Although,
that means I'll have to come to some final decision about the instruments.) The first step was to make a cardboard
template of the dash, which I've at least started doing...
Finally, for the weekend, I started looking at getting the dash made. (Although,
that means I'll have to come to some final decision about the instruments.) The first step was to make a cardboard
template of the dash, which I've at least started doing...
 I carried on fettling the dash this evening and ended up with a piece of ally that's just
about the right size and shape. On account of the removeable bodywork I need to make sure that this fixes firmly
to the chassis without relying on the body itself at all. I haven't quite worked out how to do that yet...
I carried on fettling the dash this evening and ended up with a piece of ally that's just
about the right size and shape. On account of the removeable bodywork I need to make sure that this fixes firmly
to the chassis without relying on the body itself at all. I haven't quite worked out how to do that yet...
One thing I will have to do is to work out where instruments, or whatever, will go. I think I've decided to do something simple first and buy a tacho and a couple of simple mechanical instruments for temperatures and so on. I would like to have to time to do something electronic but I just haven't got the time at the moment. Hopefully, I'll be able to sell the instruments at some later date. One problem will be making sure I've got something that will go into the right sender threads in the engine, which are doubtless some wacky Japanese things.
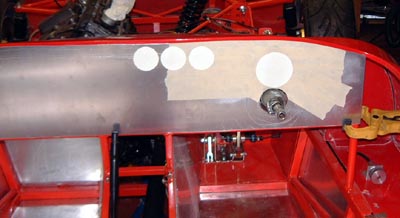
 I got the dash to the position where it fitted properly and then attached it
to the car by some rivnuts and M5 bolts into the little flanges that are welded onto the chassis.
I got the dash to the position where it fitted properly and then attached it
to the car by some rivnuts and M5 bolts into the little flanges that are welded onto the chassis.
I had been concerned that it was going to be too floppy just attached like this. However, it may just about do. If not, I've got a plan to construct some flying buttresses over the scuttle section that you can see on the right of this photo.
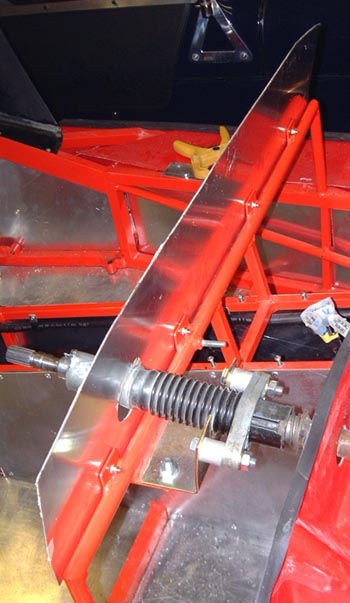
One consequence of repeatedly leaping in and out of the car and looking at the dash was that I decided that the steering column needed moving upwards. I had almost decided that this was the case a while ago but was waiting to be certain.
 So, I moved the mounting upwards by putting a couple of nuts on the fixing bolts
before the mounting plate. As you can see in the photo, this means I've now put the steering wheel higher up and
further away than would be normal. This is the cost of being too tall... The other thing you can see here is the
quite stupendous amount of glassfibre dust that's now floating about the garage. It always seems to be like this..
So, I moved the mounting upwards by putting a couple of nuts on the fixing bolts
before the mounting plate. As you can see in the photo, this means I've now put the steering wheel higher up and
further away than would be normal. This is the cost of being too tall... The other thing you can see here is the
quite stupendous amount of glassfibre dust that's now floating about the garage. It always seems to be like this..
The problem with moving the column, although it now seems to be in a much nicer position, is that I had to enlarge the holes in the scuttle and the dashboard. The latter means that there's less space for instruments that are visible through the wheel. Hopefully, there's just about enough for what I want here, which I think is the tacho, a big oil pressure warning light and the neutral light.
Hopefully I can work out the positions of the various instruments and switchs tomorrow.
 Yet again, I'm late with this. My father was reading this page and told me that I seemed
to say that all the time, oh well.
Yet again, I'm late with this. My father was reading this page and told me that I seemed
to say that all the time, oh well.
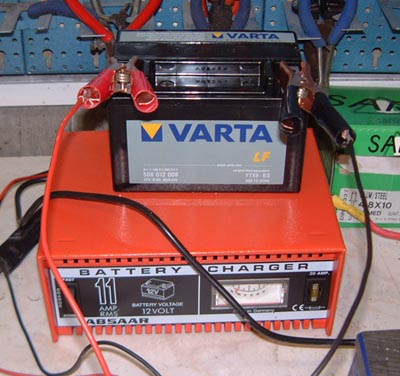
Anyway, I've been getting on with dashboard and electrical related things. One issue was that I realised that I didn't have a battery. I was about to go down to Halfords and see if they sell batteries for bikes when I saw a copy of the 750 MC magazine and remembered, prompted by a photo of Mike Fields' race car on the cover, that a company called MDS Battery are sponsors of the RGB race series. So, I ordered a Fireblade-size battery from them. It's only 8Ah but I suppose if it's good enough to start the engine then it should be fine.
When the battery arrived the next day it was amazingly tiny. Still, I filled it with the acid supplied and put it on charge for a while. I'll have to work out where to put it, for which the options are the scuttle (convenient but the weight's higher up than necessary) and at the bottom of the engine bay (the opposite).
 I've also cut all, I hope, the holes in the dash panel and mounted the switches, and so on, that I've
got already. As seems usual for race cars there seems to be an unreasonable number of switches there. What's daft
is that most of them will probably not be used.
I've also cut all, I hope, the holes in the dash panel and mounted the switches, and so on, that I've
got already. As seems usual for race cars there seems to be an unreasonable number of switches there. What's daft
is that most of them will probably not be used.
Still with that all done (although I'm waiting for various bits to be delivered still, such as the LEDs for display lamps and so on) I could start on the dash wiring. This is probably going to take me a few days...
 I've spent a while the last couple of days on the wiring on the back of the dash. It's not done yet
but it's coming on. With luck I can get it finished in a day or so and get most of the rest of the electrics wired
up. The only bit of electrics remaining then will be the lights. As it's the Stoneleigh kit car show this weekend
I'm planning on buying the cheapest, smallest, lightest, naffest lights I can find...
I've spent a while the last couple of days on the wiring on the back of the dash. It's not done yet
but it's coming on. With luck I can get it finished in a day or so and get most of the rest of the electrics wired
up. The only bit of electrics remaining then will be the lights. As it's the Stoneleigh kit car show this weekend
I'm planning on buying the cheapest, smallest, lightest, naffest lights I can find...
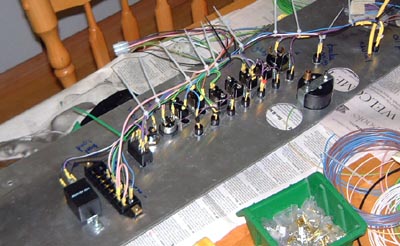
 I've finally finished the dash wiring, and wrapped it all so as to make it a
bit more dimensionally stable. The wiring that goes off the bottom of this photo goes to the four connectors that
stick up in the transmission tunnel just behind the scuttle. There's a surprising amount of wiring here though,
in some ways because everything's on the dash, including the fuses. Also there are switches for things like the
rain light which wouldn't be required normally.
I've finally finished the dash wiring, and wrapped it all so as to make it a
bit more dimensionally stable. The wiring that goes off the bottom of this photo goes to the four connectors that
stick up in the transmission tunnel just behind the scuttle. There's a surprising amount of wiring here though,
in some ways because everything's on the dash, including the fuses. Also there are switches for things like the
rain light which wouldn't be required normally.
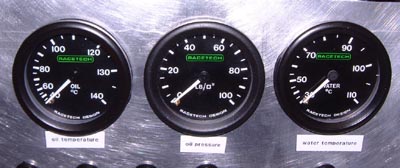 The rest of the instruments arrived today. The one you can see above is the oil pressure
gauge that I used for diagnosis when I had a problem
with oil pressure (and oil pressure senders) in the Dax a while ago. For the reasons discussed over on the Dax
page (essentially, the electrical senders are of variable quality) I was quite in favour of using mechanical instruments
until I get some whizzy electronic things sorted. So, I had decided to get another couple of Racetech gauges in
addition to a tacho. I had wondered about just getting a shift light but decided that a real tacho would be useful
at first, although buying/making a shift light later seems a sensible idea. If nothing else I really like the Racetech
instruments as they are spectacularly clear. They are the only car instruments that I've ever seen that approach
the clarity of aeronautical instrumentation.
The rest of the instruments arrived today. The one you can see above is the oil pressure
gauge that I used for diagnosis when I had a problem
with oil pressure (and oil pressure senders) in the Dax a while ago. For the reasons discussed over on the Dax
page (essentially, the electrical senders are of variable quality) I was quite in favour of using mechanical instruments
until I get some whizzy electronic things sorted. So, I had decided to get another couple of Racetech gauges in
addition to a tacho. I had wondered about just getting a shift light but decided that a real tacho would be useful
at first, although buying/making a shift light later seems a sensible idea. If nothing else I really like the Racetech
instruments as they are spectacularly clear. They are the only car instruments that I've ever seen that approach
the clarity of aeronautical instrumentation.
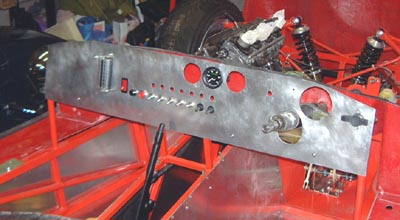
 Anyway, with all the instruments here I could finish putting the dashboard together.
Actually, there's one missing thing which is the oil pressure warning light. I've ordered a 25mm diameter LED cluster
for this and it'll be mounted right in the middle of the space behind the steering wheel. However, it hasn't arrived
yet.
Anyway, with all the instruments here I could finish putting the dashboard together.
Actually, there's one missing thing which is the oil pressure warning light. I've ordered a 25mm diameter LED cluster
for this and it'll be mounted right in the middle of the space behind the steering wheel. However, it hasn't arrived
yet.
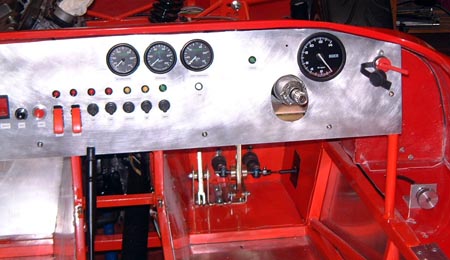
With everything in I could mount the dash back in the chassis. So I did. As you can see there's a pleasing aspect of mission control about this, perhaps exacerbated by the missile covers on a couple of the switches. I made some little labels for all the swiches and was rather entertained to see that there was a switch labelled "rain" and one next to it labelled "fog". I contemplated adding another one that said "sunshine" but I'm not convinced it'd work properly.
With that there I carried on with the wiring by wiring the low current parts of the isolater switch that's at the right hand end of the dashboard. This isn't wired into the dashboard itself, mainly because it's only on the dashboard because there isnt a convenient bit of bodywork to put it on on account of the fact that all the bodywork, just about, moves. I'll have to make up the battery cables next which also go to the isolater. Problem is, I still haven't decided where to put the battery itself...