 The
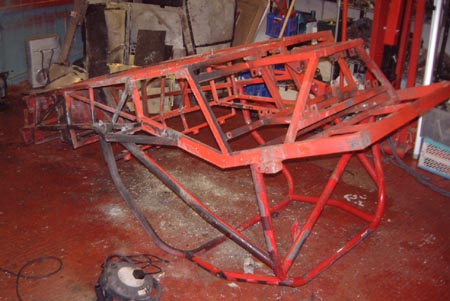
great rebuild has been proceeding slowly but surely. I got the chassis completely stripped and turned it upside
down, as you can see, to get the floor panels off.
The
great rebuild has been proceeding slowly but surely. I got the chassis completely stripped and turned it upside
down, as you can see, to get the floor panels off.
It actually didn't take that long to get it to this position, but I'm aware that I've just thrown away quite a few things that needed making in order to get here. The hard brake lines, for example, are all in the bin as I'd not be happy reusing them.
The thing was, I then had to decide how to clean up the chassis properly.
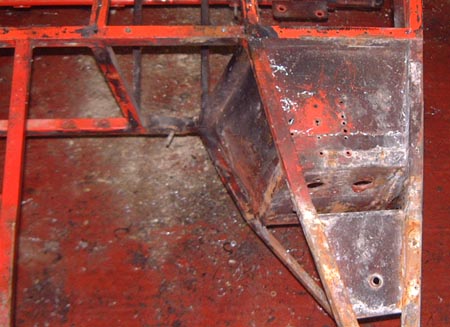 One
option was going to be to set about it with a wire brush. This is the bottom of the pedal box area which looks
rather manky.
One
option was going to be to set about it with a wire brush. This is the bottom of the pedal box area which looks
rather manky.
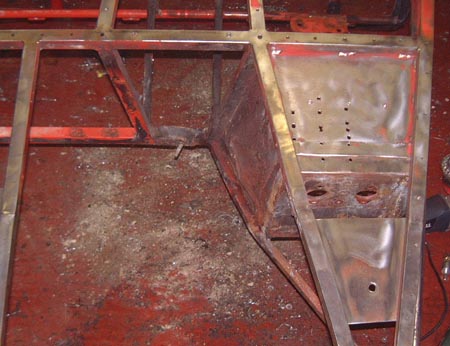 However,
with the adddition of some elbow grease and a severe shaking from the angle-grinder mounted wire brush it looks
like this. So, it's clearly possible to clean it up like this, but it's clear that it would take a long time. What's
more, after I wire-brushed my leg once I was not feeling too happy about doing it.
However,
with the adddition of some elbow grease and a severe shaking from the angle-grinder mounted wire brush it looks
like this. So, it's clearly possible to clean it up like this, but it's clear that it would take a long time. What's
more, after I wire-brushed my leg once I was not feeling too happy about doing it.
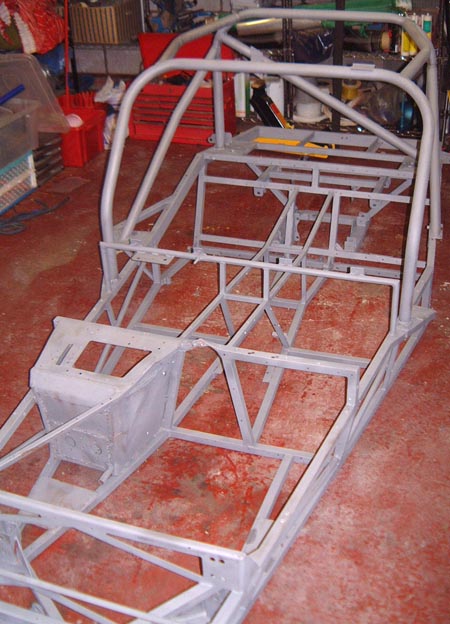 So,
I decided to get the entire thing blast cleaned and this is it after it came back. The colour is a consequence
of the bashing that every single surface has taken. You can actually make it dead shiny very easily with some wet-and-dry
but I'll probably leave it as it's clean and it'll make a decent key for what will cover up the chassis. Rather
than getting it powder coated which would only start falling off after a while, I'll probably paint the chassis
with POR-15 which seems to have the advantage of not falling off again too easily.
So,
I decided to get the entire thing blast cleaned and this is it after it came back. The colour is a consequence
of the bashing that every single surface has taken. You can actually make it dead shiny very easily with some wet-and-dry
but I'll probably leave it as it's clean and it'll make a decent key for what will cover up the chassis. Rather
than getting it powder coated which would only start falling off after a while, I'll probably paint the chassis
with POR-15 which seems to have the advantage of not falling off again too easily.
I suppose I might change my mind though...
 Anyway,
with the chassis all nice and clean I can get on with the various modifications and repairs that I want to make.
Anyway,
with the chassis all nice and clean I can get on with the various modifications and repairs that I want to make.
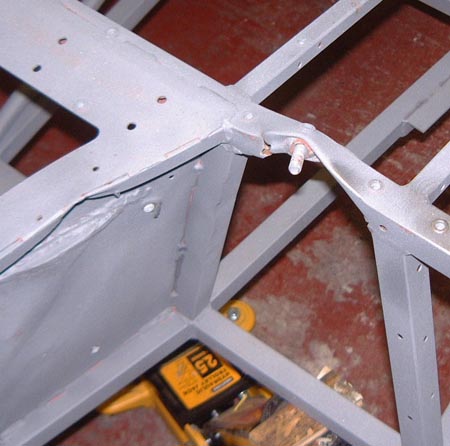
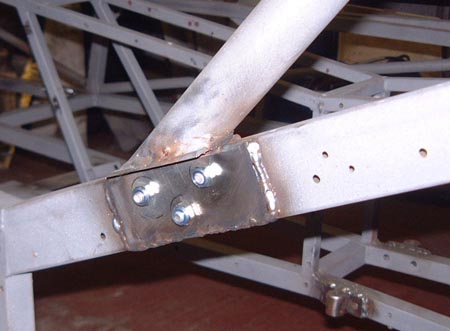
The first repair is this cross piece where the prop thumped it mega-hard. As you can see, it almost tore through the steel; it's probably very lucky that it didn't.
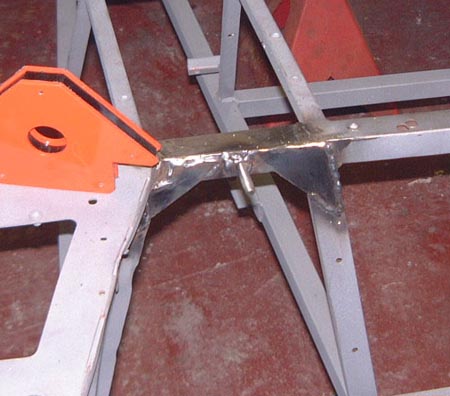 So, I cut out that section, welded a new bit in and added some gussets to replace the strength that
has been cut out. Not that I've done any calculations, you understand...
So, I cut out that section, welded a new bit in and added some gussets to replace the strength that
has been cut out. Not that I've done any calculations, you understand...
 One rather serious thing that I noticed was that the rear suspension mounts were not very well aligned.
This is the area that got a severe thumping in the Silverstone crash
last year. With all the chassis cleaned it it was clear that the cage that goes around the bottom of the diff wasn't
as well aligned as I thought it was.
One rather serious thing that I noticed was that the rear suspension mounts were not very well aligned.
This is the area that got a severe thumping in the Silverstone crash
last year. With all the chassis cleaned it it was clear that the cage that goes around the bottom of the diff wasn't
as well aligned as I thought it was.
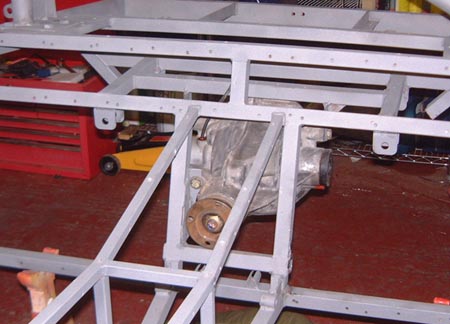
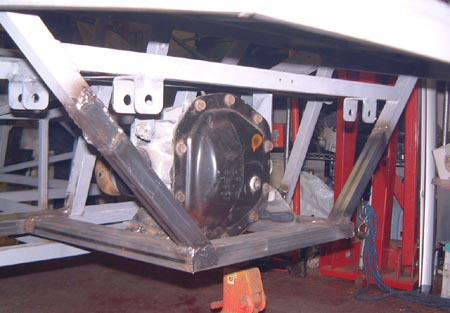
So, I spent a while debating what to do and finally decided that I had to do it properly while I had the chance. So, I cut away the entire lower rear suspension mounting! I then bolted the diff itself back into the chassis, as seen in the photo here. I can then use the diff as a datum to align a new construction with.
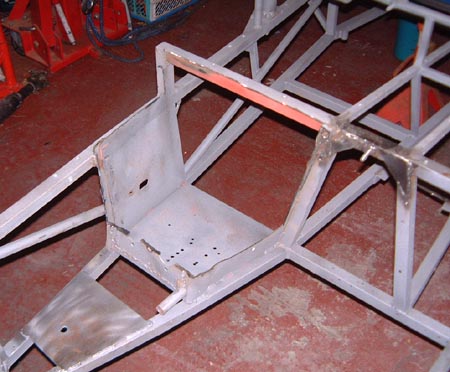
 This is the first part of the reconstruction. The tube behind the driver's seat has been replaced.
This tube actually had a small bend in it as a result of the crash. That bend meant that the lower wishbone mounts
were not properly aligned with each other. I'll add some gussets here too so as to make sure this tube is well
fixed in place.
This is the first part of the reconstruction. The tube behind the driver's seat has been replaced.
This tube actually had a small bend in it as a result of the crash. That bend meant that the lower wishbone mounts
were not properly aligned with each other. I'll add some gussets here too so as to make sure this tube is well
fixed in place.
The other thing I've done can be seen at the bottom right. When I got the chassis originally, Fishers had forgotten to weld in the inside crotch strap mounts. I've just had them bolted in for ages but with everything clean and no powder coating to mess up, it made sense to weld them into position properly. Given the trouble that Dan has had, I'm clearly lucky to have got away with just this one chassis problem.
Next up will be more chassis repairs. I'm starting to get the bits in I need to actually do the rebuild though. I'll probably get the braking stuff and what I need to make a new loom next...
 Just continuing the slow progress really, although lots of cardboard boxes have been arriving at the
house with goodies in to complete the rebuild. What's more, I phoned up Fishers today and the new bodywork I ordered
a few weeks ago is apparently now done and will be winging its way to me fairly soon.
Just continuing the slow progress really, although lots of cardboard boxes have been arriving at the
house with goodies in to complete the rebuild. What's more, I phoned up Fishers today and the new bodywork I ordered
a few weeks ago is apparently now done and will be winging its way to me fairly soon.
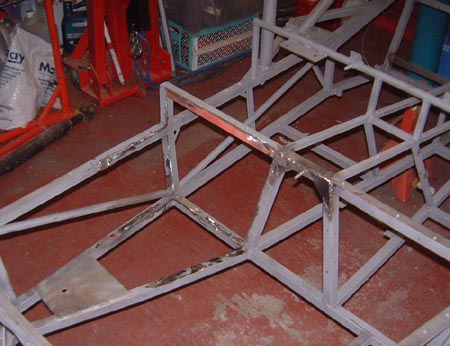
In the meantime I've been pressing on with the chassis. I've finished rebuilding the rear suspension as in the photo. The only things to do are a) weld in the lower wishbone mounting points and b) do some of the welding on the bottom of the chassis. Those things will be easier to do when I've taken the diff out again and turned the chassis upside down, respectively. I don't want to do those two things yet as I want to trial fit the engine and measure up for the size of a new propshaft.
 One of the reasons for trial fitting the engine is to look at modifying the pedal box. With that in
mind I've been cutting away the existing one, although I think I ought to buy one of those reciprocating saws that
they always advertise on TV in the run up to Christmas. Once this is back to just the flat bottom I'll fit the
engine again.
One of the reasons for trial fitting the engine is to look at modifying the pedal box. With that in
mind I've been cutting away the existing one, although I think I ought to buy one of those reciprocating saws that
they always advertise on TV in the run up to Christmas. Once this is back to just the flat bottom I'll fit the
engine again.
In the meantime, the new programme for RGB next year has been announced. Well the provisional version has. It looks great with a double header at Oulton and a weekend away in Anglesey. I'm a happy camper with that...
 Well, it's only ten days since the last update, which probably isn't too bad. Progress has continued
although at a rather pedestrian rate.
Well, it's only ten days since the last update, which probably isn't too bad. Progress has continued
although at a rather pedestrian rate.
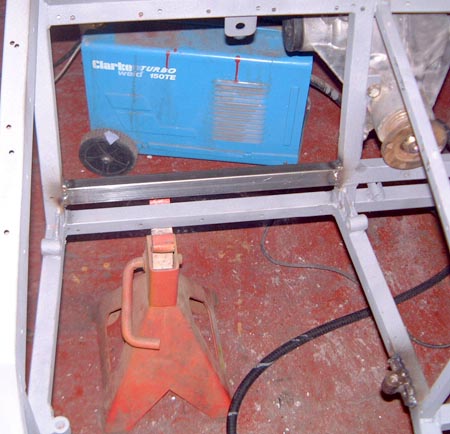
As you can see from the photo, I've continued hacking away at the chassis. In fact, I've completely removed the pedal box here. Rather than modifying the pedal box, I've decided to buy a complete 3-pedal box and fit that to the chassis. However, it's going to need a good but of cutting and shutting to make it fit. After some thought, the easiest thing to do seemed to be to completely cut the existing one away, so I did...
 I've
done a few other little mods around the chassis too. This is the support for the left hand roll bar leg and for
a while I was concerned that the chassis in this area was a bit spindly to be used for this support. So, I've welded
in the place that you can see to strengthen things up a bit.
I've
done a few other little mods around the chassis too. This is the support for the left hand roll bar leg and for
a while I was concerned that the chassis in this area was a bit spindly to be used for this support. So, I've welded
in the place that you can see to strengthen things up a bit.
The big advantage to having the chassis completely clear is that it's easy to get at things like this with the welder, and hence easier to make a decent fist of the welds. But, I've just reminded myself, my big bottle of argon/CO2 is just about empty and I ought to go and buy a new one. Problem is, I can't find my BOC account number, or at least it isn't where I thought it was.
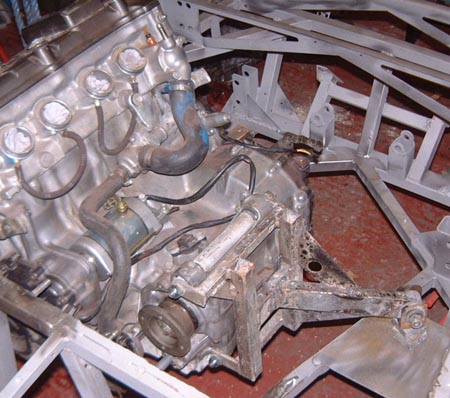 Part
of sorting out the pedals will be to change the engine mounts in some way, so as to clear the moved front of the
pedal box. To do this I needed to put the engine in the chassis, so I fitted the baffled sumped to the engine and
bolted on the original engine mounts. (Rather fire marked as you can see in the photo.)
Part
of sorting out the pedals will be to change the engine mounts in some way, so as to clear the moved front of the
pedal box. To do this I needed to put the engine in the chassis, so I fitted the baffled sumped to the engine and
bolted on the original engine mounts. (Rather fire marked as you can see in the photo.)
You should note that the engine has got a starter motor fitted. This is Colin Chapman's spare that he's kindly letting me use on extended loan. I suspect that he's hoping that it'll fail just as I'm heading off from the assembly area at some point next year.
 To check all the positioning of the pedals, I really needed to be able to sit in the car which is a
little tricky without the floor panels. I've bought a large quantity of NS4 aluminium to make these but it's currently
sitting in the shed.
To check all the positioning of the pedals, I really needed to be able to sit in the car which is a
little tricky without the floor panels. I've bought a large quantity of NS4 aluminium to make these but it's currently
sitting in the shed.
So, I lowered the complete chassis to the ground and took off the damaged engine mount that you can see in the above photo. I balanced the engine on a pad of PostIt notes to get it at the right sort of height. That's probably not going to be a viable long term strategy though.
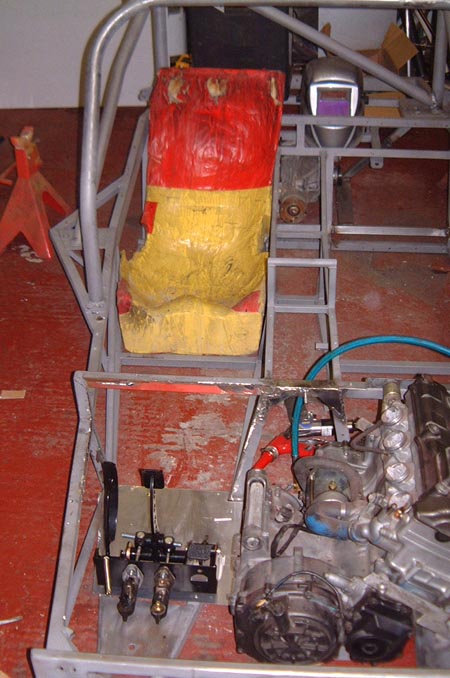
I put the seat (also fire damaged) in the chassis and started making a temporary pedal box out of very thin aluminium. You can see the new pedal box (from these people) sitting in there. I've also attached a couple of old master cylinders to it, just to make the brake pedal a bit springy. They're also fire marked, as you can tell from the colour of them, and I certainly won't be using them again although they're fine for this.
I ended up with the pedals a good distance in front of where they used to be, although eagle eyed readers will note that I've cut out the dash support tube. It was now where my knees wanted to be, but I'll have to arrange something different for supporting the top of the steering column. I'm not quite sure how at the moment.
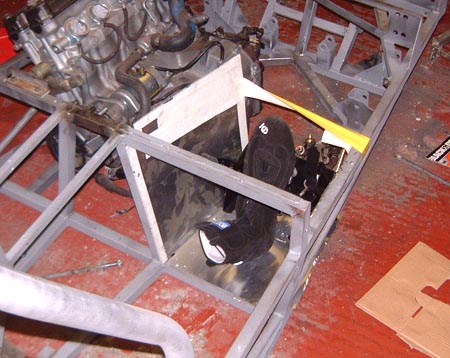 I tried various things to make sure I knew the pedals were where I wanted them to be. While I'm at
it I want to make the pedal box a trifle taller. This'll mean that I'm able to use the new boots that I bought
at the Autosport show last January and which used to scrape on the roof of the old pedal box. Although they're
the same size and make as the older ones they're actually slightly longer.
I tried various things to make sure I knew the pedals were where I wanted them to be. While I'm at
it I want to make the pedal box a trifle taller. This'll mean that I'm able to use the new boots that I bought
at the Autosport show last January and which used to scrape on the roof of the old pedal box. Although they're
the same size and make as the older ones they're actually slightly longer.
As you can see, I'm also practising my left foot braking technique.
I'm not sure, but I don't think I'll use duct tape for tensioning the new pedal box either.
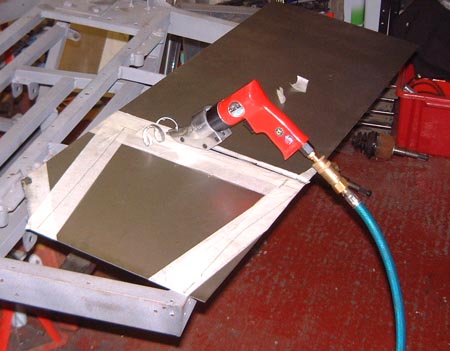 One
tip, by the way, is to buy a set of air shears if you have to do some metal work like making a pedal box. This
one here effortlessly cuts through 1.5mm steel and makes things so much easier than it used to be.
One
tip, by the way, is to buy a set of air shears if you have to do some metal work like making a pedal box. This
one here effortlessly cuts through 1.5mm steel and makes things so much easier than it used to be.
Problem is, I probably ought to replace the asthmatic little compressor that I bought from Dan a couple of years ago, especially now I realise how useful they are.
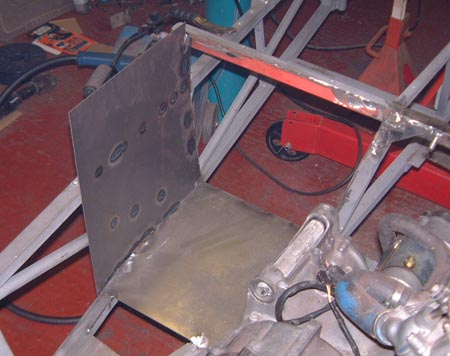 This is what I'm doing with those shears. This is the real box with the floor in place and the right
hand wall there too, I haven't cut the top yet as I'm not totally sure where I want that to be until I've fitted
the steering column and practised left foot braking some more.
This is what I'm doing with those shears. This is the real box with the floor in place and the right
hand wall there too, I haven't cut the top yet as I'm not totally sure where I want that to be until I've fitted
the steering column and practised left foot braking some more.