 Well, yet another new year has arrived and now I'm starting to feel a mite pressured about
the car. Probably good that though.
Well, yet another new year has arrived and now I'm starting to feel a mite pressured about
the car. Probably good that though.
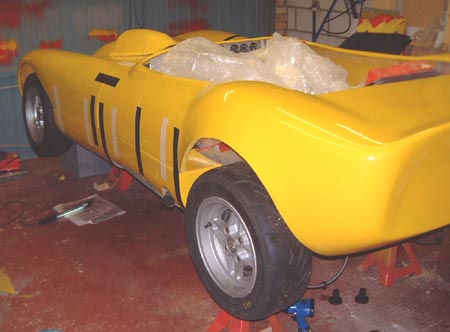
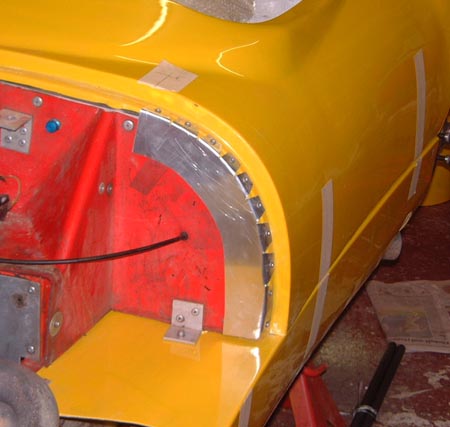
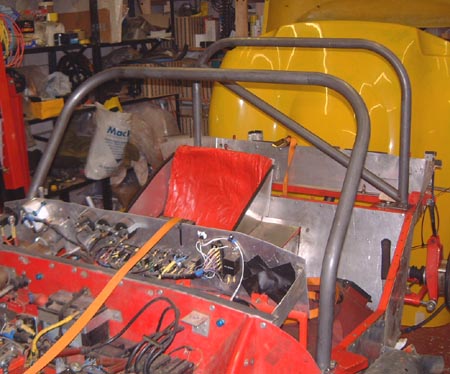
I've spent some time over the last few days fitting the new bodywork. Well, perhaps not fitting really, just sort of dropping in position.
I cut off the front of the rear tub so as to allow it to mate up with the scuttle on the car. Everything was then just placed in positioned and then secured in the right place, with much pushing around beforehand, with the time-honoured technique of securing it with gaffa tape.
As you can see in the photo, I put the wheels and suspension back on, albeit temporarily, so that I could check the wheels were in the right place with respect to the wheel arches.
Since I took that photo I've fixed the left hand sidepod properly in position, hopefully I'll do the right hand one this evening.
I've also made a new scoop for the bonnet, using the same mould as last time. I'm slightly concerned that this won't fit right due to the change in poisition of the engine. However, I'll check that in a while. I made the scoop using just about the lightest lay-up that I could manage. It's come out really light, so much so that I hope it doesn't tear off in the breeze...
I had my race licence medical the other day and my licence renewal is off in the post at the moment. The big problem though is the car. In particular I really need to get the steel for the cage and suspension so that I can get cracking on those bits...
 I've been getting on with the bodywork, as I need rather a lot of bits of steel
to do the other things I've got down for the car and I don't have that yet.
I've been getting on with the bodywork, as I need rather a lot of bits of steel
to do the other things I've got down for the car and I don't have that yet.
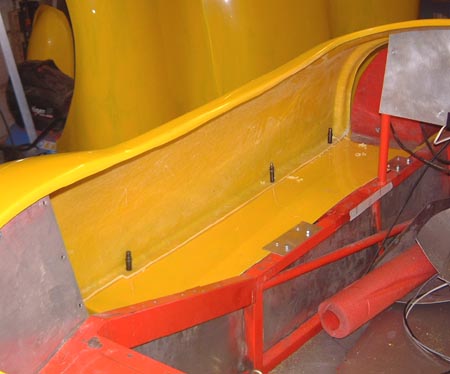
At least as I've done it before, fitting the bodywork is now rather familiar stuff. However, I've decided to do it a bit differently and I'm planning in attaching the rear tub two ways: firstly, as I did before, I'll use some bonnet pins in the rear deck, secondly I'll attach it with Dzus fasteners to the sidepods. These latter fasteners will be inside the tub and be rather neater, I think, than the camlock latches I was using before. At least one other RGB car last season worked like this so I reckon it should be fine.
Problem is, I don't have any Dzus fasteners of the size I need so for now the tub is attached by a bunch of Cleco fasteners. However, they're in the same place as the final fasteners will be. The only thing I don't know at the moment is how much hacking I'm going to have to do of the returns around the wheel arch. That'll have to wait until I've got the suspension done and the car's back on the ground.
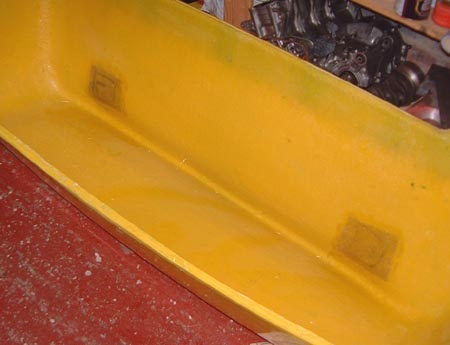 I also put a couple of small strengthening pads inside the rear deck of the
tub. These are just a single layer of 450 gsm CSM glass fibre and they're in the place where the rear support turrets
are. Experience last year was that this area of the tub is under a considerable load and it creeps as the year
progresses. With luck this'll slow that process down.
I also put a couple of small strengthening pads inside the rear deck of the
tub. These are just a single layer of 450 gsm CSM glass fibre and they're in the place where the rear support turrets
are. Experience last year was that this area of the tub is under a considerable load and it creeps as the year
progresses. With luck this'll slow that process down.
I think I've worked out what the correct red and yellow colours are that I'm going to spray (doubtlessly inexpertly) the car with. To that end I've bought a new spray gun which is a gravity-feed one. I've been doing a bit of practice with it and have got a couple of coats on the inside of the garage door now. I'll order some paint in the next couple of days in readiness for spraying it. I probaby won't get around to that for some time though. If the worse comes to the worse it could do as it is. There is a bit of a discussion going on here as to how to colour it. I originally wanted to make it all red as the original car was, before I bent the original bonnet. However, Anthea wants to retain the red/yellow theme. That leaves a number of possibilities that we've been discussing:
- Just spray the bonnet yellow and the rest red, as it used to be.
- The same, but aim for something with a more curvey line between the red and yellow.
- Tom suggested having a diagonal line across the car, right front to left rear, that divided the red and yellow bits. I originally thought that was interesting but I'm going off it.
- I've been thinking about one of the ideas we originally had when the bonnet went yellow: painting one sidepod green and the other blue, the tub red and the bonnet yellow. A bit too much like Noddy's car though.
- A rather more "classic" thing with the whole car red and a couple of wide yellow stripes (perhaps really wide) along the centre of the car. (Or even displaced from the centre.)
- A whole bunch of other even dafter ideas.
Anybody who's got any suggestions is welcome to mail them to me!
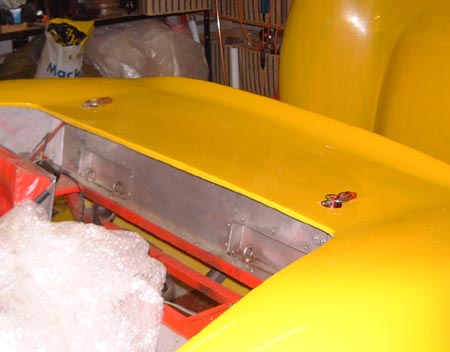 I finished fitting the rear tub this weekend. That involved fitting a couple
of bonnet pins to the rear deck of the tub as in the photo. I did wonder about using some of these new Aerocatch
things that have recently become available but managed to stop myself before spending any more unnecessary money.
I finished fitting the rear tub this weekend. That involved fitting a couple
of bonnet pins to the rear deck of the tub as in the photo. I did wonder about using some of these new Aerocatch
things that have recently become available but managed to stop myself before spending any more unnecessary money.
 I adopted the same strategy as I did for the previous tub at the front where
I made a bit of ally that goes around the left over bit of the scuttle section of the original tub. The big advantage
of fitting new bodywork is that I've done it before and such things are much easier once you've done it
once. This is, of course, a good argument for building lots of cars!
I adopted the same strategy as I did for the previous tub at the front where
I made a bit of ally that goes around the left over bit of the scuttle section of the original tub. The big advantage
of fitting new bodywork is that I've done it before and such things are much easier once you've done it
once. This is, of course, a good argument for building lots of cars!
So, the rear tub's completed fitted now and it does feel nice and firm. I'm pretty sure that I'll have to grind off most, or all, of the reveal around the wheelarches once I've got the suspension done but that can wait for a while.
 I'm now collecting lots of bits of steel! I've picked up the steel for the roll
cage at the weekend (from John Hewett, who is the main man behind Aeon
Sportscars). So, I've started to fiddle with that. Not done much yet though!
I'm now collecting lots of bits of steel! I've picked up the steel for the roll
cage at the weekend (from John Hewett, who is the main man behind Aeon
Sportscars). So, I've started to fiddle with that. Not done much yet though!
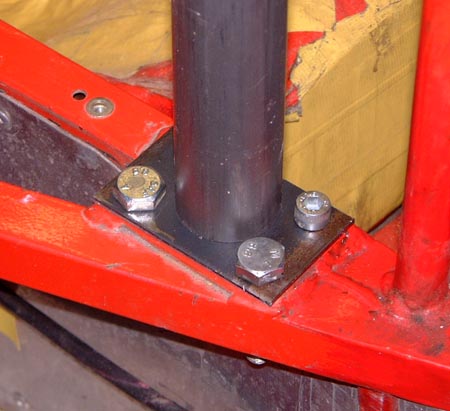
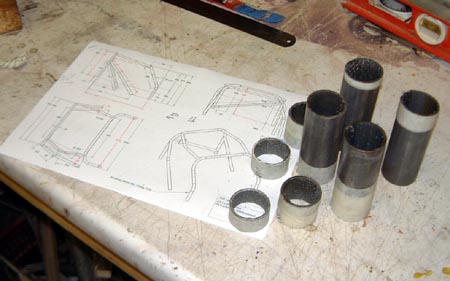
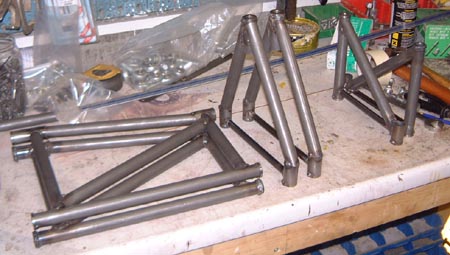
What I have done is made the little "feet" for the cage and drilled them for bolting to the chassis. The photo shows the front foot which has been modified to accept three bolts, unlike the two it had before as there's been a small problem with some people with the scrutineers pointing out that the Blue Book says that each foot of a roll cage must have at least 3 M8 bolts. Unfortunately, that roll cage tub that you can see is just a straight bit balancing on the foot. I really ought to weld it in at some point...
Next thing is to fishmouth the rear diagonal. That could well take some time as I probably need to measure it about 14 times first...
 Coo, I've just typed the date in and realised it's my birthday! I wish to hell
they didn't come round so quickly.
Coo, I've just typed the date in and realised it's my birthday! I wish to hell
they didn't come round so quickly.
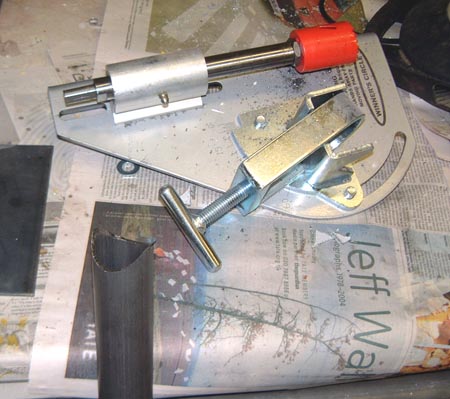
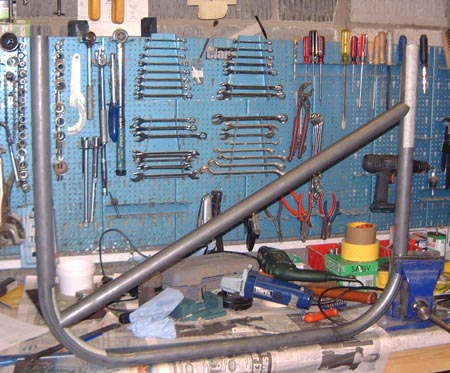
I managed to get on slightly with the cage yesterday evening. I'm planning on cutting the mitres in the tubes with this tool, which is a "tube notcher" that I got from some place in the US. You can buy exactly the same product here but it's actually cheaper to order from the US and pay for the shipping and VAT.
The photo shows the tool, it's essentially just a hole saw held at an angle and a clamp for holding a tube. I'm surprised how well it works, to be honest. When you get it set right the saw goes through even thick roll cage tube very easily. In fact, that's a bit of tube that you can see in the foreground that's previously been notched to serve duty as the rear hoop diagonal of the cage.
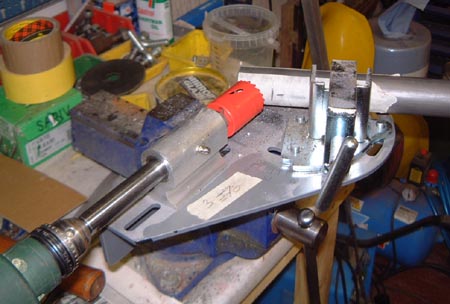 I need to do the diagonal
first as I won't be able to get it in once the rear hoop is tacked to the rear mounting "feet" on the
chassis. This is the notcher in use cutting the notch on the other end of the rear diagonal. As you can see, I'm
just driving it with an electric drill. It's really intended to mount in a drill press. However, it seems much
easier to stabilise it by clamping it tightly into a vice.
I need to do the diagonal
first as I won't be able to get it in once the rear hoop is tacked to the rear mounting "feet" on the
chassis. This is the notcher in use cutting the notch on the other end of the rear diagonal. As you can see, I'm
just driving it with an electric drill. It's really intended to mount in a drill press. However, it seems much
easier to stabilise it by clamping it tightly into a vice.
 After some faffing around I got the tube cut so that the diagonal fits fairly snugly into
the hoop. This is a tricky tube to start on as one end of the diagonal has to meet the hoop some way around the
curve at the top of the hoop. I'm really relying on the CAD model I did, to be honest, as measuring it in situ
is just incredibly difficult.
After some faffing around I got the tube cut so that the diagonal fits fairly snugly into
the hoop. This is a tricky tube to start on as one end of the diagonal has to meet the hoop some way around the
curve at the top of the hoop. I'm really relying on the CAD model I did, to be honest, as measuring it in situ
is just incredibly difficult.
This is pretty good actually and I'm moderately chuffed. One of the notches needs a little bit of trimming with an angle grinder and the sides of the hoop bringing in slightly. (It's surprisingly easy to just push them around; the steel's malleable enough to be able to have some effect.)
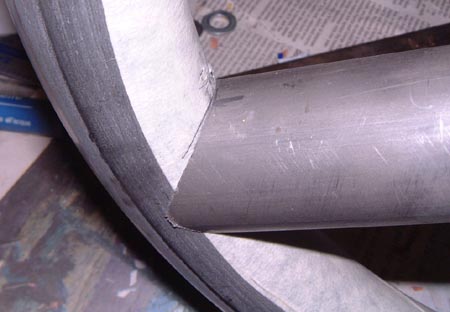 Once that's done, I think all the joints will look like this one, although I am planning
on taking the masking tape off before it's welded.
Once that's done, I think all the joints will look like this one, although I am planning
on taking the masking tape off before it's welded.
The legs on the hoop shown above are, by the way, much too long at the moment. I deliberately got the components cut over long so that I will have room to get it set up just right.
There's lot to do yet, although so far it's not been too difficult.
 I got back rather late today, well it was yesterday really, so only spent a
short time in the garage. Anyway, I did indeed manage to get the diagonal trimmed so that the joints fit pretty
snugly.
I got back rather late today, well it was yesterday really, so only spent a
short time in the garage. Anyway, I did indeed manage to get the diagonal trimmed so that the joints fit pretty
snugly.
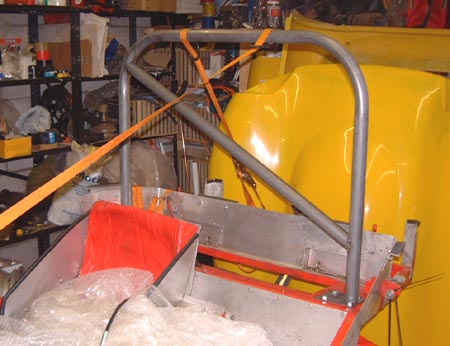
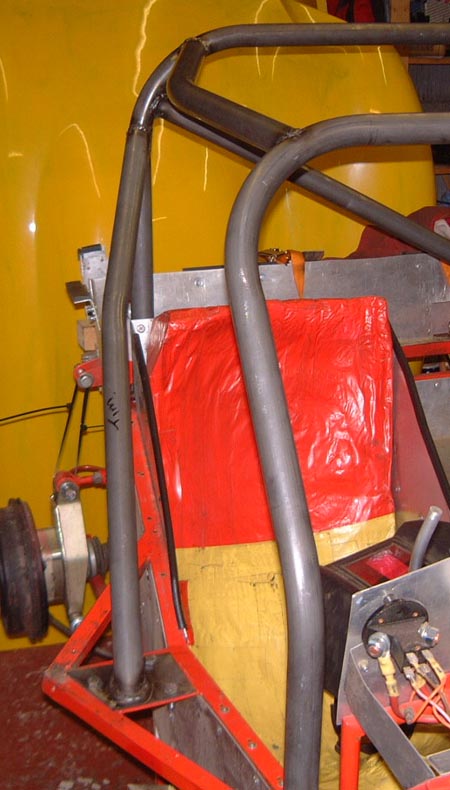
So, I tacked the diagonal in position, or what I think is position, and now I need to trim the bottoms of the vertical bits of the hoop. This is going to be a bit tricky as I need to be sure that I've cut it to the right height and it misses me by the right amount.
So, I probably need to hold it in a few places to see how it fits. So, I strapped it into the car using a couple of luggage straps, as in the photo. I think I may well end up cutting this but by shaving and inch or so off at a time until it's right. I certainly don't want to overdo it, that'd be a disaster.
I got my 2006 competition licence in the post today, so I'm now all set for the season. I've registered for the 2006 championship and I've got a licence. Admittedly, I've not paid my 750MC membership but that's probably a consequence of their new membership system which seems to be a source of continuous woes.
 I got a lot of stick about that photo above; someone suggested it looked like
another Eiffel Tower. Obviously he was only looking at the pictures and not reading the words!
I got a lot of stick about that photo above; someone suggested it looked like
another Eiffel Tower. Obviously he was only looking at the pictures and not reading the words!
Anyway, I did get on with the cage and spent a lot of time slicing bits off it. The rear hoop is just about cut down as far as possible. That is, before getting to the diagonal. That means it's a lot shorter now.
In order to make sure that the rear hoop was vertical I adjusted the whole chassis so that it was just about horizontal. Given the amount of stuff in the garage, such as the bodywork, it was a triumph just to be able to get the hoist into position to lift the chassis.
 Eventually I got things to where I want them to be and tacked the hoops the
the footplates that I've put into the chassis. The only slight worry about all this is that the front hoop seems
close to me when sitting in there. I suspect this is just because I was so used to the old one being so far away
and as the front is now shorter this one just feels odd. I'll have to see how it goes.
Eventually I got things to where I want them to be and tacked the hoops the
the footplates that I've put into the chassis. The only slight worry about all this is that the front hoop seems
close to me when sitting in there. I suspect this is just because I was so used to the old one being so far away
and as the front is now shorter this one just feels odd. I'll have to see how it goes.
Next job will probably be to put the roof bars into between these two hoops If nothing else that should make it a bit more stable. It does actually feel quite firm but I never feel like pushing tack welds too hard in case they come loose. It remains to be seen how I go about converting these tacks into real welds. I'm getting a bit concerned about taking the cage somewhere else to get it properly welded, on account of the possibility of it falling to pieces on the way there!
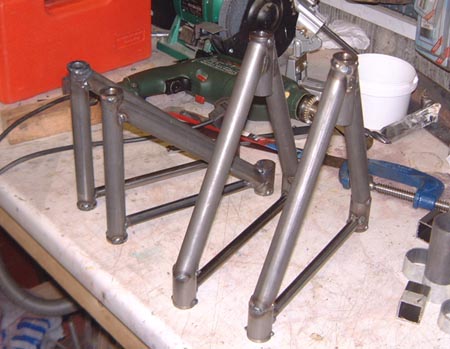 There's also been progress on the suspension. Having got a load of steel for that I've
also been fabricating wishbones. This is a collection of the ones that I've made so far.
There's also been progress on the suspension. Having got a load of steel for that I've
also been fabricating wishbones. This is a collection of the ones that I've made so far.
These are all made to work with rod end bearings ("rose joints") and are made with seamless tube, unlike the existing ones. I wasn't sure what size tubing to use for all this so I've found what size was used on the Pell Genesis that won the RGB championship in 2004. That car was rather heavier than mine and also a lot more powerful so they should be up to it.
I've also borrowed Dan's TIG welder to fabricate these. Although, to be honest, I still can't decide which is the best process for me to follow. TIG welding's a lot slower than MIG although it's a bit more relaxing as it doesn't have the problem that MIG has in that if your mind wanders slightly you don't end up with a huge hole in the workpiece. However, I'm hardly expert at TIGging at the moment. Although I wouldn't really claim to be too clever with MIG either really.
For now, these wishbones are just MIG-tacked together, if nothing else because the TIG's run out of argon.
I haven't done the rear lower wishbones yet as I've run out of the mounting bushes that I'm using for the rod ends. I turned some of these down (using Dan's lathe) for use in the lighter tubing and that means, as I did enough to be able to make a few spare wishbones, that I need a few more of the basic ones. However, they ought to arrive in the next couple of days.
 Well, Anthea as away this weekend and I'm feeling more and more pressured about getting the car done
so I spent most of the time in the garage. As a consequence I seem to have several hundred cuts and bruises on
my hands which is making typing this rather difficult. So, there might be even more errors than normal!
Well, Anthea as away this weekend and I'm feeling more and more pressured about getting the car done
so I spent most of the time in the garage. As a consequence I seem to have several hundred cuts and bruises on
my hands which is making typing this rather difficult. So, there might be even more errors than normal!
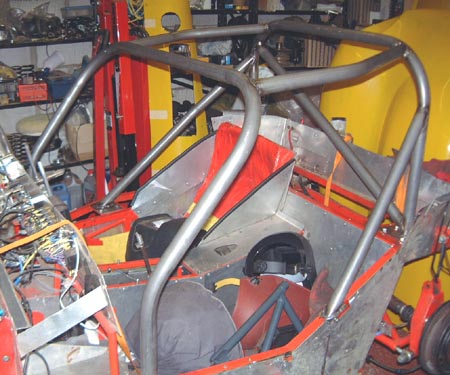
Anyway, I managed to get the cage finished as you can see in this photo. I'm actually pretty pleased with this. In particular, you can see the difference in the side impact support on the left and right sides.
 What's
more, the right side tube incorporates a small kink to provide a bit of extra room for my smashed up shoulder.
(A skiing injury; you might wonder why I'm going skiing in a couple of weeks.) You can see the kink fairly clearly
in this photograph, along with the foot plate that I also made for attaching the support to the chassis.
What's
more, the right side tube incorporates a small kink to provide a bit of extra room for my smashed up shoulder.
(A skiing injury; you might wonder why I'm going skiing in a couple of weeks.) You can see the kink fairly clearly
in this photograph, along with the foot plate that I also made for attaching the support to the chassis.
Of course, what I don't know is whether the bodywork is going to fit over all this properly. I have a suspicion that it won't! However, if that happens I shall just attack it (the bodywork that is) with a Dremel.
I think I shalll declare this done now, although I've since realised that I ought to actually weld a couple of brackets to the cage to simplify the mounting of the camera, GPS receiver and rain light. I probably won't get around to it though. What's more, if I was doing this properly I'd get the cage powder coated. However, I don't think I'll have time so I'll probably just get by with painting it.
 Next thing was to try and get the wishbones finished. I've been doing so much
welding recently that I've finally got the bits to convert my welder from the silly little disposable gas cylinders
to a proper sized cylinder of shielding gas. That makes like a lot easier.
Next thing was to try and get the wishbones finished. I've been doing so much
welding recently that I've finally got the bits to convert my welder from the silly little disposable gas cylinders
to a proper sized cylinder of shielding gas. That makes like a lot easier.
Anyway, this is the entire collection of wishbones, although the rear lower ones (at the left) don't yet have the brackets to which the coil-overs attach welded on yet. In fact, to be honest I haven't made them yet as I haven't made the jig I need yet. Perhaps tomorrow... I hope to hell they all fit...
Actually, doing the final welding on these wishbones is a real pain. It's all very well welding in a straight line but going round something is a bit difficult to do. As just about every weld on these wishbones involves going round a round tube it's really rather tricky to do.
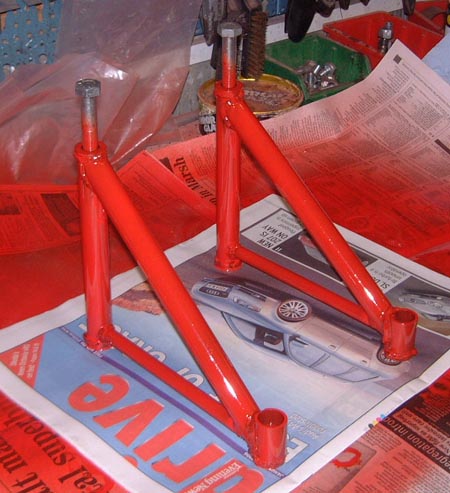 All the same, ignoring the issue of whether they fit I decided to paint up the front lower
ones anyway. These are really the most important ones as they'll probably make the most difference to what the
car feels like, and they use the natty little tapers
that I got for the front uprights a while ago. So, I set to with the Hammerite again before calling it a day.
All the same, ignoring the issue of whether they fit I decided to paint up the front lower
ones anyway. These are really the most important ones as they'll probably make the most difference to what the
car feels like, and they use the natty little tapers
that I got for the front uprights a while ago. So, I set to with the Hammerite again before calling it a day.
Again, you might think I should powder coat these but I can't be bothered spending the money. What's more experience is that it isn't such a wonderful idea anyway. Lots of people say that Hammerite's no good but my experience is that it's fine, with the significant proviso that you have to let it go off for as longs as possible: at least 3 days or so. Or course, I probably won't do that with these bits...
It'd be nice to try fitting these wishbones tomorrow, at least so that I can say the front suspension is back together (although the brake lines aren't connected).
 Well, I did manage to get one side done! Needless to say it was a bit trickier
to fit that I thought it might be. Most obviously because the rod ends need spacing properly to fit in the existing
suspension bush mountings on the chassis.
Well, I did manage to get one side done! Needless to say it was a bit trickier
to fit that I thought it might be. Most obviously because the rod ends need spacing properly to fit in the existing
suspension bush mountings on the chassis.
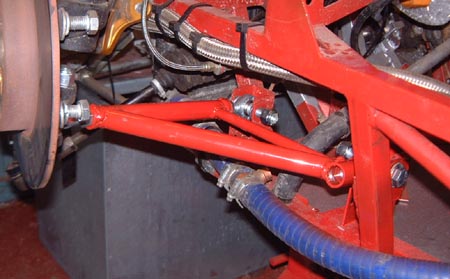
All the same, this is one side back together, although just about nothing is done yet. (Aligning all this is going to take ages.)
It's quite odd with this now in the the suspension moves smoothly throughout its full range, rather than being all bungy as it was before with the rubber bushes. Whether this will make any difference on the track I don't know. In fact, the only source of less than precise movement now seems to be the top ball-joint which hasn't been replaced with a rosejoint. (I just decided not to do that one.)
Eagle eyed readers will note that these wishbones have an extra member compared to the standard ones. The little front to back tie doesn't appear on the standard ones but several people recommended I include it. Seems sensible although, as I suspected, it gets in the way of the water hose that goes to the bottom of the expansion tank. Still, I can replace that easily enough.
I finished the day by Hammeriting some more wishbones, this time the upper rear ones. (No, I still haven't made the brackets for attaching the lower rear ones to the coilover, although I have decided how to make a jig with which to make them. That'll have to wait a few days though.