Well, I finished patching up the rear panel, although it's going to need more rubbing down. I also ordered the paint I need to do the car today so I can feel slightly confident that I'll be able to hide such things underneath some sort of covering. Could look horrible of course.
No photos today, as there's nothing interesting to see. However, I've now refilled the diff with oil and I decided to bleed the brakes. The rears were OK but when I got to the front I ended up with two more of the bleed nipples shearing off as happened at Lydden last year. Of course, each of these was in a different caliper so I have two brake calipers that are unbleedable...
To say I'm cheesed off about this is an understatement.
I've been talking to both Martin Bell and the chaps at HiSpec and it seems as though the only solution, short of buying more parts of calipers, is to send the calipers back to HiSpec and get the lumps machined out. The obvious problem with this is getting it done in time. However, I suspect that I have no choice.
 I took the calipers back to Martin on Friday and he's going to take them to
HiSpec this week. Hopefully, they'll be able to sort them out as otherwise I'm stuck.
I took the calipers back to Martin on Friday and he's going to take them to
HiSpec this week. Hopefully, they'll be able to sort them out as otherwise I'm stuck.
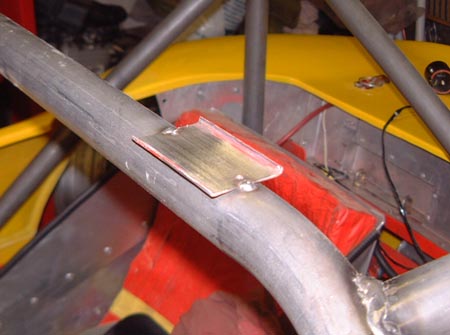
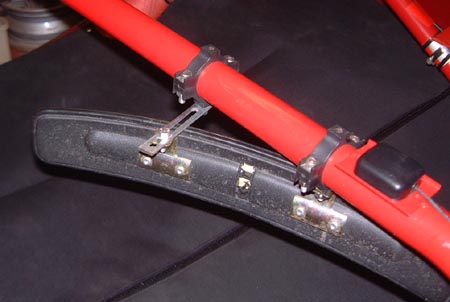
So, back to it. I've decided to add a couple of bits and pieces to the roll cage before it's painted (or whatever I do to it) as it's easy now to weld things on. First up was the little plate on which the GPS receiver sits. Last year I added this plate and riveted it to the cage. I took it off the old cage and welded it, with just a couple of small tacks, to the top of the cage.
As well as that I added a little bracket to which the rain light is bolted and a larger plate behind my head to make a head restraint. In fact, I think I'll buy some of the FIA-spec roll bar padding. This is horrendously expensive, and seems just about solid. However, it's supposedly absolutely the best thing to bash your helmeted head into if you have to bash it into something.
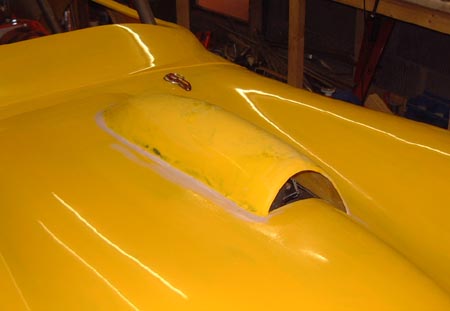 I've ordered paint for the car and it should be arriving tomorrow. Before I
can even think about that, though, I need to finish fettling the bodywork. Last week I bonded the scoop into the
bonnet and I spent a while yesterday using a small amount of filler to smooth over the joins between it and the
bonnet itself. I also did the same thing with that stupid cock-up I managed on the rear of the car!
I've ordered paint for the car and it should be arriving tomorrow. Before I
can even think about that, though, I need to finish fettling the bodywork. Last week I bonded the scoop into the
bonnet and I spent a while yesterday using a small amount of filler to smooth over the joins between it and the
bonnet itself. I also did the same thing with that stupid cock-up I managed on the rear of the car!
So, even though I could get the car out without painting it, I'l at least ready to have a go at it. Could be disaster of course. The big thing I'm not sure about at the moment is what to do with the cage. The real answer is to powder coat it. However, that would cost in excess of £100 and I'm not sure that I want to spend that. So, I'll probably try and paint it with the cellulose I'm doing the rest of the car with. What I can't decide is whether to spray it off the car or not. Obviously, that'd be the real anwer. However, the issue is the space as with the car in the way there just isn't the space in the garage. I guess the real answer is to take the cage off and put it in the shed while I paint the rest of the car, then pick a sunny day when I can put the car on the drive to do the cage.
Seems a pain though...
 Next up is a job that I've been putting off as it would be tedious. It was and it took
me most of the day to make up some new wheelarches for the rear wheels. The original approach to this, as seen
a long time ago, doesn't work anymore after I took
off the passenger side side-impact stuff. What's more, it would obscure the Dzus fasteners that hold the tub on
now.
Next up is a job that I've been putting off as it would be tedious. It was and it took
me most of the day to make up some new wheelarches for the rear wheels. The original approach to this, as seen
a long time ago, doesn't work anymore after I took
off the passenger side side-impact stuff. What's more, it would obscure the Dzus fasteners that hold the tub on
now.
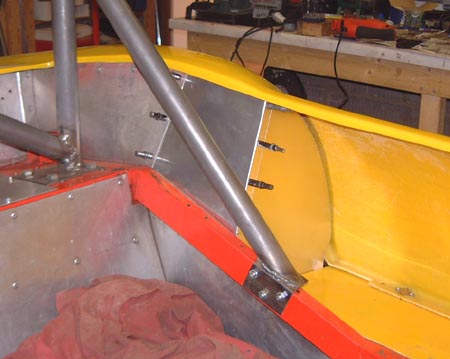
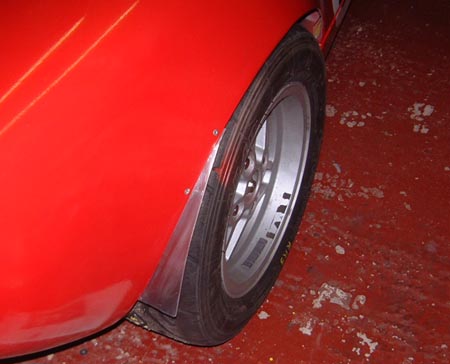
I ended up fabricating things like you see in the photo, but it took ages. In fact, this photo was taken half way through the process which is why it's held together with Clekos. I must admit, I really wish I'd bought some Clekos ages ago. They make doing this sort of thing much easier as otherwise you have to come up with all sorts of innovative clamping arrangements.
Although it took ages I'm actually quite pleased with how that's all worked out. If nothing else it's a bit lighter than it used to be, on account of being made out of thinner aluminium. It'd probably be a good idea to put some trim around the edges of the arches, but I haven't got anything suitable at the moment.
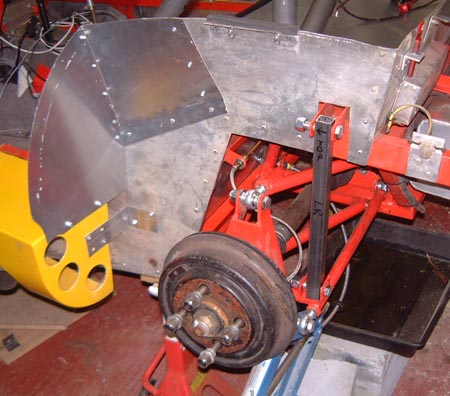 Finally, I've been thinking ahead to the process of aligning the suspension.
I've decided to try and make it a bit easier by making some rigid struts with which to replace the coilovers. These
should mean that I can do a lot of the setup with the car off the ground. The trick is going to be getting them
the right length. However, just getting it close like this, so it can be adjusted later, is probably a good start.
Finally, I've been thinking ahead to the process of aligning the suspension.
I've decided to try and make it a bit easier by making some rigid struts with which to replace the coilovers. These
should mean that I can do a lot of the setup with the car off the ground. The trick is going to be getting them
the right length. However, just getting it close like this, so it can be adjusted later, is probably a good start.
Here's the first one, at the rear left. There's also another sight of the wheelarch.
 I've now finished aligning the suspension. It was certainly a lot quicker by using the non-springy
springs as shown above. What's more, because of all the rose joints everything just stays in position, and goes
back to the same place, unlike all the rubber bushes and so on which add so much bungyness to the whole thing.
I suspect that when I come to put the car on the ground that I'll have to adjust everything slightly. However,
for now it seems to be fine.
I've now finished aligning the suspension. It was certainly a lot quicker by using the non-springy
springs as shown above. What's more, because of all the rose joints everything just stays in position, and goes
back to the same place, unlike all the rubber bushes and so on which add so much bungyness to the whole thing.
I suspect that when I come to put the car on the ground that I'll have to adjust everything slightly. However,
for now it seems to be fine.
In all, I: adjusted the rear camber and toe, adjusted the front camber and toe, used the laser pointer I made a while ago to make sure that the rear wheels are correctly aligned with respect to the chassis, tried to make sure that the wheels are pointing forwards when the wheel's exactly in the middle. (I bet that last one isn't quite right though, it never is.
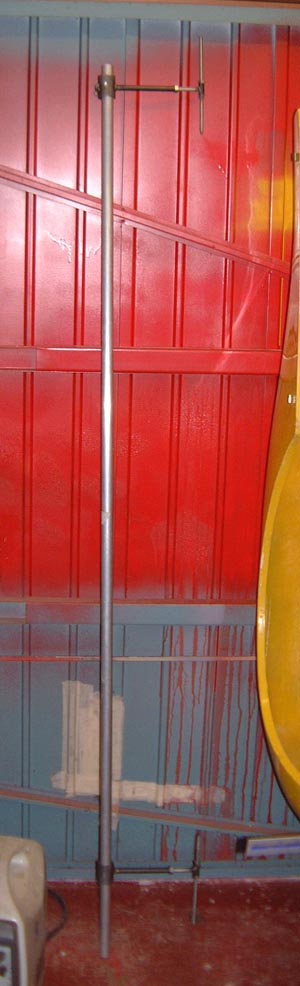
One problem with having the car off the ground is that I couldn't adopt my usual approach to setting the toe which relies on being able to move the car backwards and forwards. Hence, I made this toe gauge. It's essentially just a gadget that allows you to measure exactly the distance between the wheel rims on the car and uses a collection of bits of tubing and studding welded together with a long aluminium stick to fit it on. I've been meaning to make something like this for a while as it'd be possible to use it at race circuits which isn't something that I could be before.
With that all done I could put the springs back on. However, first I want to make sure(r) that the tyres will not bash too much into the bodywork. In order to do that want to grind off the returns around the wheel arches and then move the wheels up and down to see what touches. I started at the front left and it became obvious that I need to make a lot more dust before this particular job will be done.
There's still no word about the brake calipers which is making me a but jumpy. I tried to phone Martin today but couldn't get through. I'll have another go in the morning.
 That testing date is getting ever closer and I'm feeling more and more pushed.
I phoned Martin last Friday and there's still no word on the calipers. Ho hum, I should have left them on the car
perhaps, at least they worked there as I hadn't broken into the front brake lines all winter.
That testing date is getting ever closer and I'm feeling more and more pushed.
I phoned Martin last Friday and there's still no word on the calipers. Ho hum, I should have left them on the car
perhaps, at least they worked there as I hadn't broken into the front brake lines all winter.
All the same, it was on with the rest of the list. I did indeed grind off all the returns on the bodywork around the wheelarches. I'm a bit unsure whether the wheels are going to bash into the bodywork or not as I really need to run the car to find out. Still, I've probably done what I can for now.
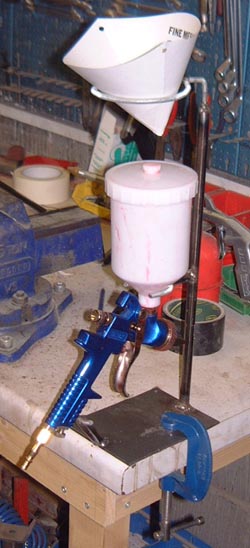
The next job was really the big one of painting the car. First step was to make another tool which in this case was little holder that would hold my gravity feed spray gun and a paint strainer. This is it here. Having a welder really makes making things like this sooo much easier!
Next up it was time to ruin the bodywork. So, I set about it with some wet and dry and rubbed the entire thing down, trying to take off the surface shinyness of the GRP so the primer had a better chance of adhering to it. I also took off the roll cage and hung it up in the corner of the garage.
After that I masked up the bodywork, which took ages, and put two complete coats of high build primer on the bodywork, with much intermediate rubbing down and use of tack rags to get rid of the resultant dust.
This was moderately successful and today I girded my loins for actually applying some colour.
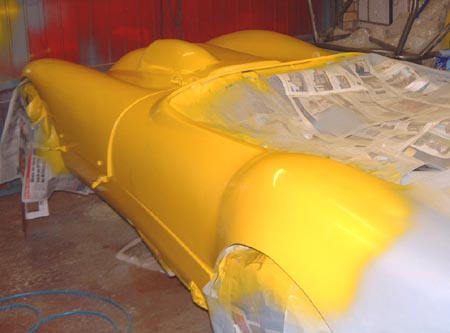 Eventually, I managed to apply three coats of yellow to a part of the car. This was thinned
at various levels until the last coat which included such a large amount of thinners that it was more like spraying
with water than paint. However, it seems to have been moderately successful and although it's nothing like a professional
finish it is fairly shiny and I think will look OK once it's been finished off and polished.
Eventually, I managed to apply three coats of yellow to a part of the car. This was thinned
at various levels until the last coat which included such a large amount of thinners that it was more like spraying
with water than paint. However, it seems to have been moderately successful and although it's nothing like a professional
finish it is fairly shiny and I think will look OK once it's been finished off and polished.
The one problem is the scoop where the paint has done something odd and sort of not covered properly. I suspect if I was a professional I'd know what the problem is but I have no idea. There are sort of holes in it that go through the colour coats and down to the underlying GRP, as if there are parts of the GRP that won't allow the cellulose to stick to them. I can't say I understand this but I guess I'll just have to put up with it. If you see the car later in its life with stickers all over the scoop then you'll know why!
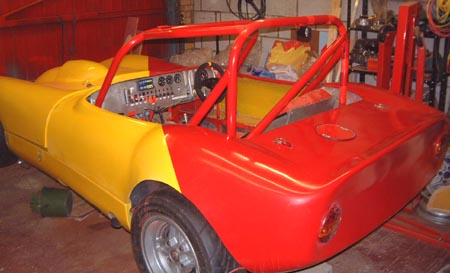
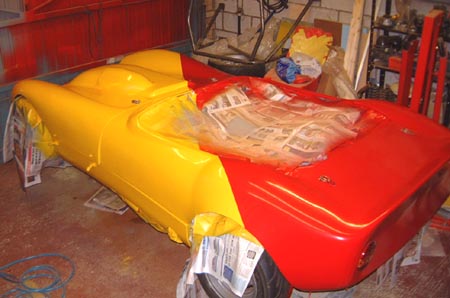 I managed to find the time today to spray the red bits on the car and this is
the rather distinctive way that it's turned out. I was in two minds whether to actually do this or not but I'm
quite pleased with the end result.
I managed to find the time today to spray the red bits on the car and this is
the rather distinctive way that it's turned out. I was in two minds whether to actually do this or not but I'm
quite pleased with the end result.
I also managed to get the fire extinguisher serviced today. I had phoned a local company and they had promised to come round and do it several times without ever actually managing to turn up. In frustration today I phoned another one, these people. This time the chap in question turned up within about two hours, checked the extinguisher over and re-certificated it for me. Much better! So, if you're in the Cambridge area and need an extinguisher looking at, phone them!
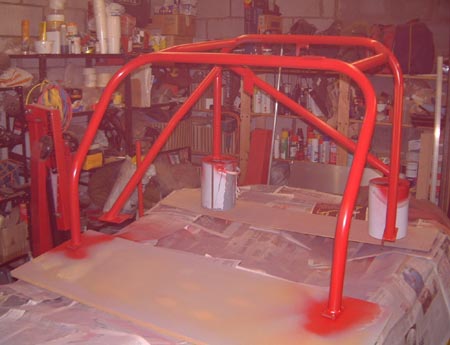 Finally today I managed to get a bit of a start at spraying the roll cage. (I'm on a bit
of a roll now, you see!) The problem with this has been working out how to actually get at it. You can see the
cage in the photo above behind the car but I couldn't work out how to spray it at the same time as the car was
in the garage.
Finally today I managed to get a bit of a start at spraying the roll cage. (I'm on a bit
of a roll now, you see!) The problem with this has been working out how to actually get at it. You can see the
cage in the photo above behind the car but I couldn't work out how to spray it at the same time as the car was
in the garage.
I finally had a brainwave and decided to perch it on top of the bodywork. I balanced it on a bunch of bits of wood and paint tins and I could, mostly, get at it OK. The photo here is after a couple of coats of primer and one colour coat. I'll do a couple more colour coats tomorrow and I'll be able to bolt it back into the car.
The only, very annoying, problem is that in hoisting it up on top of the car (it's pretty hard to manouevre) I managed to put a bit of a gouge into the top of the rear left wing. I'll have to see about sorting this when I've got the cage in the car.
 With the cage fully sprayed I took all the masking off and the garage can hopefully
start getting cleaner again. Spraying things really does create a lot of dust...
With the cage fully sprayed I took all the masking off and the garage can hopefully
start getting cleaner again. Spraying things really does create a lot of dust...
So, I could now get on with some reassembly and I bolted the cage back in. this time using nylocs unlike previously where I just had boring old nuts on there.
I put the now retested extinguisher back in and connected it up and I could then put the rear tub back on properly. With that there I could measure up for cutting the hole for the fuel access port which you can see on the back of the car in the photo. This is just the old port although it looks pretty knackered next to the rest of the bodywork. Oh well, no time to make another one.
I will in fact have to T-cut and polish all the bodywork, but I'm leaving that until the last thing. I hope I don't park it in the barriers soon...
Lastly I connected a couple of things up to the cage. You can just about see the rain light in the photo which is now bolted into the bracket that I welded to the cage. You can also just about see the tape that's holding the tank breather up the other side of the cage. (Even brand new bits still demand the use of some tape, you see...)
 I seem to have spent all weekend in the garage and I'm pretty shattered so I guess this
is going to be rather short.
I seem to have spent all weekend in the garage and I'm pretty shattered so I guess this
is going to be rather short.
Most importantly, I went down to HiSpec on Friday and got my calipers back. It was clear that getting the bleed nipples out had not been too easy but they had managed it.
With that it was pretty easy to refit them and re-bleed the brakes. (I've been using an Eezibleed for this recently, and getting on quite well with it. In the past I haven't been too impressed but for now it seems to be fine.)
 With that done there did seem to be some light at the end of the tunnel, as
just about everything else on the list was really something that could be dropped if necessary.
With that done there did seem to be some light at the end of the tunnel, as
just about everything else on the list was really something that could be dropped if necessary.
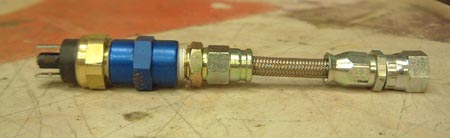
There was just, mostly, a succession of small jobs to do. First was something I bought the bits for a while ago. What you see here is a variable pressure oil warning light switch. Well, the bit on the left is, the rest is a bizarrely complex collection of fittings needed to navigate a way around the Byzantine complexities of pipe pressure fittings.
The point about this switch is that the standard Honda one really tells you when the engine's broken. This one is set to operate a much higher pressure so should, perhaps, give a few more milliseconds warning.
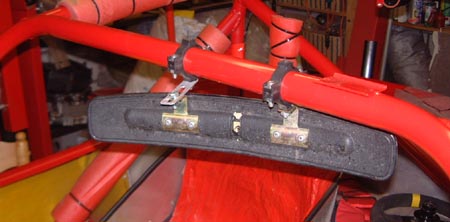 I then refitted the mirror to the car. I'm trying to just the single
large Nascar-style mirror that I've got but I still might feel the need for wing mirrors. For now I've left them
off though. Because the cage is in a different position I needed to make a little adjustment gadget for the mirror.
I then refitted the mirror to the car. I'm trying to just the single
large Nascar-style mirror that I've got but I still might feel the need for wing mirrors. For now I've left them
off though. Because the cage is in a different position I needed to make a little adjustment gadget for the mirror.
You can see it on the left hand mounting point for the mirror. I hope it doesn't wobble like Montoya's mirror was doing in the today;s yawn inducing GP. If it does, I'll use something more robust. At least I'm going to Snetterton on Tuesday so I'll be able to check all these things then.
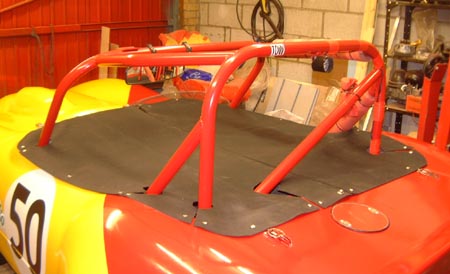 I guess the biggest job was making a tonneau. Again, I've had the bits for this for a while but this
weekend I made a template and Anthea sewed a zip into some lightweight PU canvas for me. I then fitted it to the
car, rather inexpertly, using the normal DOT and Tenas fasteners.
I guess the biggest job was making a tonneau. Again, I've had the bits for this for a while but this
weekend I made a template and Anthea sewed a zip into some lightweight PU canvas for me. I then fitted it to the
car, rather inexpertly, using the normal DOT and Tenas fasteners.
Obviously, it's not exactly going to keep all the water out because there's big holes where the roll cage goes. However, it can't be worse than nothing for when the car's sitting on the trailer. What's more there's a theory that having the passenger side on makes the car a gnat's quaver faster. However, I'm not convinced. Hopefully, what it will do is to keep some of the vast amount of rubber out of the car.
You can also see on this photo that I've put the race numbers on the car. I actually polished the car before putting these on!
Finally, I dropped the car off the stands (seven words that took an hour to complete), got in, started it up and drove it onto the drive!!!
Then I used the reverse to get back in the garage. Well, that was the plan anyway as it didn't work. A small amount of faffing about shows that it's not sufficient to just bolt the reverse mechanism back in position; you also have to reconnect the electics. Duuuuh.
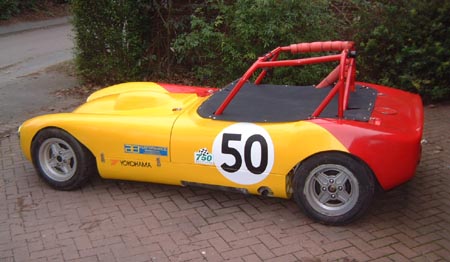 So, with that fixed I drove the car out again and took this photo.
The odd thing is, the car seems even smaller when you walk around it now. I can't see how that should be, apart from perhaps the roll cage not being quite so obvious. It's certainly the chassis that it had before.
Now I need to get the car sorted for testing on Tuesday. Hence, I spent the final evening of the weekend putting the datalogger and camera back in the car. That's all a bit of a shame really as the nice roll cage is now festooned with tape holding things like the IR lap beacon detector in position. Oh well...
It's now a few days after going testing at Snetterton and, most importantly, the car's still in one piece. I've been busy at work though, hence the delay in writing it all up.
Essentially, the day went very well and I actually managed to go nearly a second quicker than I've ever managed at Snetterton before. In fact, the time would have put me 6th in class on the grid at the race there last October which is a bit alarming. Of course, I have no chance of repeating the feat in an actual race.
Interestingly, I wasn't really pushing during the test as I just wanted to see if anything was going to break. What's more, we didn't really get any decent sorts of temperatures into the tyres all day as it was a really cold day. There was also a lot of traffic of hugely varying performance. So in my sessions I was dodging around a lot of slower cars such as the Mini Miglias that were out and then keeping out of the Carrera Cup Porsches that were blasting past. As a consequence I got very few laps that were actually complete, pushing hard, jobs.
However, the car did feel more together than in the past, presumably due to the more precise suspension movements. What's more, the ATB has made a definite difference, although I really need to practise some more with it in a slightly more benign environment. There were a couple of occasions when I really thought I'd lost it and the car was going to spin off (Sear is a favourite of mine at Snetterton for this particular manouevre) but I managed to keep the pointy end going forwards. So, that's all good, but I need more testing... In fact, I need to get more concentrated on what I want to achieve in a particular test session. For example, perhaps it'd be a good idea to concentrate on one particular corner and see just how far I could push the car there.
However, it wasn't all good. In particular we did have a small oil leak from the engine. This was traced to a slightly damaged gasket on the generator cover. This cover is really hard to fit as the magnets in the end of the propshaft tend to pull the cover out of line as it's fitted. We (that is, Andy and I) fixed this though by using loosening off the cover and adding some sealant to the gasket. I've since spoken to someone else who reckons that the gaskets are a bit of a waste of time anyway as the castings are machined so accurately. That is, you'd be better off with just a smear of sealant anyway.
I did also have one lap with a really horrendous misfire. After poking around Andy reckons that the battery terminals might have been a bit loose but that may have been clutching at straws. However, it went away. (I hate problems that just go away...)
Now we're looking forward to the race at Brands this coming weekend. I have been wondering if it'd make sense to test there for half a day on Friday, assuming that I can get in of course. However, I do need to make the car RGB compliant which it isn't quite at the moment. I've spent most of this weekend doing a few things to make it OK from this point of view.
First of all was to raise the radiator slightly. A consequence of the floor and the new suspension is that I've been able to lower the ride height at the front of the chassis slightly. This meant that the bottom of the radiator was actually below the 75mm ride height rule even though the chassis itself was OK. So, I spent a while yesterday moving it up by about 15mm on the mountings, which is about as far as it can go before bashing into the underside of the bonnet. I do keep wondering if it would make sense to continue the flat floor forwards of the front of the chassis, so that it met up with the lower front of the bonnet. If nothing else it would protect the radiator slightly which gets rather bashed up as it is by stones and the like.
 One slight, but very annoying, problem at the test was that the mirror mounting
I made before was completely useless in that it just folded up at speed and I
couldn't see who was behind me. This made the aforementioned Porsches a bit of a risk... So, I remade the bracket
out of a piece of steel rather than the aluminium used before. Let's hope that this will work better.
One slight, but very annoying, problem at the test was that the mirror mounting
I made before was completely useless in that it just folded up at speed and I
couldn't see who was behind me. This made the aforementioned Porsches a bit of a risk... So, I remade the bracket
out of a piece of steel rather than the aluminium used before. Let's hope that this will work better.
In this same photo you can see the GPS receiver and I've had a bit of a mare the last day or so with the DL1. I decided, probably stupidly, to update the firmware in the DL1 to the latest version as this would allow me to control more accurately the data that goes down the serial port to the Palm. Better, it also allows an auto-start facility which means it can be set to start logging as soon as some external stimulus is achieved, meaning that I won't have to remember to start it logging. However, the upgrade all went horribly wrong and I was left with a non-functional DL1.
Luckily, the nice people at Race Technology even read their mail on Sunday mornings and Martin Hill there sent me some modified firmware that allows the DL1 to work. I guess it was a known problem which is a relief. I still don't have the facilities of the new firmware though, although that's a minor issue compared to it not working at all.
 Next issue was spats for the rear wheels. As we all discovered last year there's a problem with the
Fury bodywork in that it isn't completely compliant with the Blue Book. The sort of spats I fitted last year are no longer suitable as they increase the width of the bodywork which has
been outlawed for this year. However, the fact that I'm now using narrower tyres means that some little bits of
2mm aluminium, as in the photo, will make the bodywork compliant. At least I hope it will.
Next issue was spats for the rear wheels. As we all discovered last year there's a problem with the
Fury bodywork in that it isn't completely compliant with the Blue Book. The sort of spats I fitted last year are no longer suitable as they increase the width of the bodywork which has
been outlawed for this year. However, the fact that I'm now using narrower tyres means that some little bits of
2mm aluminium, as in the photo, will make the bodywork compliant. At least I hope it will.
It'd be much nicer if these sorts of things were part of the bodywork, but I don't think Fishers are minded to change the body moulds.
You can see one of my old wheels in this photo and I'm probably going to buy four new tyres at Brands. I've still got two unused wheels so I'll put two new tyres on those and displace some of the old 205 section tyres from two other wheels. I guess I'll phone George Polley in the week and check when he's going to be at Brands. It's possible that he'll be there on the test day I suppose.
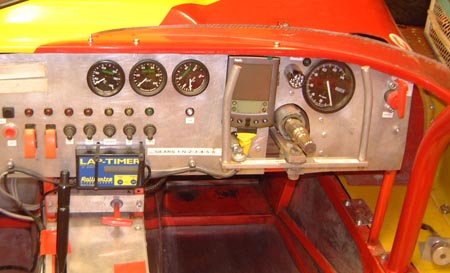 Another small problem at Snetterton was that the tonneau obscured the lap timer.
Although I made the Palm show lap times a while ago
I still am not totally relying on it. (I probably will do so soon though.) In the meantime, I've repositioned the
lap timer so that I will be able to see it again, as in the photo.
Another small problem at Snetterton was that the tonneau obscured the lap timer.
Although I made the Palm show lap times a while ago
I still am not totally relying on it. (I probably will do so soon though.) In the meantime, I've repositioned the
lap timer so that I will be able to see it again, as in the photo.
Finally, for this weekend, I went around the entire suspension and checked every single bolt and locknut for tightness. I then marked everything so I can actually see if it's moved. In the process I did discover one really loose nut which was a bit alarming.
I must admit that I'm really starting to look forward to this weekend's race now. That is, when I think about it I don't feel too apprehensive. I just hope it isn't wet, I really wouldn't want to get involved in a really wet race although I did do a complete test day at Brands in the pouring rain last year.